Remove the old PPA if it exists
1
2
3
4
5
6
7This step is only required if you previously used Chris Lea's Node.js PPA.
# add-apt-repository may not be present on some Ubuntu releases:
# sudo apt-get install python-software-properties
sudo add-apt-repository -y -r ppa:chris-lea/node.js
sudo rm -f /etc/apt/sources.list.d/chris-lea-node_js-*.list
sudo rm -f /etc/apt/sources.list.d/chris-lea-node_js-*.list.saveAdd the NodeSource package signing key
1
2
3curl -sSL https://deb.nodesource.com/gpgkey/nodesource.gpg.key | sudo apt-key add -
# wget can also be used:
# wget --quiet -O - https://deb.nodesource.com/gpgkey/nodesource.gpg.key | sudo apt-key add -Add the desired NodeSource repository
1
2
3
4
5
6
7
8
9# Replace with the branch of Node.js or io.js you want to install: node_6.x, node_8.x, etc...
VERSION=node_8.x
# The below command will set this correctly, but if lsb_release isn't available, you can set it manually:
# - For Debian distributions: jessie, sid, etc...
# - For Ubuntu distributions: xenial, bionic, etc...
# - For Debian or Ubuntu derived distributions your best option is to use the codename corresponding to the upstream release your distribution is based off. This is an advanced scenario and unsupported if your distribution is not listed as supported per earlier in this README.
DISTRO="$(lsb_release -s -c)"
echo "deb https://deb.nodesource.com/$VERSION $DISTRO main" | sudo tee /etc/apt/sources.list.d/nodesource.list
echo "deb-src https://deb.nodesource.com/$VERSION $DISTRO main" | sudo tee -a /etc/apt/sources.list.d/nodesource.list上述步骤可以省略,直接在/etc/apt/sources.list.d/目录下新建nodesource.list文件,并修改其内容如下
如需要按照别的版本的nodejs,直接根据https://github.com/nodesource/distributions网址的说明,直接修改nodesource.list文件的版本即可Update package lists and install Node.js
1
2
sudo apt-get update
sudo apt-get install nodejs通过添加ppa源,然后通过sudo apt-get install nodejs方式安装nodejs的同时,npm同时也会被安装,但这时输入sudo apt-get install npm试图安装npm,会出现如下错误,但是随后查看nodejs和npm版本的命令能成功执行,可以忽略该错误。
https://github.com/nodesource/distributions/issues/1821
2
3
4
5
6
7
8
9
10
11
12
13
14
15
16
17
18
19
20
21apt-get install npm
Reading package lists... Done
Building dependency tree
Reading state information... Done
Some packages could not be installed. This may mean that you have
requested an impossible situation or if you are using the unstable
distribution that some required packages have not yet been created
or been moved out of Incoming.
The following information may help to resolve the situation:
The following packages have unmet dependencies:
npm : Depends: nodejs but it is not going to be installed
Depends: node-abbrev (>= 1.0.4) but it is not going to be installed
Depends: node-ansi (>= 0.3.0-2) but it is not going to be installed
...
如以下两条命令被成功执行,并返回了版本号,则以上错误忽略。
hogan@ubuntu:/mnt/share/github/hoganchen.github.io$ nodejs -v
v8.11.2
hogan@ubuntu:/mnt/share/github/hoganchen.github.io$ npm -v
5.6.0
选择Hexo还是Jekyll
https://www.jianshu.com/p/ce1619874d34
于是开始接触比较流行的一些静态博客框架,比较流行的有Jekyll,Hexo,Simple,Octopress,Pelican以及Lo·gecho等等。这些静态程序可以说都有各自的好处,但最后我选择了Hexo来搭建自己的博客,和Jekyll相比,选择Hexo主要原因是:1
2
31. Jeky基于Ruby实现,安装Jeky需要搭建Ruby环境,在Windows搭建Ruby环境并不是被推荐的,而 Hexo基于NodeJs实现,在Windows上安装NodeJs开发环境简单。
2. 比较直接的另一个原因是在网上查找了很多博客的主题,发现Jekyll官网提供的主题都不怎么好看(可能是个人原因),而Hexo的主题看的比较顺眼。
两者都支持Markdown语法,这点我非常喜欢。
Hexo博客开发过程
https://hexo.io/zh-cn/docs/index.html
安装nodejs和npm
https://www.howtoing.com/install-latest-nodejs-npm-on-ubuntu
https://github.com/nodesource/distributions
以下为ubuntu中添加NodeJS的PPA,并安装了8.*版本的nodejs,sudo apt-get install nodejs命令会同时安装nodejs和npm,所以不需要再次安装npm,同时也不要安装ubuntu包管理器自带的nodejs,ubuntu自带的nodejs版本过低(v0.10.25),会导致hexo generate失败,如已按照旧版本的nodejs和npm,请使用命令sudo apt-get purge nodejs和sudo apt-get purge npm删除旧版本的nodejs和npm,然后根据如下步骤安装新版本的nodejs和npm。
如果系统中以前没有添加过nodejs的ppa,可以直接跳到第4步
1 | hogan@ubuntu:/mnt/share/github/hoganchen.github.io$ cat /etc/apt/sources.list.d/nodesource.list |
安装git
1 | sudo apt-get update |
github添加username.github.io的库
github创建一个新库,库名称为”用户名.github.io”,例如我添加的库为hoganchen.github.io,以下都以我添加的库来说明,可自行修改为对应的库名称,用户名是你的github用户名哦!千万别弄错了,不然访问不到的!
安装hexo博客
https://hexo.io/zh-cn/docs/index.html
安装hexo
https://github.com/hexojs/hexo/issues/1836
https://docs.npmjs.com/getting-started/fixing-npm-permissions
以上两个网址建议不要用sudo的方式安装hexo,并给出了解决方案,但是sudo方式安装是OK的,所以就没有去care权限问题了,有兴趣可以看看。1
sudo npm install -g hexo-cli
建站
https://hexo.io/zh-cn/docs/setup.html
安装 Hexo 完成后,请执行下列命令,Hexo 将会在指定文件夹中新建所需要的文件。1
2
3hexo init hoganchen.github.io
cd hoganchen.github.io
npm install
安装 hexo-deployer-git
https://hexo.io/zh-cn/docs/deployment.html
Hexo 提供了快速方便的一键部署功能,让您只需一条命令就能将网站部署到服务器上。1
2
3
4
5
6
7
8
9
10
11
12
13
14
15
16
17$ npm install hexo-deployer-git --save
修改配置。
deploy:
type: git
repo: <repository url>
branch: [branch]
message: [message]
示例如下:
# Deployment
## Docs: https://hexo.io/docs/deployment.html
deploy:
type: git
repo: https://github.com/hoganchen/hoganchen.github.io.git
branch: master
修改_config.yml中site section和Deployment section相关信息,全部内容如下
https://hexo.io/zh-cn/docs/configuration.html1
2
3
4
5
6
7
8
9
10
11
12
13
14
15
16
17
18
19
20
21
22
23
24
25
26
27
28
29
30
31
32
33
34
35
36
37
38
39
40
41
42
43
44
45
46
47
48
49
50
51
52
53
54
55
56
57
58
59
60
61
62
63
64
65
66
67
68
69
70
71
72
73
74
75
76
77
78
79
80
81
82
83
84# Hexo Configuration
## Docs: https://hexo.io/docs/configuration.html
## Source: https://github.com/hexojs/hexo/
# Site
title: Hogan's Blog
subtitle:
description:
keywords:
author: Hogan Chen
language:
timezone:
# URL
## If your site is put in a subdirectory, set url as 'http://yoursite.com/child' and root as '/child/'
url: http://yoursite.com
root: /
permalink: :year/:month/:day/:title/
permalink_defaults:
# Directory
source_dir: source
public_dir: public
tag_dir: tags
archive_dir: archives
category_dir: categories
code_dir: downloads/code
i18n_dir: :lang
skip_render:
# Writing
new_post_name: :title.md # File name of new posts
default_layout: post
titlecase: false # Transform title into titlecase
external_link: true # Open external links in new tab
filename_case: 0
render_drafts: false
post_asset_folder: false
relative_link: false
future: true
highlight:
enable: true
line_number: true
auto_detect: false
tab_replace:
# Home page setting
# path: Root path for your blogs index page. (default = '')
# per_page: Posts displayed per page. (0 = disable pagination)
# order_by: Posts order. (Order by date descending by default)
index_generator:
path: ''
per_page: 10
order_by: -date
# Category & Tag
default_category: uncategorized
category_map:
tag_map:
# Date / Time format
## Hexo uses Moment.js to parse and display date
## You can customize the date format as defined in
## http://momentjs.com/docs/#/displaying/format/
date_format: YYYY-MM-DD
time_format: HH:mm:ss
# Pagination
## Set per_page to 0 to disable pagination
per_page: 10
pagination_dir: page
# Extensions
## Plugins: https://hexo.io/plugins/
## Themes: https://hexo.io/themes/
# theme: landscape
theme: next
# Deployment
## Docs: https://hexo.io/docs/deployment.html
deploy:
type: git
repo: https://github.com/hoganchen/hoganchen.github.io.git
branch: master
新建文章并发布
1 | cd hoganchen.github.io/ |
相关命令
https://hexo.io/zh-cn/docs/commands.html
https://segmentfault.com/a/1190000002632530
1 | hexo n "我的博客" == hexo new "我的博客" #新建文章 |
github相关操作
git命令行连接远程库的相关操作
https://www.liaoxuefeng.com/wiki/0013739516305929606dd18361248578c67b8067c8c017b000/0013752340242354807e192f02a44359908df8a5643103a000
http://www.ruanyifeng.com/blog/2014/06/git_remote.html
https://git-scm.com/book/zh/v2/Git-%E5%9F%BA%E7%A1%80-%E8%BF%9C%E7%A8%8B%E4%BB%93%E5%BA%93%E7%9A%84%E4%BD%BF%E7%94%A8
https://blog.csdn.net/u013372487/article/details/52925960
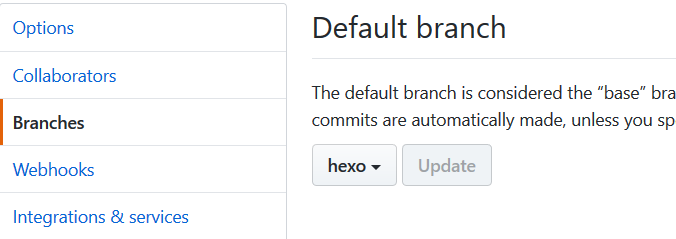
在上述操作中(修改_config.yml中Deployment section相关信息),设置的deploy的分支为master,然而也需要把原始的md, 图片等文件git管理起来,这时在github上hoganchen.github.io库上再创建一个分支为hexo,并在setting中把hexo设置为默认分支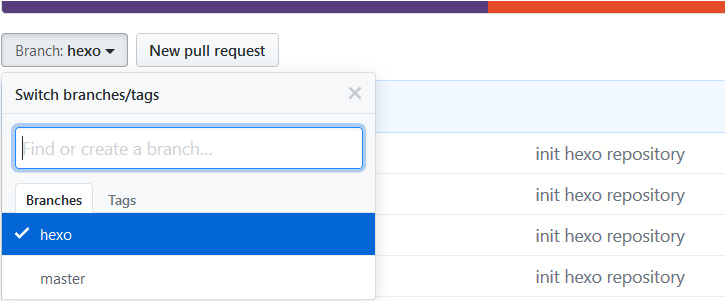
1 | 由于hexo建站时已主动生成.gitignore文件,内容如下: |
VirtualBox相关操作
由于是在虚拟机环境上执行以上操作,所以为了预览文章,需要在虚拟机上作端口转发,设置如下,这样就可以在windows浏览器中输入http://localhost:4000/来进行预览。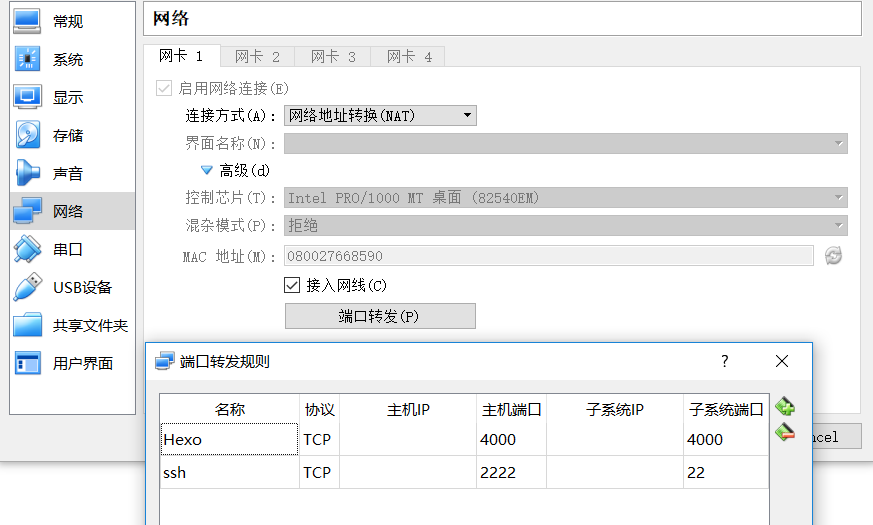
hexo博客如何设置「阅读全文」
1 | 在首页显示一篇文章的部分内容,并提供一个链接跳转到全文页面是一个常见的需求。 NexT 提供三种方式来控制文章在首页的显示方式。 也就是说,在首页显示文章的摘录并显示 阅读全文 按钮,可以通过以下方法: |
更换主题
1 | cd hoganchen.github.io/ |
插入图片
1 | upload_image位于themes/next/source目录下 |
“hexo g”错误解决
https://sessionch.com/hexo/hexo-common-markdown.html1
2
3
4
5
6
7
8
9
10
11
12
13
14
15
16
17
18
19
20
21
22
23
24
25
26
27
28
29
30
31
32
33
34hogan@ubuntu:~/hoganchen.github.io$ hexo g
INFO Start processing
FATAL Something's wrong. Maybe you can find the solution here: http://hexo.io/docs/troubleshooting.html
Template render error: (unknown path)
Error: expected end of comment, got end of file
INFO Start processing
FATAL Something's wrong. Maybe you can find the solution here: http://hexo.io/docs/troubleshooting.html
Template render error: (unknown path)
Error: expected end of comment, got end of file
特殊字符未转义导致
! ! — 惊叹号 Exclamation mark
” " " 双引号 Quotation mark
# # — 数字标志 Number sign
$ $ — 美元标志 Dollar sign
% % — 百分号 Percent sign
& & & Ampersand
‘ ' — 单引号 Apostrophe
( ( — 小括号左边部分 Left parenthesis
) ) — 小括号右边部分 Right parenthesis
* * — 星号 Asterisk
+ + — 加号 Plus sign
< < < 小于号 Less than
= = — 等于符号 Equals sign
> > > 大于号 Greater than
? ? — 问号 Question mark
@ @ — Commercial at
[ [ --- 中括号左边部分 Left square bracket
\ \ --- 反斜杠 Reverse solidus (backslash)
] ] — 中括号右边部分 Right square bracket
{ { — 大括号左边部分 Left curly brace
| | — 竖线Vertical bar
} } — 大括号右边部分 Right curly brace
“hexo s”错误解决(watch xxx ENOSPC)
https://hexo.io/zh-cn/docs/troubleshooting.html
http://zclau.com/2015/12/01/%E4%BD%BF%E7%94%A8hexo%E6%90%AD%E5%BB%BA%E4%B8%AA%E4%BA%BA%E5%8D%9A%E5%AE%A2/
https://zcdll.github.io/2018/01/11/hexo-bugs/1
2
3
4
5
6
7
8
9
10
11
12
13
14
15现象:
hogan@ubuntu:~/hoganchen.github.io$ hexo s
INFO Start processing
FATAL Something's wrong. Maybe you can find the solution here: http://hexo.io/docs/troubleshooting.html
Error: watch /home/hogan/hoganchen.github.io/themes/next/source/upload_image/ubuntu-usage/input_method_configuration.png ENOSPC
at _errnoException (util.js:992:11)
at FSWatcher.start (fs.js:1382:19)
at Object.fs.watch (fs.js:1408:11)
解决方法:
可以用过运行 $ npm dedupe 来解决,如果不起作用的话,可以尝试在 Linux 终端中运行下列命令:
$ echo fs.inotify.max_user_watches=524288 | sudo tee -a /etc/sysctl.conf && sudo sysctl -p
这将会提高你能监视的文件数量。