Python实现__func__, __LINE__, __FILE_\
1 | import inspect |
Python操作excel表格
http://openpyxl.readthedocs.io/en/default/usage.html
https://stackoverflow.com/questions/28691998/is-openpyxl-iter-rows-skipping-last-row
Python 2和3的区别
http://blog.jobbole.com/80006/
http://www.techug.com/post/the-difference-of-python2-and-python3.html
https://segmentfault.com/a/1190000000618286
https://www.zhihu.com/question/19698598
http://www.runoob.com/python/python-2x-3x.html
http://www.cnblogs.com/hanggegege/p/5840005.html
https://wizardforcel.gitbooks.io/w3school-python/content/29.html
https://www.gitbook.com/book/wizardforcel/w3school-python/details1
2
3
4
5
6
7
8
9
10
11
12
13
14
15
16
17
18
19
20
21
22作者:王猫猫
链接:https://www.zhihu.com/question/19698598/answer/12704353
来源:知乎
著作权归作者所有。商业转载请联系作者获得授权,非商业转载请注明出处。
> 1. print不再是语句,而是函数,比如原来是 print 'abc' 现在是 print('abc')但是 python2.6+ 可以使用 from __future__ import print_function 来实现相同功能
>
> 2. 在Python 3中,没有旧式类,只有新式类,也就是说不用再像这样 class Foobar(object): pass 显式地子类化object但是最好还是加上. 主要区别在于 old-style 是 classtype 类型而 new-style 是 type类型
>
> 3. 原来1/2(两个整数相除)结果是0,现在是0.5了python 2.2+ 以上都可以使用 from __future__ import division 实现改特性, 同时注意 // 取代了之前的 / 运算
>
> 4. 新的字符串格式化方法format取代%错误, 从 python2.6+ 开始已经在str和unicode中有该方法, 同时 python3依然支持 % 算符
>
> 5. xrange重命名为range同时更改的还有一系列内置函数及方法, 都返回迭代器对象, 而不是列表或者 元组, 比如 filter, map, dict.items 等
>
> 6. !=取代 < > python2 也很少有人用 < > 所以不算什么修改
>
> 7. long重命名为int不完全对, python3 彻底废弃了 long+int 双整数实现的方法, 统一为 int , 支持高精度整数运算.
>
> 8. except Exception, e变成except (Exception) as e只有 python2.5 及以下版本不支持该语法. python2.6 是支持的. 不算新东西
>
> 9. exec变成函数类似 print() 的变化, 之前是语句.
编写python2,python3兼容代码
http://python-future.org/compatible_idioms.html
http://blog.csdn.net/foryouslgme/article/details/52353836
http://blog.csdn.net/ronnyjiang/article/details/533335381
2
3
4
5
6
7
8
9
10
11
12
13
14
15
16
17
18
19
20
21
22
23
24
25
26
27
28
29
30
31
32
33
34
35
36
37
38
39
40
41
42
43
44
45
46
47
48
49
50
51
52
53
54
55
56
57
58
59
60
61
62
63
64
65
66
67
68
69
70
71
72
73
74
75
76
77
78
79
80
81
82
83
84
85
86
87
88
89
90
91
92
93
94
95
96
97
98
99
100
101
102
103
104
105
106
107
108
109
110
111
112
113
114
115
116
117
118
119
120
121
122
123python commands模块在python3.x被subprocess取代
subprocess
可以执行shell命令的相关模块和函数有:
os.system
os.spawn
os.popen --废弃
popen2.* --废弃
commands.* --废弃,3.x中被移除
import commands
result = commands.getoutput('cmd') #
只返回执行的结果, 忽略返回值.
result = commands.getstatus('cmd')
#返回ls -ld file执行的结果.
result = commands.getstatusoutput('cmd')
#
用os.popen()执行命令cmd, 然后返回两个元素的元组(status, result). cmd执行的方式是{ cmd ; }2>&1, 这样返回结果里面就会包含标准输出和标准错误.
例子
>>> subprocess.getstatusoutput('pwd')
(0, '/home/ronny')
>>> subprocess.getoutput('pwd')
'/home/ronny'
>>> subprocess.getstatus('pwd')
Traceback (most recent call last):
File "<stdin>", line 1, in <module>
AttributeError: module 'subprocess' has no attribute 'getstatus'
以上执行shell命令的相关的模块和函数的功能均在 subprocess 模块中实现,并提供了更丰富的功能。
(1) call
执行命令,返回状态码(命令正常执行返回0,报错则返回1)
ret1=subprocess.call("ifconfig")
ret2=subprocess.call("ipconfig") #python3.5不是这样,依然会抛出异常导致无法对ret2赋值
print(ret1) #0
print(ret2) #1
ret = subprocess.call(["ls", "-l"], shell=False) #shell为False的时候命令必须分开写
ret = subprocess.call("ls -l", shell=True)
(2) check_call
执行命令,如果执行成功则返回状态码0,否则抛异常
subprocess.check_call(["ls", "-l"])
subprocess.check_call("exit 1", shell=True)
(3) check_output
执行命令,如果执行成功则返回执行结果,否则抛异常
subprocess.check_output(["echo", "Hello World!"])
subprocess.check_output("exit 1", shell=True)
(4) subprocess.Popen(...)
用于执行复杂的系统命令
参数 注释
args shell命令,可以是字符串或者序列类型(如:list,元组)
bufsize 指定缓冲。0 无缓冲,1 行缓冲,其他 缓冲区大小,负值 系统缓冲
stdin, stdout, stderr 分别表示程序的标准输入、输出、错误句柄
preexec_fn 只在Unix平台下有效,用于指定一个可执行对象(callable object),它将在子进程运行之前被调用
close_sfs 在windows平台下,如果close_fds被设置为True,则新创建的子进程将不会继承父进程的输入、输出、错误管道。所以不能将close_fds设置为True同时重定向子进程的标准输入、输出与错误(stdin, stdout, stderr)。
shell 同上
cwd 用于设置子进程的当前目录
env 用于指定子进程的环境变量。如果env = None,子进程的环境变量将从父进程中继承。
universal_newlines 不同系统的换行符不同,True -> 同意使用 \n
startupinfo 只在windows下有效,将被传递给底层的CreateProcess()函数,用于设置子进程的一些属性,如:主窗口的外观,进程的优先级等等
createionflags 同上
import subprocess
ret1 = subprocess.Popen(["mkdir","t1"])
ret2 = subprocess.Popen("mkdir t2", shell=True)
终端输入的命令分为两种:
输入即可得到输出,如:ifconfig
输入进行某环境,依赖再输入,如:python
import subprocess
obj = subprocess.Popen("mkdir t3", shell=True, cwd='/home/dev',) #在cwd目录下执行命令
import subprocess
obj = subprocess.Popen(["python"], stdin=subprocess.PIPE, stdout=subprocess.PIPE, stderr=subprocess.PIPE, universal_newlines=True)
obj.stdin.write("print(1)\n")
obj.stdin.write("print(2)")
obj.stdin.close()
cmd_out = obj.stdout.read()
obj.stdout.close()
cmd_error = obj.stderr.read()
obj.stderr.close()
print(cmd_out)
print(cmd_error)
import subprocess
obj = subprocess.Popen(["python"], stdin=subprocess.PIPE, stdout=subprocess.PIPE, stderr=subprocess.PIPE, universal_newlines=True)
obj.stdin.write("print(1)\n")
obj.stdin.write("print(2)")
out_error_list = obj.communicate()
print(out_error_list)
import subprocess
obj = subprocess.Popen(["python"], stdin=subprocess.PIPE, stdout=subprocess.PIPE, stderr=subprocess.PIPE, universal_newlines=True)
out_error_list = obj.communicate('print("hello")')
print(out_error_list)
Python的几种取整方式
1 | https://www.2cto.com/kf/201507/422109.html |
Python字符串补零
http://www.runoob.com/python/att-string-zfill.html
http://www.runoob.com/python3/python3-string-zfill.html
http://www.sharejs.com/codes/python/80371
2
3
4
5
6
7
8
9
10
11
12
13
14
15python中有一个zfill方法用来给字符串前面补0,非常有用
n = "123"
s = n.zfill(5)
assert s == "00123"
zfill()也可以给负数补0
n = "-123"
s = n.zfill(5)
assert s == "-0123"
对于纯数字,我们也可以通过格式化的方式来补0
n = 123
s = "%05d" % n
assert s == "00123"
python命令行参数
http://www.runoob.com/python/python-command-line-arguments.html
https://www.jianshu.com/p/0361cd8b8fec
https://www.jianshu.com/p/c2c0447e8fd5
http://blog.51cto.com/dragonball/14179161
2
3
4
5
6
7
8
9
10
11
12
13
14
15
16
17
18
19
20
21
22
23
24
25
26#!/usr/bin/python
# -*- coding: UTF-8 -*-
import sys, getopt
def main(argv):
inputfile = ''
outputfile = ''
try:
opts, args = getopt.getopt(argv,"hi:o:",["ifile=","ofile="])
except getopt.GetoptError:
print 'test.py -i <inputfile> -o <outputfile>'
sys.exit(2)
for opt, arg in opts:
if opt == '-h':
print 'test.py -i <inputfile> -o <outputfile>'
sys.exit()
elif opt in ("-i", "--ifile"):
inputfile = arg
elif opt in ("-o", "--ofile"):
outputfile = arg
print '输入的文件为:', inputfile
print '输出的文件为:', outputfile
if __name__ == "__main__":
main(sys.argv[1:])
检查变量是否被定义
https://stackoverflow.com/questions/1592565/determine-if-variable-is-defined-in-python
https://stackoverflow.com/questions/750298/easy-way-to-check-that-a-variable-is-defined-in-python
https://stackoverflow.com/questions/843277/how-do-i-check-if-a-variable-exists
http://bbs.chinaunix.net/thread-1620204-1-1.html
http://www.cnblogs.com/freemao/p/3940580.html1
2
3
4
5
6
7
8
9
10
11
12try:
a # does a exist in the current namespace
except NameError:
a = 10 # nope
>>> x = 10
>>> 'x' in dir()
True
>>> 'y' in dir()
False
>>>
Python的raise函数用法
http://www.pythondoc.com/pythontutorial3/errors.html
http://blog.csdn.net/mr_jj_lian/article/details/67860521
2
3
4
5
6
7
8
9
10
11
12
13
14
15
16
17
18
19
20
21
22
23
24
25
26
27
28
29
30
31
32
33
34
35
36
37
38
39
40
41
42
43
44
45
46
47
48
49
50
51
52
53
54
55
56
57
58
59
60
61
62
63
64
65
66
67
68
69
70
71
72
73
74
75
76
77
78
79
80
81
82
83抛出异常
raise 语句允许程序员强制抛出一个指定的异常。例如:
>>> raise NameError('HiThere')
Traceback (most recent call last):
File "<stdin>", line 1, in ?
NameError: HiThere
要抛出的异常由 raise 的唯一参数标识。它必需是一个异常实例或异常类(继承自 Exception 的类)。
如果你需要明确一个异常是否抛出,但不想处理它,raise 语句可以让你很简单的重新抛出该异常:
>>> try:
... raise NameError('HiThere')
... except NameError:
... print('An exception flew by!')
... raise
...
An exception flew by!
Traceback (most recent call last):
File "<stdin>", line 2, in ?
NameError: HiThere
8.5. 用户自定义异常
在程序中可以通过创建新的异常类型来命名自己的异常(Python 类的内容请参见 类 )。异常类通常应该直接或间接的从 Exception 类派生,例如:
>>> class MyError(Exception):
... def __init__(self, value):
... self.value = value
... def __str__(self):
... return repr(self.value)
...
>>> try:
... raise MyError(2*2)
... except MyError as e:
... print('My exception occurred, value:', e.value)
...
My exception occurred, value: 4
>>> raise MyError('oops!')
Traceback (most recent call last):
File "<stdin>", line 1, in ?
__main__.MyError: 'oops!'
在这个例子中,Exception 默认的 __init__() 被覆盖。新的方式简单的创建 value 属性。这就替换了原来创建 args 属性的方式。
异常类中可以定义任何其它类中可以定义的东西,但是通常为了保持简单,只在其中加入几个属性信息,以供异常处理句柄提取。如果一个新创建的模块中需要抛出几种不同的错误时,一个通常的作法是为该模块定义一个异常基类,然后针对不同的错误类型派生出对应的异常子类:
class Error(Exception):
"""Base class for exceptions in this module."""
pass
class InputError(Error):
"""Exception raised for errors in the input.
Attributes:
expression -- input expression in which the error occurred
message -- explanation of the error
"""
def __init__(self, expression, message):
self.expression = expression
self.message = message
class TransitionError(Error):
"""Raised when an operation attempts a state transition that's not
allowed.
Attributes:
previous -- state at beginning of transition
next -- attempted new state
message -- explanation of why the specific transition is not allowed
"""
def __init__(self, previous, next, message):
self.previous = previous
self.next = next
self.message = message
与标准异常相似,大多数异常的命名都以 “Error” 结尾。
很多标准模块中都定义了自己的异常,用以报告在他们所定义的函数中可能发生的错误。关于类的进一步信息请参见 类 一章。
Python变量,可变变量
https://foofish.net/python-variable.html
http://www.jianshu.com/p/67db61f013b7
http://songlee24.github.io/2014/08/12/python-FAQ-01/
https://foofish.net/iadd_add.html
https://foofish.net/python-tricks.html1
2
3
4
5
6
7
8
9
10
11
12
13
14
15
16
17
18
19
20
21
22
23
24
25
26
27
28
29
30
31
32
33
34
35
36
37
38
39
40
41
42
43
44
45
46
47
48
49
50
51
52
53
54
55
56
57
58
59
60
61
62
63
64
65
66
67
68
69
70
71
72
73Python在heap中分配的对象分为两类:可变对象和不可变对象。
可变对象:list,dict
不可变对象:int,float,string,tuple
在python中一切皆对象,python中的变量是指向对象的引用,当然变量也是对象。可变对象及不可变对象的根本区别就是对象本身是否可变。
函数的参数传递
由于python规定参数传递都是传递引用,即传递给函数的是原始变量指向的内存地址。如果修改参数的话,就会改变原始参数,但是python有可变对象和不可变对象;这就使得当传递的参数为可变对象时,函数内部修改参数会影响到原始变量;当传递的参数为不可变对象时,函数内部修改参数不会影响到原始变量。
https://foofish.net/iadd_add.html
代码1与代码2中的l2的值是一样的,但是l1的值却不一样,说明 i += x 与 i = i + x 是不等价的,那什么情况下等价,什么情况下不等价呢?
弄清楚这个问题之前,首选得明白两个概念:可变对象(mutable)与不可变对象(immutable)。在 Python 中任何对象都有的三个通用属性:唯一标识、类型、值。
唯一标识:用于标识对象的在内存中唯一性,它在对象创建之后就不会再改变,函数 id()可以查看对象的唯一标识
类型:决定了该对象支持哪些操作,不同类型的对象支持的操作就不一样,比如列表可以有length属性,而整数没有。同样地对象的类型一旦确定了就不会再变,函数 type()可以返回对象的类型信息。
对象的值与唯一标识不一样,并不是所有的对象的值都是一成不变的,有些对象的值可以通过某些操作发生改变,值可以变化的对象称之为可变对象(mutable),值不能改变的对象称之为不可变对象(immutable)
_add_ 和 _iadd_ 的区别
_add_ 方法接收两个参数,返回它们的和,两个参数的值均不会改变。
_iadd_ 方法同样接收两个参数,但它是属于 in-place 操作,就是说它会改变第一个参数的值,因为这需要对象是可变的,所以对于不可变对象没有__iadd__方法。
下列代码中,代码1中的 += 操作调用的是__iadd__方法,他会原地修改l2指向的那个对象本身的值,而代码2中的 + 操作调用的是 _add_ 方法,该方法会返回一个新的对象,原来的对象保持不变,l1还是指向原来的对象,而l2已经指向一个新的对象。
>>> l1 = range(3)
>>> l2 = l1
>>> l1
[0, 1, 2]
>>> l2
[0, 1, 2]
>>> l2 += [3]
>>> l1
[0, 1, 2, 3]
>>> l2
[0, 1, 2, 3]
>>>
>>>
>>>
>>> l1 = range(3)
>>> l2 = l1
>>> l1
[0, 1, 2]
>>> l2
[0, 1, 2]
>>> l2 = l2 + [3]
>>> l1
[0, 1, 2]
>>> l2
[0, 1, 2, 3]
>>> id(l1)
139956819091328
>>> id(l2)
139956819169152
>>>
>>>
>>> tup = (1, 2, 3)
>>> tup1 = tuple(tup)
>>> id(tup)
139956819114896
>>> id(tup1)
139956819114896
>>> tup1 = tup[:]
>>> id(tup)
139956819114896
>>> id(tup1)
139956819114896
Python垃圾回收
http://www.wklken.me/posts/2015/09/29/python-source-gc.html#biao-ji-qing-chu_1
http://python.jobbole.com/82061/
https://github.com/Hipponensis/Notes/blob/master/%E5%85%B3%E4%BA%8EPython%E5%9E%83%E5%9C%BE%E5%9B%9E%E6%94%B6.md
https://foofish.net/python-gc.html
http://hbprotoss.github.io/posts/pythonla-ji-hui-shou-ji-zhi.html
http://www.jianshu.com/p/1e375fb40506
https://my.oschina.net/hebianxizao/blog/57367?fromerr=KJozamtm
http://www.cnblogs.com/Xjng/p/5128269.html1
2
3
4
5
6
7
8
9
10
11
12
13
14
15
16
17
18
19
20
21
22
23
24
25
26
27
28
29
30
31
32
33
34
35
36
37
38
39
40
41
42
43
44
45
46
47
48
49
50
51
52
53
54
55
56
57
58
59Python中的垃圾回收是以引用计数为主,分代收集为辅。引用计数的缺陷是循环引用的问题。
在Python中,如果一个对象的引用数为0,Python虚拟机就会回收这个对象的内存。
python里也同java一样采用了垃圾收集机制,不过不一样的是,python采用的是引用计数机制为主,标记-清除和分代收集两种机制为辅的策略。
引用计数机制:
python里每一个东西都是对象,它们的核心就是一个结构体:PyObject
PyObject是每个对象必有的内容,其中ob_refcnt就是做为引用计数。当一个对象有新的引用时,它的ob_refcnt就会增加,当引用它的对象被删除,它的ob_refcnt就会减少
引用计数为0时,该对象生命就结束了。
Python的GC模块主要运用了“引用计数”(reference counting)来跟踪和回收垃圾。在引用计数的基础上,还可以通过“标记-清除”(mark and sweep)解决容器对象可能产生的循环引用的问题。通过“分代回收”(generation collection)以空间换取时间来进一步提高垃圾回收的效率。
一、引用计数
在Python中,大多数对象的生命周期都是通过对象的引用计数来管理的。从广义上来讲,引用计数也是一种垃圾收集机制,而且也是一种最直观,最简单的垃圾收集技术。
原理:当一个对象的引用被创建或者复制时,对象的引用计数加1;当一个对象的引用被销毁时,对象的引用计数减1;当对象的引用计数减少为0时,就意味着对象已经没有被任何人使用了,可以将其所占用的内存释放了。
虽然引用计数必须在每次分配和释放内存的时候加入管理引用计数的动作,然而与其他主流的垃圾收集技术相比,引用计数有一个最大的有点,即“实时性”,任何内存,一旦没有指向它的引用,就会立即被回收。而其他的垃圾收集计数必须在某种特殊条件下(比如内存分配失败)才能进行无效内存的回收。
引用计数机制执行效率问题:引用计数机制所带来的维护引用计数的额外操作与Python运行中所进行的内存分配和释放,引用赋值的次数是成正比的。而这点相比其他主流的垃圾回收机制,比如“标记-清除”,“停止-复制”,是一个弱点,因为这些技术所带来的额外操作基本上只是与待回收的内存数量有关。
如果说执行效率还仅仅是引用计数机制的一个软肋的话,那么很不幸,引用计数机制还存在着一个致命的弱点,正是由于这个弱点,使得侠义的垃圾收集从来没有将引用计数包含在内,能引发出这个致命的弱点就是循环引用(也称交叉引用)。
二、标记-清除
“标记-清除”是为了解决循环引用的问题。可以包含其他对象引用的容器对象(比如:list,set,dict,class,instance)都可能产生循环引用。
我们必须承认一个事实,如果两个对象的引用计数都为1,但是仅仅存在他们之间的循环引用,那么这两个对象都是需要被回收的,也就是说,它们的引用计数虽然表现为非0,但实际上有效的引用计数为0。我们必须先将循环引用摘掉,那么这两个对象的有效计数就现身了。假设两个对象为A、B,我们从A出发,因为它有一个对B的引用,则将B的引用计数减1;然后顺着引用达到B,因为B有一个对A的引用,同样将A的引用减1,这样,就完成了循环引用对象间环摘除。
但是这样就有一个问题,假设对象A有一个对象引用C,而C没有引用A,如果将C计数引用减1,而最后A并没有被回收,显然,我们错误的将C的引用计数减1,这将导致在未来的某个时刻出现一个对C的悬空引用。这就要求我们必须在A没有被删除的情况下复原C的引用计数,如果采用这样的方案,那么维护引用计数的复杂度将成倍增加。
原理:“标记-清除”采用了更好的做法,我们并不改动真实的引用计数,而是将集合中对象的引用计数复制一份副本,改动该对象引用的副本。对于副本做任何的改动,都不会影响到对象生命走起的维护。
这个计数副本的唯一作用是寻找root object集合(该集合中的对象是不能被回收的)。当成功寻找到root object集合之后,首先将现在的内存链表一分为二,一条链表中维护root object集合,成为root链表,而另外一条链表中维护剩下的对象,成为unreachable链表。之所以要剖成两个链表,是基于这样的一种考虑:现在的unreachable可能存在被root链表中的对象,直接或间接引用的对象,这些对象是不能被回收的,一旦在标记的过程中,发现这样的对象,就将其从unreachable链表中移到root链表中;当完成标记后,unreachable链表中剩下的所有对象就是名副其实的垃圾对象了,接下来的垃圾回收只需限制在unreachable链表中即可。
三、分代回收
背景:分代的垃圾收集技术是在上个世纪80年代初发展起来的一种垃圾收集机制,一系列的研究表明:无论使用何种语言开发,无论开发的是何种类型,何种规模的程序,都存在这样一点相同之处。即:一定比例的内存块的生存周期都比较短,通常是几百万条机器指令的时间,而剩下的内存块,起生存周期比较长,甚至会从程序开始一直持续到程序结束。
从前面“标记-清除”这样的垃圾收集机制来看,这种垃圾收集机制所带来的额外操作实际上与系统中总的内存块的数量是相关的,当需要回收的内存块越多时,垃圾检测带来的额外操作就越多,而垃圾回收带来的额外操作就越少;反之,当需回收的内存块越少时,垃圾检测就将比垃圾回收带来更少的额外操作。为了提高垃圾收集的效率,采用“空间换时间的策略”。
原理:将系统中的所有内存块根据其存活时间划分为不同的集合,每一个集合就成为一个“代”,垃圾收集的频率随着“代”的存活时间的增大而减小。也就是说,活得越长的对象,就越不可能是垃圾,就应该减少对它的垃圾收集频率。那么如何来衡量这个存活时间:通常是利用几次垃圾收集动作来衡量,如果一个对象经过的垃圾收集次数越多,可以得出:该对象存活时间就越长。
>>> import sys
>>> sys.getrefcount(1)
605
>>> a = [1, 3, 4, 5]
>>> sys.getrefcount(a)
2
>>> b = a
>>> sys.getrefcount(a)
3
>>> sys.getrefcount(b)
3
>>> b = 123456
>>> sys.getrefcount(b)
2
>>> sys.getrefcount(a)
2
函数的参数传递方式
https://foofish.net/python-function-args.html
http://dantangfan.github.io/2015/05/11/python-arguments.html
https://www.zhihu.com/question/20591688
http://winterttr.me/2015/10/24/python-passing-arguments-as-value-or-reference/
http://songlee24.github.io/2014/08/12/python-FAQ-01/1
2
3
4
5
6
7
8
9
10
11
12
13
14
15
16
17
18
19
20
21
22
23
24
25
26
27
28Python语言中,万物皆对象,而对象分可改变对象和不可改变对象,也就是说传参即是传对象,如果参数是不可改变对象,赋值则是重新赋予了一个新的对象,而参数是可改变对象,则对对象的操作是直接作用于对象本身。
>>> summary_info = {}
>>> summary_info[phone_name] = {'suite_name': phone_name, 'running_time': 0,
... 'total_tests': 0, 'pass': 0, 'failure': 0, 'error': 0, 'skip': 0}
>>>
>>>
>>> id(phone_name)
139975784995896
>>> id(phone_name).hex()
Traceback (most recent call last):
File "<stdin>", line 1, in <module>
AttributeError: 'int' object has no attribute 'hex'
>>> hex(id(phone_name))
'0x7f4ea6f11c38'
>>> hex(id(summary_info))
'0x7f4ea8b762d0'
>>> hex(id(summary_info[phone_name]))
'0x7f4ea8b76318'
>>> hex(id(summary_info[phone_name]['pass']))
'0x7f4ea8a069a0'
>>> device_info = summary_info.get(phone_name)
>>> hex(id(device_info))
'0x7f4ea8b76318'
>>> device_info['pass'] = 10
>>> summary_info
{'xiaomi': {'suite_name': 'xiaomi', 'running_time': 0, 'total_tests': 0, 'pass': 10, 'failure': 0, 'error': 0, 'skip': 0}}
>>>
列表复制(深层赋值只有copy.deepcopy能实现,仔细分析5种复制方法比较)
http://www.cnblogs.com/ifantastic/p/3811145.html
http://henry.precheur.org/python/copy_list
https://code.i-harness.com/zh-CN/q/27de421
2
3
4
5
6
7
8
9
10
11
12
13
14
15
16
17
18
19
20
21
22
23
24附:五种复制方法的比较(前四种只满足简单列表的复制,即浅拷贝)
你可以使用另一种拷贝方式,给定一个列表L,无论是完整切片L[:]或者列表解析[x for x in L],都会获得L的浅拷贝,试试L+[],L*1...但是上面两种方法都会使人迷惑,使用list(L)最清晰和快速,当然,由于历史原因,你可能会经常看到L[:]的写法.
>>> import copy
>>> a = [[10], 20]
>>> b = a[:]
>>> c = list(a)
>>> d = a * 1
>>> e = copy.copy(a)
>>> f = copy.deepcopy(a)
>>> a.append(21)
>>> a[0].append(11)
>>> print id(a), a
30553152 [[10, 11], 20, 21]
>>> print id(b), b
44969816 [[10, 11], 20]
>>> print id(c), c
44855664 [[10, 11], 20]
>>> print id(d), d
44971832 [[10, 11], 20]
>>> print id(e), e
44833088 [[10, 11], 20]
>>> print id(f), f
44834648 [[10], 20]
Python对象的浅拷贝和深拷贝
http://www.cnblogs.com/wilber2013/p/4645353.html
http://www.runoob.com/python/att-dictionary-copy.html
http://www.runoob.com/w3cnote/python-understanding-dict-copy-shallow-or-deep.html
http://python.jobbole.com/82294/
https://code.i-harness.com/zh-CN/q/27de42
http://songlee24.github.io/2014/08/12/python-FAQ-01/
https://songlee24.github.io/2014/08/15/python-FAQ-02/
http://www.jianshu.com/p/efa9dd51f5cc
http://wecatch.me/blog/2016/06/18/python-copy-deepcopy/
http://www.cnblogs.com/fendou-999/p/3535118.html
http://blog.csdn.net/sharkw/article/details/1934090
深拷贝代码分析
https://juejin.im/entry/5927e2300ce463006b065eb01
2
3
4
5
6
7
8
9
10
11
12
13
14
15
16
17
18
19
20
21
22
23
24
25
26python中的深拷贝和浅拷贝和java里面的概念是一样的,所谓浅拷贝就是对引用的拷贝,所谓深拷贝就是对对象的资源的拷贝。
首先,对赋值操作我们要有以下认识:
赋值是将一个对象的地址赋值给一个变量,让变量指向该地址( 旧瓶装旧酒 )。
修改不可变对象(str、tuple)需要开辟新的空间
修改可变对象(list等)不需要开辟新的空间
浅拷贝仅仅复制了容器中元素的地址
这里可以看出,未修改前,a和b中元素的地址都是相同的,不可变的hello
和可变的list地址都一样,说明浅拷贝知识将容器内的元素的地址复制了一份。这可以通过修改后,b中字符串没改变,但是list元素随着a相应改变得到验证。
浅拷贝是在另一块地址中创建一个新的变量或容器,但是容器内的元素的地址均是源对象的元素的地址的拷贝。也就是说新的容器中指向了旧的元素( 新瓶装旧酒 )。
深拷贝,完全拷贝了一个副本,容器内部元素地址都不一样
这里可以看出,深拷贝后,a和b的地址以及a和b中的元素地址均不同,这是完全拷贝的一个副本,修改a后,发现b没有发生任何改变,因为b是一个完全的副本,元素地址与a均不同,a修改不影响b。
深拷贝是在另一块地址中创建一个新的变量或容器,同时容器内的元素的地址也是新开辟的,仅仅是值相同而已,是完全的副本。也就是说( 新瓶装新酒 )。
总结一下,当我们使用下面的操作的时候,会产生浅拷贝的效果:
使用切片[:]操作
使用工厂函数(如list/dir/set)
使用copy模块中的copy()函数
Python进制转换
http://www.runoob.com/python3/python3-conversion-binary-octal-hexadecimal.html1
2
3
4
5
6
7
8
9
10
11
12
13
14以下代码用于实现十进制转二进制、八进制、十六进制:
# -*- coding: UTF-8 -*-
# Filename : test.py
# author by : www.runoob.com
# 获取用户输入十进制数
dec = int(input("输入数字:"))
print("十进制数为:", dec)
print("转换为二进制为:", bin(dec))
print("转换为八进制为:", oct(dec))
print("转换为十六进制为:", hex(dec))
默认参数的坑
https://foofish.net/python-function-args.html1
2
3
4
5
6
7
8
9
10
11
12
13
14
15
16
17
18
19def bad_append(new_item, a_list=[]):
a_list.append(new_item)
return a_list
>>> print add_end('one')
['one']
>>> print bad_append('one')
['one', 'one']
上述错误在于,第一次调用a_list已经绑定了一个对象[],第二次调用则是在这个空的列表上继续append
这段代码是初学者最容易犯的错误,用可变(mutable)对象作为参数的默认值。函数定义好之后,默认参数 a_list 就会指向(绑定)到一个空列表对象,每次调用函数时,都是对同一个对象进行 append 操作。因此这样写就会有潜在的bug,同样的调用方式返回了不一样的结果。
def good_append(new_item, a_list=None):
if a_list is None:
a_list = []
a_list.append(new_item)
return a_list
即默认参宿不可以是可变对象,可变对象作为默认参数有潜在的风险
静态类和静态函数的区别
1 | IND = 'ON' |
Python类成员方法,静态方法和静态类的区别
1 | IND = 'ON' |
正则表达式
http://www.cnblogs.com/huxi/archive/2010/07/04/1771073.html
https://oncemore2020.github.io/blog/python-re/1
2
3
4
5
6
7
8
9
10
11
12
13
14
15
16
17
18
19
20
21
22
23
24
25
26
27
28
29
30
31
32
33
34
35
36
37
38
39
40
41
42
43
44
45
46
47
48
49
50
51
52
53
54
55
56
57
58
59
60
61
62
63
64
65
66
67
68
69
70
71
72
73
74
75
76
77
78
79
80
81
82
83
84
85
86
87
88
89
90
91
92
93
94
95
96
97
98
99
100
101
102
103
104
105
106
107re.compile(strPattern[, flag]):
这个方法是Pattern类的工厂方法,用于将字符串形式的正则表达式编译为Pattern对象。 第二个参数flag是匹配模式,取值可以使用按位或运算符'|'表示同时生效,比如re.I | re.M。另外,你也可以在regex字符串中指定模式,比如re.compile('pattern', re.I | re.M)与re.compile('(?im)pattern')是等价的。
可选值有:
re.I(re.IGNORECASE): 忽略大小写(括号内是完整写法,下同)
M(MULTILINE): 多行模式,改变'^'和'$'的行为(参见上图)
S(DOTALL): 点任意匹配模式,改变'.'的行为
L(LOCALE): 使预定字符类 \w \W \b \B \s \S 取决于当前区域设定
U(UNICODE): 使预定字符类 \w \W \b \B \s \S \d \D 取决于unicode定义的字符属性
X(VERBOSE): 详细模式。这个模式下正则表达式可以是多行,忽略空白字符,并可以加入注释。以下两个正则表达式是等价的:
a = re.compile(r"""\d + # the integral part
\. # the decimal point
\d * # some fractional digits""", re.X)
b = re.compile(r"\d+\.\d*")
实例方法[ | re模块方法]:
match(string[, pos[, endpos]]) | re.match(pattern, string[, flags]):
这个方法将从string的pos下标处起尝试匹配pattern;如果pattern结束时仍可匹配,则返回一个Match对象;如果匹配过程中pattern无法匹配,或者匹配未结束就已到达endpos,则返回None。
pos和endpos的默认值分别为0和len(string);re.match()无法指定这两个参数,参数flags用于编译pattern时指定匹配模式。
注意:这个方法并不是完全匹配。当pattern结束时若string还有剩余字符,仍然视为成功。想要完全匹配,可以在表达式末尾加上边界匹配符'$'。
示例参见2.1小节。
search(string[, pos[, endpos]]) | re.search(pattern, string[, flags]):
这个方法用于查找字符串中可以匹配成功的子串。从string的pos下标处起尝试匹配pattern,如果pattern结束时仍可匹配,则返回一个Match对象;若无法匹配,则将pos加1后重新尝试匹配;直到pos=endpos时仍无法匹配则返回None。
pos和endpos的默认值分别为0和len(string));re.search()无法指定这两个参数,参数flags用于编译pattern时指定匹配模式。
1. 使用变量
DATA_TIME_PATTERN = re.compile(r'^(\d{4}-\d{2}-\d{2}\s+\d{2}:\d{2}:\d{2}\.\d+)')
line_data = self.__get_line_from_file()
# match_obj = re.match(r'^(\d{4}-\d{2}-\d{2}\s+\d{2}:\d{2}:\d{2}\.\d+)', line_data)
# date_pattern_str = '(\d{4}-\d{2}-\d{2}\s+\d{2}:\d{2}:\d{2}\.\d+)'
# match_obj = re.match(r'^%s' % date_pattern_str, line_data)
match_obj = re.match(DATA_TIME_PATTERN, line_data)
2. escape的用法
re模块还提供了一个方法escape(string),用于将string中的正则表达式元字符如*/+/?等之前加上转义符再返回,在需要大量匹配元字符时有那么一点用。
COMMENT_START = '/****'
COMMENT_END = '****/'
if re.search(r'^%s' % re.escape(COMMENT_START), line_data):
case_start_flag = 1
elif re.search(r'%s$' % re.escape(COMMENT_END), line_data):
case_start_flag = 0
elif re.search(r'^%s' % re.escape(CMD_PREFIX), line_data):
match_obj = re.match(r'^\S+\s+(.+?)\s+\((.*)\)', line_data)
if match_obj:
# cmd_dict.clear()
cmd_dict['type'] = CMD_ATTR
cmd_dict['cmd'] = match_obj.group(1)
cmd_dict['msg'] = match_obj.group(2).strip()
self.cases_attribute[case_name].append(cmd_dict)
self.__result_str = 'Test result:'
self.__warning_str = 'Warning:'
self.__error_str = 'Error:'
if re.search(r'^\d{4}-\d{2}-\d{2}\s+\d{2}:\d{2}:\d{2}\.\d+\s*->\s*%s'
% re.escape(self.__result_str), line_data, re.I):
match_obj = re.match(r'^\d{4}-\d{2}-\d{2}\s+\d{2}:\d{2}:\d{2}\.\d+\s*->\s*%s\s*(.*)$'
% re.escape(self.__result_str), line_data, re.I)
if match_obj:
if match_obj.group(1) in self.__result_content_str:
test_result['result'] = match_obj.group(1)
else:
test_result['result'] = 'FAILED'
3. 使用re对字符串分组
serial_data = '043E1301001600010028AAE050A000070000000A0001'
# 如使用'.{2,2}',则奇数个serial_data,最后一个会被丢弃,而用'.{1,2}'则可以避免这个问题
pattern = re.compile('.{1,2}')
pattern = re.compile('.{2,2}')
serial_hex_str = ' '.join(pattern.findall(serial_data)) + ' '
# serial_hex_str = " ".join(serial_data[i:i+2] for i in range(0, len(serial_data), 2))
print(serial_hex_str)
4. re.sub字符串转列表
line_data = "case: ['advertisement', 'connect', 'checkRepeatConnect', 'checkProfile', 'testThroughput']"
line_match_obj = re.match(r'^case:\s+\[\s*(.*?)\s*\]$', line_data)
if line_match_obj:
cases_num_dict[phone_name]['case_list'] = re.sub(r'[\' ]', '', line_match_obj.group(1)).split(',')
cases_num_dict[phone_name]['case_list'] = re.sub(r'(\'| )', '', line_match_obj.group(1)).split(',')
cases_num_dict[phone_name]['case_list'] = re.sub(r'\'| ', '', line_match_obj.group(1)).split(',')
5. re.match与re.search区别
>>> re.match(r'world', 'hello world').group()
Traceback (most recent call last):
File "<stdin>", line 1, in <module>
AttributeError: 'NoneType' object has no attribute 'group'
>>> re.search(r'world', 'hello world').group()
'world'
>>>
>>> link = '<div class="thumbnail"><div class="cat"><a href="http://mebook.cc/category/cxxs/wxyq" rel="category tag">武侠玄幻·穿越言情</a> · <a href="http://mebook.cc/category/cxxs" rel="category tag">畅销小说</a></div><div class="img"><a href="http://mebook.cc/19656.html" title="《逝鸿传说(精排)》碎石(作者)epub+mobi"><img src="http://i2.cfimg.com/621500/b269420e4803dcee.png"/></a></div></div>'
>>> re.match(r'a\s*href=\"([^\"]+)\"\s*title=\"\s*(.*?)\"', link).group()
Traceback (most recent call last):
File "<stdin>", line 1, in <module>
AttributeError: 'NoneType' object has no attribute 'group'
>>> re.search(r'a\s*href=\"([^\"]+)\"\s*title=\"\s*(.*?)\"', link).group()
'a href="http://mebook.cc/19656.html" title="《逝鸿传说(精排)》碎石(作者)epub+mobi"'
>>>
正则表达式使用变量
https://stackoverflow.com/questions/6930982/how-to-use-a-variable-inside-a-regular-expression
https://code.i-harness.com/zh-CN/q/69c226
https://codeday.me/bug/20170627/34116.html
https://oncemore2020.github.io/blog/python-re/
http://www.cnblogs.com/yangshuo/archive/2013/06/06/3120595.html1
2
3
4
5
6
7
8
9
10
11
12
13
14
15
16
17
18
19
20
21
22
23
24
25
26
27
28
29
30
31
32
33
34
35
36
37
38
391. Method 1
TEXTO = sys.argv[1]
my_regex = r"\b(?=\w)" + re.escape(TEXTO) + r"\b(?!\w)"
if re.search(my_regex, subject, re.IGNORECASE):
etc.
2. Method 2
if re.search(r"\b(?<=\w)%s\b(?!\w)" % TEXTO, subject, re.IGNORECASE):
etc.
3. Method 3
rx = r'\b(?<=\w){0}\b(?!\w)'.format(TEXTO)
4. Method 4
pattern = re.compile(r"("+username+".*):(.*?):(.*?):(.*?):(.*)"
matches = re.findall(pattern, lines)
5. Method 5
import re
string = "begin:id1:tag:middl:id2:tag:id3:end"
re_str1 = r'(?<=(\S{5})):'
re_str2 = r'(id\d+):(?=tag:)'
re_pattern = re.compile(re_str1 + re_str2)
match = re_pattern.findall(string)
print(match)
6. Method 6
>>> user = 'heinz'
>>> import re
>>> regex = re.compile('%s-\d*'%user)
>>> regex.match('heinz-1')
<_sre.SRE_Match object at 0x2b27a18e3f38>
>>> regex.match('heinz-11')
<_sre.SRE_Match object at 0x2b27a2f7c030>
>>> regex.match('heinz-12345')
<_sre.SRE_Match object at 0x2b27a18e3f38>
>>> regex.match('foo-12345')
Str模块相关函数用法
1 | 1. split |
Python检查列表,字符串为空
https://taizilongxu.gitbooks.io/stackoverflow-about-python/content/15/README.html
http://codewenda.com/%E7%94%A8python%E7%9A%84%E6%96%B9%E5%BC%8F%E6%9F%A5%E7%9C%8B%E4%B8%80%E4%B8%AA%E5%AD%97%E7%AC%A6%E4%B8%B2%E6%98%AF%E5%90%A6%E4%B8%BA%E7%A9%BA/1
2
3
4
5
6
7
8
9
10
11
12
13
14
15
16
17
18
19
20
21
22
23
24
25例如,传递下面:
a = []
我怎么检查a是空值?
if not a:
print "List is empty"
用隐藏的空列表的布尔值才是最Pythonic的方法.
在Python中,如果要判断是个字符串是否为空,应该怎么写呢?
这个问题很简单的,但是stackoverflow上依然是一个常被查看的问题。
判断str的布尔值
一个字符串如果是空字符串,那么if str判断其布尔值为False。
代码如下:
if str:
print('This is an empty string.')
直接与空字符串比较
当然前提是确认str是string类型了。如果不能确定它的类型,那就用最直接的判断:
if str == '':
print('This is an empty string.')
Python os.path模块
https://www.cnblogs.com/dkblog/archive/2011/03/25/1995537.html
http://yysfire.github.io/python/python2-standard-library-os.path.html1
2
3
4
5
6
7
8
9
10
11
12
13
14
15
16
17
18
19
20
21
22
23
24
25
26
27
28
29
30
31
32
33
34
35
36
37
38
39
40
41
42
43
44
45
46
47
48
49
50
51
52
53
54
55
56
57
58
59
60
61
62
63
64
65
66
67
68
69
70
71
72
73
74
75
76
77
78
79
80
81
82
83
84
85
86
87
88
89
90
91
92
93
94
95
96
97
98
99
100
101
102
103
104
105
106
107
108
109
110
111
112
113
114
115
116
117
118
119
120
121
122
123
124
125
126
127
128
129
130
131
132
133
134
135
136
137
138
139
140
141
142
143
144
145
146
147
148
149
150
151
152
153
154
155
156
157
158
159
160 python os.path模块
os.path.abspath(path) #返回绝对路径
os.path.basename(path) #返回文件名
os.path.commonprefix(list) #返回list(多个路径)中,所有path共有的最长的路径。
os.path.dirname(path) #返回文件路径
os.path.exists(path) #路径存在则返回True,路径损坏返回False
os.path.lexists #路径存在则返回True,路径损坏也返回True
os.path.expanduser(path) #把path中包含的"~"和"~user"转换成用户目录
os.path.expandvars(path) #根据环境变量的值替换path中包含的”$name”和”${name}”
os.path.getatime(path) #返回最后一次进入此path的时间。
os.path.getmtime(path) #返回在此path下最后一次修改的时间。
os.path.getctime(path) #返回path的大小
os.path.getsize(path) #返回文件大小,如果文件不存在就返回错误
os.path.isabs(path) #判断是否为绝对路径
os.path.isfile(path) #判断路径是否为文件
os.path.isdir(path) #判断路径是否为目录
os.path.islink(path) #判断路径是否为链接
os.path.ismount(path) #判断路径是否为挂载点()
os.path.join(path1[, path2[, ...]]) #把目录和文件名合成一个路径
os.path.normcase(path) #转换path的大小写和斜杠
os.path.normpath(path) #规范path字符串形式
os.path.realpath(path) #返回path的真实路径
os.path.relpath(path[, start]) #从start开始计算相对路径
os.path.samefile(path1, path2) #判断目录或文件是否相同
os.path.sameopenfile(fp1, fp2) #判断fp1和fp2是否指向同一文件
os.path.samestat(stat1, stat2) #判断stat tuple stat1和stat2是否指向同一个文件
os.path.split(path) #把路径分割成dirname和basename,返回一个元组
os.path.splitdrive(path) #一般用在windows下,返回驱动器名和路径组成的元组
os.path.splitext(path) #分割路径,返回路径名和文件扩展名的元组
os.path.splitunc(path) #把路径分割为加载点与文件
os.path.walk(path, visit, arg) #遍历path,进入每个目录都调用visit函数,visit函数必须有
3个参数(arg, dirname, names),dirname表示当前目录的目录名,names代表当前目录下的所有
文件名,args则为walk的第三个参数
os.path.supports_unicode_filenames #设置是否支持unicode路径名
os.path 模块主要用来处理路径字符串,以提取出自己需要的信息。
>>> from os import path
分割与连接路径
os.path.split(path)
将路径分割成一对元组(head,tail),tail 是路径中最后一个斜杠后面的部分,而 head 是前面所有的部分。tail 部分不会包含斜杠;如果路径是以斜杠结尾,那么 tail 将为空串。如果路径中不包含斜杠,那么 head 为空。路径尾部的斜杠,除非代表的是根目录,否则 head 会将其去掉。
>>> path.split(pathstr)
('/home/user/archive', 'src.tar.gz')
os.path.basename(path)
提取路径中的文件名,相当于 split(path) 返回值的 tail。
>>> pathstr='/home/user/archive/src.tar.gz'
>>> path.basename(pathstr)
src.tar.gz
>>> path.basename('/home/user/archive/')
''
os.path.dirname(path)
提取路径中的目录名,相当于 split(path) 返回值的 head。
>>> path.dirname(pathstr)
'/home/user/archive'
os.path.splitdrive(path)
将路径分割成元组(drive,tail),drive 是盘符部分,在不用盘符的系统上,drive 始终为空串。drive + tail始终和path一样。
>>> path.splitdrive(pathstr)
('', '/home/user/archive/src.tar.gz')
os.path.splitext(path)
将路径分割成(root,ext),root + ext == path,ext 部分以点号开头且至多包含一个点号。如果路径部分就是一个以点号开头的文件名,那么 ext 为空串。
>>> path.splitext(pathstr)
('/home/user/archive/src.tar', '.gz')
>>> path.splitext('.bashrc')
('.bashrc', '')
os.path.join(path1[, path2[, ...]])
将一个或多个路径组分智能地连接起来。
>>> path.join('/home/user','archive','src.tar.gz')
'/home/user/archive/src.tar.gz'
>>> path.join('/home/user','archive','')
'/home/user/archive/'
>>> path.join('/home/user','archive')
'/home/user/archive'
os.path.commonprefix(list)
返回列表 list 中所有路径的最长相同首部,因为是逐个字符进行比较,所以可能得到的不是一个有效的路径。
>>> path.commonprefix(['/home/user/aabb.log','/home/user/abc.txt'])
'/home/user/a'
os.path.relpath(path[, start])
返回path对于当前工作目录或者start指定路径的相对路径。start的默认值就是os.curdir。仅适用于 Windows 和 Unix(Linux)。
>>> path.relpath(pathstr,'/home/user/doc')
'../archive/src.tar.gz'
对路径进行扩展和标准化处理
os.path.expanduser(path)
将路径中的 ~ 或者 ~user 扩展成用户的主目录。如果扩展失败,或是 path 不是以波浪线开头,那么 path 会被原样返回。
os.path.expandvars(path)
将路径中的环境变量($name 或 ${name})扩展成该变量自身的值。无效和异常的变量名不会被处理。在 Windows 系统下,还支持 %name% 的形式。
os.path.normcase(path)
对路径进行大小写标准化处理。在对大小写不敏感的文件系统上,将路径全部转换成小写。在 Unix(Linux) 和 Mac OS X 系统上,不作修改。在 Windows 系统下,将路径中的斜杠(/)全部转换成反斜杠(\)。
os.path.normpath(path)
对路径进行标准化处理。去掉路径中冗余的分隔符和表示相对路径的点号,例如,将A//B, A/B/, A/./B 和 A/foo/../B 全部变成 A/B。在 Windows 系统下,将路径中的斜杠(/)全部转换成反斜杠(\)。
os.path.abspath(path)
返回将 path 标准化后的绝对路径,相当于 normpath(join(os.getcwd(), path))
查询及检测路径
os.path 还可以用于检测路径是否有效,以及查询文件的相关信息(metadata)。
注意:在使用以下函数前,需要先将路径中的波浪线和环境变量扩展开。
os.path.getatime(path)
获取文件的最后访问时间。如果文件不存在或不可访问,抛出 os.error 异常。
os.path.getmtime(path)
获取文件的最后修改时间。如果文件不存在或不可访问,抛出 os.error 异常。
os.path.getctime(path)
获取文件的创建时间(需要系统自身支持,否则和最后修改时间一样,例如 Unix/Linux 系统)。如果文件不存在或不可访问,抛出 os.error 异常。
os.path.getsize(path)
获取文件的大小,以字节为单位。如果文件不存在或不可访问,抛出 os.error 异常。
os.path.realpath(path)
返回 path 实际指向的目标路径,即消除所有的符号链接(前提是系统支持)。
os.path.isabs(path)
path 是绝对路径时返回 True。这意味着,在 Unix/Linux 下,以 / 开头;在 Windows 下,以 \ 开头(需斩掉盘符)
os.path.isfile(path)
path 指向的是一个文件时返回 True。此函数跟踪符号链接。
os.path.isdir(path)
path 指向的是一个目录时返回 True。此函数跟踪符号链接。
os.path.islink(path)
path 指向的是一个符号链接时返回 True。如果不支持符号链接,那么返回 False
os.path.exists(path)
path 指向一个实际存在的路径时返回 True。对于坏掉的符号链接,它返回 False。
os.path.lexists(path)
path 指向一个实际存在的路径时返回 True。对于坏掉的符号链接,它返回 True。
python id函数
http://www.runoob.com/python/python-func-id.html
http://blog.jobbole.com/49705/
http://blog.csdn.net/djskl/article/details/25886187
http://pycoders-weekly-chinese.readthedocs.io/en/latest/issue15/python-built-in-functions-are-awesome-use-them.html1
2
3
4
5
6
7
8
9
10
11
12
13
14
15
16
17
18
19
20
21
22
23
24
25
26
27
28
29
30
31
32
33
34
35
36
37描述
id() 函数用于获取对象的内存地址。
语法
id 语法:
id([object])
参数说明:
object -- 对象。
>>> a = {}
>>> id(a)
140000777319912
>>> a={}
>>> id(a)
140000777755384
>>> a = {}
>>> b = a
>>> a[100] = 200
>>> b
{100: 200}
>>> a = {}
>>> a[100] = 300
>>> a
{100: 300}
>>> b
{100: 200}
>>> a = {}
>>> hex(id(a))
'0x7f548dbea480'
>>> hex(id(b))
'0x7f547899b5e8'
>>>
python内存管理
https://chenrudan.github.io/blog/2016/04/23/pythonmemorycontrol.html
http://www.cnblogs.com/vamei/p/3232088.html
http://www.cnblogs.com/Lvkun/archive/2012/03/01/python_object_memory_usage.html
http://blog.csdn.net/liweiblog/article/details/64128241
https://www.zhihu.com/question/34895986
http://liuliqiang.info/post/memory-manager-in-python/1
2
3
4
5
6
7
8
9
10
11
12
13
14
15
16
17
18
19
20
21
22
23
24
25
26
27
28
29
30
31
32
33
34
35
36
37
38
39
40
41
42
43
44
45
46
47
48
49
50
51
52
53
54
55
56
571. Python变量、对象、引用、存储
python语言是一种解释性的编程语言,它不同于一些传统的编译语言,不是先编译成汇编再编程机器码,而是在运行的过程中,逐句将指令解释成机器码,所以造就了python语言一些特别的地方。例如a=1,其中a是变量,1是对象。这里所谓的变量,它的意义类似一个指针,它本身是没有类型的,只有它指向的那个对象是什么类型,它才是什么类型,一旦把它指到别的地方,它的类型就变了,现在指向的是1,它的类型可以认为是int,假如接下来执行a=2.5,那么变量的类型就变了。甚至当先给a=1,a=a+1时,a的地址也会改变。而这里的1,2.5或者一个list一个dict就是一个被实例化的对象,对象拥有真正的资源与取值,当一个变量指向某个对象,被称为这个对象的产生了一个引用,一个对象可以有多个变量指向它,有多个引用。而一个变量可以随时指向另外的对象。同时一个变量可以指向另外一个变量,那么它们指向的那个对象的引用就增加了一个。
Python有个特别的机制,它会在解释器启动的时候事先分配好一些缓冲区,这些缓冲区部分是固定好取值,例如整数[-5,256]的内存地址是固定的(这里的固定指这一次程序启动之后,这些数字在这个程序中的内存地址就不变了,但是启动新的python程序,两次的内存地址不一样)。有的缓冲区就可以重复利用。这样的机制就使得不需要python频繁的调用内存malloc和free。下面的id是取内存地址,hex是转成16进制表示。
#第一次启动解释器
>>> hex(id(1))
'0x14c5158'
#第二次启动解释器
>>> hex(id(1))
'0xe17158'
#缓冲区被重复利用
>>> hex(id(100000))
'0xe5be00'
>>> hex(id(1000000))
'0xe5be00'
>>> hex(id(10000000))
'0xe5be00'
>>> hex(id(100000000))
'0xe5be00'
针对整数对象,它的内存区域似乎是一个单独的区域,跟string、dict等的内存空间都不一样,从实验结果来看,它的地址大小只有’0xe5be00’,其他的是’0x7fe7e03c7698’。而存储整数对象的这块区域,有一块内存区域是事先分配好的,即[-5,256]范围内的整数。这块称为小整数缓冲池,静态分配,对某个变量赋值就是直接从里面取就行了,在python初始化时被创建。而另外的整数缓冲池称为大整数缓冲池,这块内存也是已经分配好了,只是要用的时候再赋值。可以从下面的例子中看到,针对257这个数字,虽然给a和b赋了相同的值,但是解释器实际上是先分配了不同的地址,再把这个地址给两个变量。
>>> a = 1
>>> b = 1
>>> hex(id(a))
'0xe17158'
>>> hex(id(b))
'0xe17158'
>>> b = 257
>>> a = 257
>>> hex(id(a))
'0xe5be00'
>>> hex(id(b))
'0xe5bdd0'
针对string类型,它也有自己的缓冲区,也是分为固定缓冲区和可重复缓冲区,固定的是256个ASCII码字符。还发现一个有意思的现象,string中只要不出现除了字母和数字其他字符,那么对a和b赋同样的值,它们的内存地址都相同。但是如果string对象中有其他字符,那么对两个变量赋相同的string值,它们的内存地址还是不一样的。
>>> b = 'aaaaaaaaaaaaaaaaaaaaaaaaaaaaaaaaaaaaaaaaaaaaaaaaaaaaaaaaaaaaaaaaaaaaaaaaaaaaaaaaaaaaaaaaaaaaaaaaaaaaaaaaaaaaaaaaaaaaaaaaaaaaaaaaaaaaaaaaaaaaaaaaaaaaaaaaaaaaaaaaaaaaaaaaaaaaaaaaaaaaaaaaaaaaaaaaaaaaaaaaaaaaaaaaaaaaaaaaaaaaaaaaaaaaaaaaaaaaaaaaaaaaaaaaaaaaaaaaaa'
>>> hex(id(b))
'0x7fe7e03af848'
>>> a = 'aaaaaaaaaaaaaaaaaaaaaaaaaaaaaaaaaaaaaaaaaaaaaaaaaaaaaaaaaaaaaaaaaaaaaaaaaaaaaaaaaaaaaaaaaaaaaaaaaaaaaaaaaaaaaaaaaaaaaaaaaaaaaaaaaaaaaaaaaaaaaaaaaaaaaaaaaaaaaaaaaaaaaaaaaaaaaaaaaaaaaaaaaaaaaaaaaaaaaaaaaaaaaaaaaaaaaaaaaaaaaaaaaaaaaaaaaaaaaaaaaaaaaaaaaaaaaaaaaa'
>>> hex(id(a))
'0x7fe7e03af848'
>>> a = 'abcd%'
>>> b = 'abcd%'
>>> hex(id(a))
'0x7fe7e02d4900'
>>> hex(id(b))
'0x7fe7e02d48d0'
而另外的dict和list的缓冲区也是事先分配好,大小为80个对象。
因此变量的存储有三个区域,事先分配的静态内存、事先分配的可重复利用内存以及需要通过malloc和free来控制的自由内存。
python利用dis模块进行代码层次的性能剖析
http://hyry.dip.jp/tech/book/page/python/variable_scope_dis.html
http://blog.csdn.net/handsomekang/article/details/41479597
http://tinyweb.blog.51cto.com/2462673/982585
http://program.dengshilong.org/2017/03/02/Python%E4%B9%8Bdis%E6%A8%A1%E5%9D%97/
http://www.cweye.net/python/2014/08/18/python-bytecode.html1
2
3
4
5>>> import dis
>>> dis.dis(hex(id(a)))
1 0 LOAD_CONST 0 (140001160313888)
2 RETURN_VALUE
>>>
Python中给List添加元素的4种方法分享
http://www.jb51.net/article/57923.htm1
2
3
4
5
6
7
8
9
10
11
12
13
14
15
16
17
18
19
20
21
22
23
24
25
26
27
28
29
30
31
32
33
34
35
36
37
38
39
40
41
42
43
44
45List 是 Python 中常用的数据类型,它一个有序集合,即其中的元素始终保持着初始时的定义的顺序(除非你对它们进行排序或其他修改操作)。
在Python中,向List添加元素,方法有如下4种方法(append(),extend(),insert(), +加号)
1. append() 追加单个元素到List的尾部,只接受一个参数,参数可以是任何数据类型,被追加的元素在List中保持着原结构类型。
此元素如果是一个list,那么这个list将作为一个整体进行追加,注意append()和extend()的区别。
复制代码 代码如下:
>>> list1=['a','b']
>>> list1.append('c')
>>> list1
['a', 'b', 'c']
2. extend() 将一个列表中每个元素分别添加到另一个列表中,只接受一个参数;extend()相当于是将list B 连接到list A上。
复制代码 代码如下:
>>> list1
['a', 'b', 'c']
>>> list1.extend('d')
>>> list1
['a', 'b', 'c', 'd']
3. insert() 将一个元素插入到列表中,但其参数有两个(如insert(1,”g”)),第一个参数是索引点,即插入的位置,第二个参数是插入的元素。
复制代码 代码如下:
>>> list1
['a', 'b', 'c', 'd']
>>> list1.insert(1,'x')
>>> list1
['a', 'x', 'b', 'c', 'd']
4. + 加号,将两个list相加,会返回到一个新的list对象,注意与前三种的区别。前面三种方法(append, extend, insert)可对列表增加元素的操作,他们没有返回值,是直接修改了原数据对象。 注意:将两个list相加,需要创建新的list对象,从而需要消耗额外的内存,特别是当list较大时,尽量不要使用“+”来添加list,而应该尽可能使用List的append()方法。
复制代码 代码如下:
>>> list1
['a', 'x', 'b', 'c', 'd']
>>> list2=['y','z']
>>> list3=list1+list2
>>> list3
['a', 'x', 'b', 'c', 'd', 'y', 'z']
python浮点数精度截取
http://python3-cookbook.readthedocs.io/zh_CN/latest/c03/p01_round_number.html1
2
3
4
5
6
7
8
9
10
11
12
13
14
15
16
17
18
19
20
21
22
23
24对于简单的舍入运算,使用内置的 round(value, ndigits) 函数即可。比如:
>>> round(1.23, 1)
1.2
>>> round(1.27, 1)
1.3
>>> round(-1.27, 1)
-1.3
>>> round(1.25361,3)
1.254
>>>
当一个值刚好在两个边界的中间的时候, round 函数返回离它最近的偶数。 也就是说,对1.5或者2.5的舍入运算都会得到2。
传给 round() 函数的 ndigits 参数可以是负数,这种情况下, 舍入运算会作用在十位、百位、千位等上面。比如:
>>> a = 1627731
>>> round(a, -1)
1627730
>>> round(a, -2)
1627700
>>> round(a, -3)
1628000
>>>
使用logging分级打印日志
http://www.vimer.cn/archives/1883.html1
2
3
4
5
6
7
8
9
10
11
12
13LOGGING_LEVEL = logging.DEBUG
def logging_config():
# log_format = "%(asctime)s [line: %(lineno)d] - %(levelname)s - %(message)s"
log_format = "[line: %(lineno)d] - %(levelname)s - %(message)s"
logging.basicConfig(level=LOGGING_LEVEL, format=log_format)
if __name__ == "__main__":
time_start = time.time()
logging_config()
main()
logging.info("\n\nTotal Elapsed Time: %s seconds\n" % (time.time() - time_start))
sleep的用法
1 | time.sleep(value),value支持小数,即可进行毫秒级的延时 |
Python字符串合并与格式化
1 | x = '19991110' |
String类中format函数的用法
1 | 6.1.3.2. Format examples |
Python字符串间隔固定位置插入分割符号
https://stackoverflow.com/questions/10055631/how-do-i-insert-spaces-into-a-string-using-the-range-function
https://stackoverflow.com/questions/2657693/insert-a-newline-character-every-64-characters-using-python
https://stackoverflow.com/questions/9475241/split-string-every-nth-character
https://stackoverflow.com/questions/35662526/python-3-4-inserting-spaces-at-regular-intervals
1 | >>> b |
Python字符串转日期
1 | >>> timestr = '2017-09-20 16:20:30' |
datetime显示开始执行时间和结束执行时间
1 | if __name__ == "__main__": |
判断字符串是否为空
1 | if len(str): |
获取指定路径下所有指定后缀的文件
http://outofmemory.cn/code-snippet/7194/python-get-specify-path-suo-exist-specify-houzhui-file1
2
3
4
5
6
7
8
9
10
11
12
13
14
15
16
17
18
19
20
21
22
23
24
25
26
27
28
29
30
31
32
33
34
35
36
37
38
39
40
41
42
43
44
45
46
47
48
49
50
51
52
53
54
55
56
57# 获取指定路径下所有指定后缀的文件
# dir 指定路径
# ext 指定后缀,链表&不需要带点 或者不指定。例子:['xml', 'java']
def GetFileFromThisRootDir(dir,ext = None):
allfiles = []
needExtFilter = (ext != None)
for root,dirs,files in os.walk(dir):
for filespath in files:
filepath = os.path.join(root, filespath)
extension = os.path.splitext(filepath)[1][1:]
if needExtFilter and extension in ext:
allfiles.append(filepath)
elif not needExtFilter:
allfiles.append(filepath)
return allfiles
递归调用,同时支持字符串,列表,元组等方式过滤文件
@staticmethod
def get_all_log_files(dir_path, suffix=None):
if os.path.exists(dir_path):
if os.path.isdir(dir_path):
file_list = os.listdir(dir_path)
for file in file_list:
file_path = os.path.join(dir_path, file)
if os.path.isdir(file_path):
LogHandleClass.get_all_log_files(file_path, suffix)
else:
if suffix is None:
LogHandleClass.log_file_list.append(file_path)
else:
# suffix = ['log', 'xml']
if isinstance(suffix, list) or isinstance(suffix, tuple):
if os.path.splitext(os.path.split(file_path)[1])[1][1:] in suffix:
LogHandleClass.log_file_list.append(file_path)
elif isinstance(suffix, str):
# suffix = '*.log'
# if '*.' in suffix: # abc*.log will match this condition
if 0 == suffix.find(r'*.'):
if fnmatch.fnmatch(file_path, suffix):
LogHandleClass.log_file_list.append(file_path)
else:
# abc*d.log ==> log
suffix = re.sub(r'^.*\.', '', suffix)
if os.path.splitext(os.path.split(file_path)[1])[1][1:] == suffix:
LogHandleClass.log_file_list.append(file_path)
else:
raise SuffixFormatError('Unsupported suffix format, '
'must be str, list or tuple, not %s ' % type(suffix))
return LogHandleClass.log_file_list
使用glob模块,可以设置文件过滤
import glob
for filename in glob.glob(r'c:\windows\*.exe'):
print filename
Python文件遍历
http://laocao.blog.51cto.com/480714/525140
http://hackerxu.com/2014/07/09/file-contrl.html
http://gohom.win/2016/01/14/py-oswalk/
https://hexo2hexo.github.io/traverse-in-python/1
2
3
4
5
6
7
8
9
10
11
12
13
14
15
16
17
18
19
20
21
22
23
24
25
26
27
28
29
30
31
32
33
34
35
36
37
38
39
40
41
42
43
44
45
46
47
48
49
50
51
52
53
54
55
56
57
58
59
60
61
62
63
64
65
66
67
68
69
70
71
72
73
74
75
76
77
78
791. os.walk
os.walk可以自顶向下或者自底向上遍历整个文件树,然后返回一个含有3个元素的tuple,(dirpath, dirnames, filenames),要注意的是,os.walk()会返回一个generater,所以调用的时候一定要放到for循环中。
# -*- coding: utf-8 -*-
import os
def Test1(rootDir):
list_dirs = os.walk(rootDir)
for root, dirs, files in list_dirs:
for d in dirs:
print os.path.join(root, d)
for f in files:
print os.path.join(root, f)
2. os.listdir
# -*- coding: utf-8 -*-
import os
def Test2(rootDir):
for lists in os.listdir(rootDir):
path = os.path.join(rootDir, lists)
print path
if os.path.isdir(path):
Test2(path)
3. 区别如下:
E:\TEST
│--A
│ │--A-A
│ │ │--A-A-A.txt
│ │--A-B.txt
│ │--A-C
│ │ │--A-B-A.txt
│ │--A-D.txt
│--B.txt
│--C
│ │--C-A.txt
│ │--C-B.txt
│--D.txt
│--E
Test1('E:\TEST')
print '======================================='
Test2('E:\TEST')
>>>
E:\TEST\A
E:\TEST\C
E:\TEST\E
E:\TEST\B.txt
E:\TEST\D.txt
E:\TEST\A\A-A
E:\TEST\A\A-C
E:\TEST\A\A-B.txt
E:\TEST\A\A-D.txt
E:\TEST\A\A-A\A-A-A.txt
E:\TEST\A\A-C\A-B-A.txt
E:\TEST\C\C-A.txt
E:\TEST\C\C-B.txt
=======================================
E:\TEST\A
E:\TEST\A\A-A
E:\TEST\A\A-A\A-A-A.txt
E:\TEST\A\A-B.txt
E:\TEST\A\A-C
E:\TEST\A\A-C\A-B-A.txt
E:\TEST\A\A-D.txt
E:\TEST\B.txt
E:\TEST\C
E:\TEST\C\C-A.txt
E:\TEST\C\C-B.txt
E:\TEST\D.txt
E:\TEST\E
4. 打印目录树
def Test3(rootDir, level=1):
if level==1: print rootDir
for lists in os.listdir(rootDir):
path = os.path.join(rootDir, lists)
print '│ '*(level-1)+'│--'+lists
if os.path.isdir(path):
Test3(path, level+1)
python遍历某个文件夹下的全部文件
http://www.huqi.tk/index.php/2017/04/22/python_os_path/1
2
3
4
5
6
7
8
9
10
11
12
13
14
15
16
17
18
19
20
21
22
23
24
25
26
27
28
29
30
31
32
33
34
35
36
37
38
39
40
41
42
43
44
45
46
47
48
49
50
51
52
53
54
55
56
57
58
59
60
61
62
63
64
65
66
67
68
69
70
71
72
73
74
75
76
77
78
79
80
81
82
83
84
85
86
87
88
89
90
91
92
93
94
95
96
97
98
99
100
101
102
103
104
105
106
107
108
109
110
111
112
113
114
115
116
117
118
119
120
121
122
123
124
125
126
127
128
129
130
131
132
133
134
135
136
137
138
139
140
141
142
143
144
145
146
147
148
149
150
151
152
153
154
155
156
157
158
159
160
161
162
163
164在前面的一小节中,我们谈到了对文件的读写操作,这一节我们谈谈使用python遍历某个文件夹下的全部文件,因为在实际的项目场景中这种情况非常常见,如在apk的逆向工程中可能需要在把dex文件反编译后产生的smali文件中查找某一特定的字符串,然后进行替换操作。这个场景很显然就涉及到了对某一文件夹下所有文件进行遍历的过程。这个过程很显然是对文件,目录,路径进行操作,而这些很显然是属于操作系统管理的范畴,因此这些功能被定义在了python中的os模块和os.path模块,使用前需要import相应的模块。这一小节就讲讲python中这两个模块常用的和文件操作相关的重要函数。
os模块
os.listdir(path)
该函数的功能是返回一个列表,该列表是path路径下的全部文件或者文件夹的名称,注意:返回的列表中是不会包含该path路径下的某个文件夹包含的子文件或者子文件夹,只会包含该路径下的文件夹与文件。path是传入的路径,通常是一个字符串。另外需要注意的是如果path不存在,会出现错误:WindowsError: [Error 3],系统找不到指定路径,因此使用该函数之前一定要对路径是否存在进行判断,代码如下:
if os.path.exists(dirPath):
file_list=os.listdir(dirPath)
os.walk(top, topdown=True, onerror=None, followlinks=False)
该函数的功能是通过遍历top路径以生成一个目录树的文件名(Generate the file names in a directory tree by walking the tree)。该函数参数很多,但是后面几个参数都是带默认值参数,通常我们只需要关心第一个参数top,表示的是传入的top目录的路径。该函数返回一个三元组tuple(dirpath, dirnames, filenames),其中dirpath表示top路径下的全部目录的路径名称,通常是一个字符串,第二个参数表示的是dirpath目录下的全部子文件夹的名称列表(dirnames is a list of the names of the subdirectories in dirpath),filenames表示的是dirpath目录下的非文件夹文件的列表(filenames is a list of the names of the non-directory files in dirpath),需要注意的是第二个参数子目录名和第三个参数文件名都是没带根路径的,因此如果要得到完整的目录名或者文件名需要加上根路径dirpath。遍历某个文件夹下的全部文件的代码如下:
import os
dirPath='C:/Users/htq/Desktop/test'
for dirpath,dirnames,filenames in os.walk(dirPath):
for file in filenames:
print os.path.join(dirpath, file)#将dirpath和file连接起来得到完整的文件名
os.sep/os.linesep
os.sep 表示的是系统路径分隔符,在不同平台上表示不同,如windows平台上用’\\’表示而linux平台用’/’表示,因此为了保证我们所写的代码能够跨平台运行,请不要在程序中使用’\\’或者’/’来连接路径,而是使用os.sep
os.linesep表示的是行结束符,在不同的平台表示不同,如Windows使用’\r\n’,Linux使用’\n’而Mac使用’\r’。另外在上一小节python文件操作中我们也提到了,write()和writelines()写入文件时是不包含行结束符的,因此如果需要在写入文件时插入行结束符的话需要我们要自己处理这些情况
os.path模块
os.path.exists(path)
该函数用来判断path路径指向的文件或者目录是否存在,如果不存在返回false
os.path.isdir(path)/os.path.isfile(path)
os.path.isdir(path)判断path是否为目录,如果是返回true否则返回false
os.path.isfile(path)判断path是否为文件,如果是返回true否则返回false
那么讲到这里,然后在根据前面我们提到的os模块的os.listdir(path),我们自然可以想到一种递归的方式来遍历某一路径下的全部文件,首先通过os.listdir(path)得到path路径下的全部文件,然后使用os.path.isdir(path)/os.path.isfile(path)来判断,如果该文件为目录那么我们递归调用,否则如果为文件,那么遍历输出,这样就可以实现和前面walk一样的效果。代码如下:
import os
def listDir(rootDir):
if not os.path.exists(rootDir):
return
for dirname in os.listdir(rootDir):
filename = os.path.join(rootDir, dirname)
if (os.path.isfile(filename)):
print filename
else:
listDir(filename)
虽然这中方式也可以实现遍历文件夹下的全部文件,但是因为使用的是递归的方式,效率应该比walk要低一些,另外从代码量上看也比使用walk要麻烦一些,唯一的好处就是从逻辑上理解起来比使用walk要清晰明了,因此尽量使用os.walk(path)的方式来替代这种方式。
os.path.join(path, *paths)
用来连接一个或多个目录与文件名/目录,前面说过在不同的平台上路径分隔符不同,因此为了做到跨平台,不要直接使用’\\’或者’/’的方式来连接目录与文件,应该使用os.sep的方式或者使用该函数,这样如果需要连接的字符串很多的时候会更简单
os.path.split(path)
该函数用来分割文件名和目录,如果path是目录,它会将最后一级目录作为文件名而分离,返回的是一个二元祖pair(head,tail),注意该函数不会判断路径是否存在,如果不存在也不会出错,但返回的结果可能不是我们预期的结果
os.path.splitext(path)
该函数用来分离文件名和扩展名,返回的是一个二元组pair(root,ext),其中root+ext==path,因此如果我们要得到一个文件的后缀类型需要这么使用:
ext=os.path.splitext(dirPath)[1]
这个函数的使用场景很多,如在遍历某一个文件夹下的某一特定类型的文件如.txt,.smali文件。
os.path.basename(path)
该函数用来得到path路径的文件名(如果path为目录则为目录名),如:path=’C:/Users/htq/Desktop’ 则返回’Desktop’,path=’C:/Users/htq/Desktop/test.py’则返回’test.py’,如果path是以路径分隔符结尾,那么返回一个空字符串,如path=’C:/Users/htq/Desktop/’ ,则返回空字符串”。
os.getcwd()
获取当前目录
>>> os.getcwd()
'/home/hogan'
In[5]: os.getcwd()
Out[5]: 'C:\\Users\\hogan\\Documents'
os.path.dirname(path)
返回当前目录的父目录
>>> os.path.dirname('/home/hogan/test.txt')
'/home/hogan'
In[7]: os.path.dirname(os.getcwd())
Out[7]: 'C:\\Users\\hogan'
os.stat()
获取文件属性
检查文件是否为空
>>> import os
>>> os.stat("file").st_size == 0
True
判断目录是否为空
if 0 == len(os.listdir(WVT_LOG_FOLDER)):
continue
os.path.relpath(path[, start])
返回自当前目录或者可选的start 目录的 path相对文件路径。这只是单纯的路径计算:不会访问文件系统以确认path 或者 start 的存在性或者属性。
http://blog.csdn.net/use_my_heart/article/details/52239169
# 将每次运行的KS值存入一个文件,每次运行时加入文件,再读取文件画出连续一些天数的ks曲线图
if os.path.exists('./ks_accumulate.csv'):
if os.path.getsize('./ks_accumulate.csv'):
print('文件存在且不为空')
ks_temp.to_csv('./ks_accumulate.csv', mode='a', header=False, index=False)
else:
print('文件存在且为空')
ks_temp.to_csv('./ks_accumulate.csv', mode='a', index=False)
else:
print('文件不存在')
ks_temp.to_csv('./ks_accumulate.csv', mode='a', index=False)
ks_acc = pd.read_csv('./ks_accumulate.csv')
代码实例
应用场景:将某一文件夹及其子文件夹下的全部的txt文件中的某个字符串替换为指定的字符串,这个实例综合了上一节和这一节的内容,在实际项目的文件操作中很常见。
import os
dirPath='C:/Users/htq/Desktop/test'
for dirpath,dirnames,filenames in os.walk(dirPath):
for file in filenames:
filename=os.path.join(dirpath, file)#将dirpath和file连接起来得到完整的文件名
print filename
if os.path.splitext(filename)[1]=='.txt':
print filename
try:
with open(filename, 'r+') as fileObject:
lines = fileObject.readlines()
'''
for line in lines:#这中方式不能修改lines中的值,使用索引访问的方式才可以
line=line.replace('alibaba','tencent')
print line
'''
for index in range(len(lines)): # 此处使用索引的方式访问,才可以修改原来的值
lines[index] = lines[index].replace('alibaba', 'tencent')
fileObject.seek(0) # 让文件指针移动到文件开始位置,然后写入处理后的数据
fileObject.writelines(lines)
except IOError, e:
print 'could not open file:', e
import os
os.path.splitext('./hello.py')
Out[5]: ('./hello', '.py')
os.path.basename('./hello.py')
Out[7]: 'hello.py'
os.path.dirname('./hello.py')
Out[8]: '.'
os.path.split('./hello.py')
Out[9]: ('.', 'hello.py')
Python删除文件和目录
http://www.manongjc.com/article/975.html
https://zhiwei.li/text/2010/11/08/python%E5%88%A0%E9%99%A4%E6%96%87%E4%BB%B6%E5%92%8C%E7%9B%AE%E5%BD%95/1
2
3
4
5
6
7
8
9
10
11
12
13
14
15
16
17
18
19
20
21
22
23
24
25
26
27
28
29
30
31
32
33
34
35
36
37
38
39
40
41
42
43
44
45
46
47
48
49
50
51
52
53
54
55
56
57
58
59
60
61
62
63
64
65
66
67
68
69
70
71
72
73
74
75
76
77
78
79
80
81
82
83
84
85
86
87
88
89
90
91
92
93
94
95
96
97
98
99
100
101
102
103
104下面来看一下python里面是如何删除一个文件及文件夹的~~
首先引入OS模块
import os
删除文件:
os.remove()
删除空目录:
os.rmdir()
递归删除空目录:
os.removedirs()
递归删除目录和文件(类似DOS命令DeleteTree):
方法1:
# Delete everything reachable from the directory named in 'top',
# assuming there are no symbolic links.
# CAUTION: This is dangerous! For example, if top == '/', it
# could delete all your disk files.
import os
for root, dirs, files in os.walk(top, topdown=False):
for name in files:
os.remove(os.path.join(root, name))
for name in dirs:
os.rmdir(os.path.join(root, name))
方法2:利用python的成熟的模块
import shutil
shutil.rmtree()
一行搞定 __import__('shutil').rmtree()
os.remove(path)
删除文件 path. 如果path是一个目录, 抛出 OSError错误。如果要删除目录,请使用rmdir().
remove() 同 unlink() 的功能是一样的
在Windows系统中,删除一个正在使用的文件,将抛出异常。在Unix中,目录表中的记录被删除,但文件的存储还在。
os.removedirs(path)
递归地删除目录。类似于rmdir(), 如果子目录被成功删除, removedirs() 将会删除父目录;但子目录没有成功删除,将抛出错误。
举个例子, os.removedirs(“foo/bar/baz”) 将首先删除 “foo/bar/ba”目录,然后再删除foo/bar 和 foo, 如果他们是空的话
如果子目录不能成功删除,将 抛出 OSError异常
os.rmdir(path)
删除目录 path,要求path必须是个空目录,否则抛出OSError错误
清空一个目录
def clean_folder(folder_path):
if os.path.exists(folder_path):
if os.path.isfile(folder_path):
os.remove(folder_path)
os.makedirs(folder_path)
elif os.path.isdir(folder_path):
file_list = os.listdir(folder_path)
for file_name in file_list:
file_path = os.path.join(folder_path, file_name)
if os.path.isdir(file_path):
shutil.rmtree(file_path)
elif os.path.isfile(file_path):
os.remove(file_path)
else:
os.makedirs(folder_path)
递归删除目录
#! /usr/bin/python
# -*- coding: utf-8 -*-
import os
def del_dir_tree(path):
''' 递归删除目录及其子目录, 子文件'''
if os.path.isfile(path):
try:
os.remove(path)
except Exception, e:
#pass
print e
elif os.path.isdir(path):
for item in os.listdir(path):
itempath = os.path.join(path, item)
del_dir_tree(itempath)
try:
os.rmdir(path) # 删除空目录
except Exception, e:
#pass
print e
if __name__ == '__main__':
dirname = '/home/xx/log'
del_dir_tree(dirname)
Python文件复制拷贝
http://python3-cookbook.readthedocs.io/zh_CN/latest/c13/p07_copy_move_files_and_directories.html
https://www.zhukun.net/archives/63261
2
3
4
5
6
7
8
9
10
11
12
13
14
15
16
17
18
19
20
21
22
23
24
25
26
27文件的复制
file类中没有提供专门的文件复制函数,因此只能通过使用文件的读写函数来实现文件的复制。这里仅仅给出范例:
src = file("myfile.txt", "w+")
temp = ["hello world! \n"]
src.writelines(temp)
src.close()
src = file("myfile.txt", "r+")
des = file("myfile2.txt", "w+")
des.writelines(src.read())
src.close()
des.close()
使用shutil来实现文件的拷贝
shutil.copyfile(src, dst) #文件到文件的拷贝,其中dst必须是一个文件
shutil.copy(src, dst) #文件拷贝,src必须是一个文件,dst可以是一个文件或者目录
shutil.copy2(src, dst) #同上,但是拷贝的文件带着原有属性,类似于Linux系统里的cp -p命令
shutil.move(src, dst) #移动一个文件或者目录到指定的位置,src和dst都可以是文件或者目录
shutil.copytree(src, dst, symlinks=False, ignore=None) #目录的复制
import shutil
shutil.copyfile("myfile1.txt", "myfile2.txt")
shutil.move("myfile1.txt", "../") #把myfile1.txt移动到当前目录的父目录,然后删除myfile1.txt
shutil.move("myfile2.txt", "myfile3.txt") #把myfile2.txt移动到当前目录并重命名myfile3.txt
shutil.rmtree('c:\\test') #删除整个文件夹(文件夹可以是非空的)
更详细的shutil命令可以参考http://docs.python.org/2/library/shutil.html
os.mkdir与os.makedirs区别
https://github.com/dokelung/Python-QA/blob/master/questions/standard_lib/os.mkdir%E5%92%8Cos.makedirs%E7%9A%84%E5%8D%80%E5%88%A5.md
http://blog.csdn.net/ljl6158999/article/details/70807738
http://blog.csdn.net/l904126360/article/details/549440201
2
3
4
5
6
7
8
9
10
11
12
13
14
15
16
17
18
19
20
21
22
23
24
25os.mkdir 与 os.makedirs 的差別在于 os.makedirs 会递归地去建立目录,也就是说连同中继的目录也会一起建立,就类似於 Linux 中的 mkdir -p.
>>> import os
>>> os.mkdir('foo/bar')
Traceback (most recent call last):
File "<stdin>", line 1, in <module>
OSError: [Errno 2] No such file or directory: 'foo/bar'
>>> os.makedirs('foo/bar')
使用 os.mkdir 时,如果你给定的 path 参数是个多层的 path,如果某个中继的目录不存在(比如说上例中的 foo), Python 将会报错.
但如果使用 os.makedirs 则 Python 会连同中间的目录一起建立.但有一点值得注意,当 path 末端的目录已经存在的话,os.makedirs 也是会引发例外.
1.mkdir( path [,mode] )
作用:创建一个目录,可以是相对或者绝对路径,mode的默认模式是0777。
如果目录有多级,则创建最后一级。如果最后一级目录的上级目录有不存在的,则会抛出一个OSError。
2.makedirs( path [,mode] )
作用: 创建递归的目录树,可以是相对或者绝对路径,mode的默认模式也是0777。
如果子目录创建失败或者已经存在,会抛出一个OSError的异常,Windows上Error 183即为目录已经存在的异常错误。如果path只有一级,与mkdir一样。
很显然在创建多级目录且上级目录的存在未知时,使用makedirs比较方便,不容易出错。mark
Python文件操作
http://python.usyiyi.cn/translate/python_278/library/os.path.html
http://www.cnblogs.com/rollenholt/archive/2012/04/23/2466179.html
http://blog.csdn.net/longshenlmj/article/details/13294871
http://www.runoob.com/python/python-files-io.html
http://www.runoob.com/python/os-file-methods.html
http://wiki.jikexueyuan.com/project/explore-python/File-Directory/os.html1
2
3
4
5
6
7
8
9
10
11
12
13
14
15
16
17
18
19
20
21
22
23
24
25
26
27
28
29
30
31
32
33
34
35
36
37
38
39
40
41
42
43
44
45
46
47
48
49
50
51
52
53
54
55
56
57
58
59
60
61
62
63
64
65
66
67
68
69
70
71
72
73
74
75
76
77
78
79
80
81
82
83
84
85
86
87
88
89
90
91
92
93
94
95
96
97
98
99
100
101
102
103
104
105
106
107
108
109
110
111
112
113
114
115
116
117
118
119
120
121
122
123
124
125
126
127
128
129
130
131
132
133
134
135
136
137
138
139
140
141
142
143
144
145
146
147
148
149
150
151
152
153
154
155
156
157
158
159
160
161
162
163总是记不住API。昨晚写的时候用到了这些,但是没记住,于是就索性整理一下吧:
python中对文件、文件夹(文件操作函数)的操作需要涉及到os模块和shutil模块。
得到当前工作目录,即当前Python脚本工作的目录路径: os.getcwd()
返回指定目录下的所有文件和目录名:os.listdir()
函数用来删除一个文件:os.remove()
删除多个目录:os.removedirs(r“c:\python”)
检验给出的路径是否是一个文件:os.path.isfile()
检验给出的路径是否是一个目录:os.path.isdir()
判断是否是绝对路径:os.path.isabs()
检验给出的路径是否真地存:os.path.exists()
返回一个路径的目录名和文件名:os.path.split() eg os.path.split('/home/swaroop/byte/code/poem.txt') 结果:('/home/swaroop/byte/code', 'poem.txt')
分离扩展名:os.path.splitext()
获取路径名:os.path.dirname()
获取文件名:os.path.basename()
运行shell命令: os.system()
读取和设置环境变量:os.getenv() 与os.putenv()
给出当前平台使用的行终止符:os.linesep Windows使用'\r\n',Linux使用'\n'而Mac使用'\r'
指示你正在使用的平台:os.name 对于Windows,它是'nt',而对于Linux/Unix用户,它是'posix'
重命名:os.rename(old, new)
创建多级目录:os.makedirs(r“c:\python\test”)
创建单个目录:os.mkdir(“test”)
获取文件属性:os.stat(file)
修改文件权限与时间戳:os.chmod(file)
终止当前进程:os.exit()
获取文件大小:os.path.getsize(filename)
文件操作:
os.mknod("test.txt") 创建空文件
fp = open("test.txt",w) 直接打开一个文件,如果文件不存在则创建文件
关于open 模式:
w 以写方式打开,
a 以追加模式打开 (从 EOF 开始, 必要时创建新文件)
r+ 以读写模式打开
w+ 以读写模式打开 (参见 w )
a+ 以读写模式打开 (参见 a )
rb 以二进制读模式打开
wb 以二进制写模式打开 (参见 w )
ab 以二进制追加模式打开 (参见 a )
rb+ 以二进制读写模式打开 (参见 r+ )
wb+ 以二进制读写模式打开 (参见 w+ )
ab+ 以二进制读写模式打开 (参见 a+ )
fp.read([size]) #size为读取的长度,以byte为单位
fp.readline([size]) #读一行,如果定义了size,有可能返回的只是一行的一部分
fp.readlines([size]) #把文件每一行作为一个list的一个成员,并返回这个list。其实它的内部是通过循环调用readline()来实现的。如果提供size参数,size是表示读取内容的总长,也就是说可能只读到文件的一部分。
fp.write(str) #把str写到文件中,write()并不会在str后加上一个换行符
fp.writelines(seq) #把seq的内容全部写到文件中(多行一次性写入)。这个函数也只是忠实地写入,不会在每行后面加上任何东西。
fp.close() #关闭文件。python会在一个文件不用后自动关闭文件,不过这一功能没有保证,最好还是养成自己关闭的习惯。 如果一个文件在关闭后还对其进行操作会产生ValueError
fp.flush() #把缓冲区的内容写入硬盘
fp.fileno() #返回一个长整型的”文件标签“
fp.isatty() #文件是否是一个终端设备文件(unix系统中的)
fp.tell() #返回文件操作标记的当前位置,以文件的开头为原点
fp.next() #返回下一行,并将文件操作标记位移到下一行。把一个file用于for … in file这样的语句时,就是调用next()函数来实现遍历的。
fp.seek(offset[,whence]) #将文件打操作标记移到offset的位置。这个offset一般是相对于文件的开头来计算的,一般为正数。但如果提供了whence参数就不一定了,whence可以为0表示从头开始计算,1表示以当前位置为原点计算。2表示以文件末尾为原点进行计算。需要注意,如果文件以a或a+的模式打开,每次进行写操作时,文件操作标记会自动返回到文件末尾。
fp.truncate([size]) #把文件裁成规定的大小,默认的是裁到当前文件操作标记的位置。如果size比文件的大小还要大,依据系统的不同可能是不改变文件,也可能是用0把文件补到相应的大小,也可能是以一些随机的内容加上去。
目录操作:
os.mkdir("file") 创建目录
复制文件:
shutil.copyfile("oldfile","newfile") oldfile和newfile都只能是文件
shutil.copy("oldfile","newfile") oldfile只能是文件夹,newfile可以是文件,也可以是目标目录
复制文件夹:
shutil.copytree("olddir","newdir") olddir和newdir都只能是目录,且newdir必须不存在
重命名文件(目录)
os.rename("oldname","newname") 文件或目录都是使用这条命令
移动文件(目录)
shutil.move("oldpos","newpos")
删除文件
os.remove("file")
删除目录
os.rmdir("dir")只能删除空目录
shutil.rmtree("dir") 空目录、有内容的目录都可以删
转换目录
os.chdir("path") 换路径
相关例子
1 将文件夹下所有图片名称加上'_fc'
python代码:
# -*- coding:utf-8 -*-
import re
import os
import time
#str.split(string)分割字符串
#'连接符'.join(list) 将列表组成字符串
def change_name(path):
global i
if not os.path.isdir(path) and not os.path.isfile(path):
return False
if os.path.isfile(path):
file_path = os.path.split(path) #分割出目录与文件
lists = file_path[1].split('.') #分割出文件与文件扩展名
file_ext = lists[-1] #取出后缀名(列表切片操作)
img_ext = ['bmp','jpeg','gif','psd','png','jpg']
if file_ext in img_ext:
os.rename(path,file_path[0]+'/'+lists[0]+'_fc.'+file_ext)
i+=1 #注意这里的i是一个陷阱
#或者
#img_ext = 'bmp|jpeg|gif|psd|png|jpg'
#if file_ext in img_ext:
# print('ok---'+file_ext)
elif os.path.isdir(path):
for x in os.listdir(path):
change_name(os.path.join(path,x)) #os.path.join()在路径处理上很有用
img_dir = 'D:\\xx\\xx\\images'
img_dir = img_dir.replace('\\','/')
start = time.time()
i = 0
change_name(img_dir)
c = time.time() - start
print('程序运行耗时:%0.2f'%(c))
print('总共处理了 %s 张图片'%(i))
输出结果:
程序运行耗时:0.11
总共处理了 109 张图片
Python压缩解压模块
http://python3-cookbook.readthedocs.io/zh_CN/latest/c05/p07_read_write_compressed_datafiles.html
http://blog.csdn.net/luoshengkim/article/details/46647423
http://www.jianshu.com/p/0c7b3365eec0
http://www.cnblogs.com/PandaBamboo/p/3254449.html
http://blog.csdn.net/ekeuy/article/details/18303555
http://m.xf166.com/share/201703/508681.html
http://blog.51cto.com/wangwei007/1045577
http://blog.csdn.net/liyuan_669/article/details/27125287
http://blog.sina.com.cn/s/blog_8db5baf9010138q4.html
https://python.freelycode.com/contribution/detail/568
如果你已经使用计算机一段时间,你可能遇到了.zip扩展名的文件。它们是可以保存许多其他文件,文件夹和子文件夹的压缩内容的特殊文件。这种类型的文件在使用互联网传输文件时非常有用。Python也可以用来压缩或解压文件,你知道吗?
本教程将教你如何在Python中使用zipfile模块,同时提取或压缩单个或多个文件。
压缩单个文件
这很容易,而且只需很少的代码。我们先导入zipfile模块,然后通过指定第二个参数为“w”在写模式下打开ZipFile对象。第一个参数是文件本身的路径。代码如下:

请注意,我的所有代码片段中使用了Windows样式格式指定路径;如果您使用的是Linux或Mac,则需要进行相应的更改。
可以指定不同的压缩方法来压缩文件。在Python 3.3版本中添加了新的BZIP2和LZMA方法,但有一些工具还不支持这两种压缩方法。因此,比较安全的用法是使用DEFLATED方法。你仍然可以尝试这些方法来查看压缩文件大小的差异。
压缩多个文件
这稍微有点复杂,因为你需要遍历所有文件。下面的代码展示了如何压缩指定文件夹下的所有扩展名为pdf的文件:
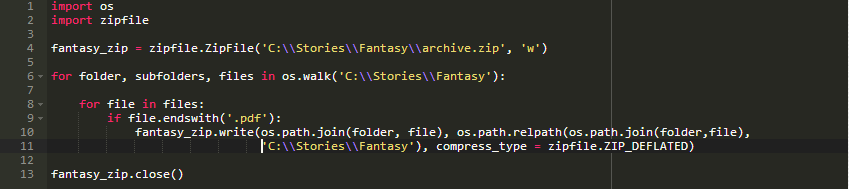
这一次,我们导入了os模块,并使用它的walk()方法来遍历所有文件和子文件夹,并且只压缩pdf文件。你可以使用if语句为每种格式创建不同的归档文件。
如果不想保留目录结构,可以使用以下行将所有文件放在一起:

write()方法接受三个参数:第一个参数是我们要压缩的文件的名称;第二个参数是可选的,可以为压缩文件指定不同的文件名;如果未指定任何内容,则使用默认名称。
提取所有文件
你可以使用extractall()方法将所有文件和文件夹从zip文件解压缩到当前目录。你还可以将文件夹名称传递给extractall(),以解压缩特定目录中的所有文件和文件夹。如果文件夹不存在,此方法将会自动创建。代码如下:

如果想提取其中的多个文件,需要提供包含文件名称的列表。
提取单个文件
和提取多个文件相似。区别是,这次你需要指定文件名和解压目录;需要使用extract()方法,而不是extractall()。下面是一个提取单个文件的代码片段:

读取Zip文件
考虑以下场景:你需要查看zip存档是否包含特定文件。到目前为止,你唯一的选择是通过解压所有文件。同样,你也可能只提取大于特定大小的文件。其实zipfile模块允许我们查询存档的内容,而不必提取它。
使用ZipFile对象的namelist()方法将按名称返回归档的所有成员的列表。要获取档案中特定文件的信息,可以使用ZipFile对象的getinfo()方法。这将允许您访问特定文件的信息,例如文件的压缩前后的大小或其上次修改时间。
当有很多文件需要处理时,对所有文件逐个调用getinfo()方法可能是一个令人讨厌的过程。在这种情况下,可以使用infolist()方法返回包含归档中每个成员的ZipInfo对象的列表。列表中这些对象的顺序与实际zip文件的顺序相同。
您还可以使用read(file)方法从归档中直接读取特定文件的内容,其中file是要读取的文件的名称。为此,必须以读取或追加模式打开归档。
要从归档中获取单个文件的压缩大小,可以使用compress_size属性。同样,要知道未压缩的大小,可以使用file_size属性。
以下代码使用刚才讨论的属性和方法来提取大小低于1MB的文件。

要知道归档中特定文件最后修改的时间和日期,可以使用date_time属性。这将返回一个包含六个值的元组,分别对应年、月、日、日、时、分、秒。年份总是大于或等于1980,时、分、秒是从零计算的。

有关原始文件大小和压缩文件大小的信息可以帮助您决定是否值得压缩文件。我相信它可以用于其他一些场景。
最后的想法
从本教程中能看到,使用zipfile模块来压缩文件有很大的灵活性。可以根据类型、名称或大小将目录中的不同文件压缩到不同的归档。你还可以决定是否要保留目录结构。同样,在提取文件时,您可以根据自己的标准,如大小等,将它们提取到所需的位置。
实际上,通过编写我自己的代码来压缩和提取文件也是非常令人兴奋的。我希望你喜欢的教程,如果你有任何问题,请让我知道的意见。
英文原文:https://code.tutsplus.com/tutorials/compressing-and-extracting-files-in-python--cms-26816
Python列表合并
https://taizilongxu.gitbooks.io/stackoverflow-about-python/content/65/README.html
http://www.cnblogs.com/NewZi/p/a-pythonic-method-to-merge-list.html
http://tool.oschina.net/uploads/apidocs/python2.7.3/library/stdtypes.html#mutable-sequence-types
https://zhidao.baidu.com/question/328728387.html1
2
3
4
5
6
7
8
9
10
11
12
13
14
15
16
17
18
19
20
21
22>>> a = [1, 2, 3, 4, 5]
>>> b = [6, 7, 8, 9, 0]
>>> c = a + b
>>> c
[1, 2, 3, 4, 5, 6, 7, 8, 9, 0]
>>>
>>> a[len(a):len(a)] = b
>>> a
[1, 2, 3, 4, 5, 6, 7, 8, 9, 0]
>>> b
[6, 7, 8, 9, 0]
>>>
>>> a
[1, 2, 3, 4, 5, 6, 7, 8, 9, 0]
>>> b
[6, 7, 8, 9, 0]
>>> a[2:2]
[]
>>> a[2:3]
[3]
>>> a[0:1]
[1]
Python随机字符串
https://taizilongxu.gitbooks.io/stackoverflow-about-python/content/63/README.html
https://gist.github.com/hxer/9f03c978ad1fe8ccde26
https://steemit.com/cn-programming/@oflyhigh/python
http://blog.csdn.net/heybob/article/details/453412411
2
3
4
5
6
7
8
9
10
11
12
13
14
15
16
17
18
19
20
21
22
23
24
25
26
27
28
29
30
31
32
33
34
35
36
37
38
39
40
41
42
43
44
45
46
47
48
49
50
51
52
53
54
55
56
57
58
59
60
61
62
63
64
65
66
67
68
69
70
71
72
73
74
75
76
77
78
79
80
81
82
83
84
85
86
87
88
89
90
91
92
93
94
95
96
97
98
99
100
101
102
103
104
105
106
107
108
109
110
111
112
113# 生成字母列表
https://zh.wikipedia.org/wiki/ASCII
[chr(i) for i in range(97,123)]
[chr(i) for i in range(33,126)]
# 将n修改为字符串长度
import os
print((''.join(map(lambda xx:(hex(ord(xx))[2:]),os.urandom(n))))[0:16])
>>> print((''.join(map(lambda xx:(hex(ord(xx))[2:]),os.urandom(16))))[0:16])
d057995f3a83db1d
>>> print((''.join(map(lambda xx:(hex(ord(xx))[2:]),os.urandom(16))))[0:16])
499cdae9842d8cca
import random
import string
print(''.join(random.choice(string.ascii_uppercase + string.digits) for _ in range(N)))
>>> print(''.join(random.choice(string.ascii_uppercase + string.digits) for _ in range(16)))
MMIF4UEK4FGPHT2R
>>> print(''.join(random.choice(string.ascii_uppercase + string.digits) for _ in range(16)))
24EO93YC3CHD5TL3
# 随机所有可显示字符
>>> print(''.join(random.choice([chr(i) for i in range(33,126)]) for _ in range(16)))
52k<gDs9WJW-C5J1
>>> print(''.join(random.choice([chr(i) for i in range(33,126)]) for _ in range(16)))
\vGsX*dq=NZ'RklM
https://www.v2ex.com/t/394944
感谢楼下提出的method 3使用的random.choices()函数。 写了一段代码来测试速度,生成一个100W长的随机字符串,最后发现速度method 3>method 1>method 2。
import time, random, string
time_s_1 = time.time()
s1=''.join(random.choice(string.ascii_letters + string.digits) for _ in range(10**7))
time_e_1 = time.time()
print('method 1:', str(time_e_1 - time_s_1))
s2=''
time_s_2 = time.time()
for _ in range(10**7):
s2 += random.choice(string.ascii_letters + string.digits)
time_e_2 = time.time()
print('method 2:', str(time_e_2 - time_s_2))
time_s_3 = time.time()
s3=''.join(random.choices(string.ascii_letters + string.digits, k=10**7))
time_e_3 = time.time()
print('method 3:', str(time_e_3 - time_s_3))
# output
# method 1: 12.540435075759888
# method 2: 14.365357160568237
# method 3: 3.15765118598938
最后测试是用系统内置函数random.choices速度最快,学习了。
可以对比一下 choice 和 choices 的源码
https://hg.python.org/cpython/file/tip/Lib/random.py#l252
https://hg.python.org/cpython/file/tip/Lib/random.py#l340
choice 是生成一个随机的整数索引
choices 是把分布比重(默认等比重)转换成 0-1 的数轴,然后 random()生成 0-1 小数,对应到数轴上
大家底层都是用的 random(),choices 更复杂,理应更慢才对
使用 cProfile 测试
>>> cProfile.run('"".join(random.choice(string.ascii_letters + string.digits) for _ in range(10**7))')
60321941 function calls in 21.869 seconds
Ordered by: standard name
ncalls tottime percall cumtime percall filename:lineno(function)
10000001 5.516 0.000 20.772 0.000 <string>:1(<genexpr>)
1 0.000 0.000 21.869 21.869 <string>:1(<module>)
10000000 6.283 0.000 8.918 0.000 random.py:222(_randbelow)
10000000 5.381 0.000 15.256 0.000 random.py:252(choice)
1 0.000 0.000 21.869 21.869 {built-in method builtins.exec}
10000000 0.956 0.000 0.956 0.000 {built-in method builtins.len}
10000000 0.785 0.000 0.785 0.000 {method 'bit_length' of 'int' objects}
1 0.000 0.000 0.000 0.000 {method 'disable' of '_lsprof.Profiler' objects}
10321936 1.851 0.000 1.851 0.000 {method 'getrandbits' of '_random.Random' objects}
1 1.097 1.097 21.869 21.869 {method 'join' of 'str' objects}
>>> cProfile.run('"".join(random.choices(string.ascii_letters + string.digits, k=10**7))')
10000007 function calls in 3.463 seconds
Ordered by: standard name
ncalls tottime percall cumtime percall filename:lineno(function)
1 0.014 0.014 3.463 3.463 <string>:1(<module>)
1 0.000 0.000 3.374 3.374 random.py:340(choices)
1 2.780 2.780 3.374 3.374 random.py:352(<listcomp>)
1 0.000 0.000 3.463 3.463 {built-in method builtins.exec}
1 0.000 0.000 0.000 0.000 {built-in method builtins.len}
1 0.000 0.000 0.000 0.000 {method 'disable' of '_lsprof.Profiler' objects}
1 0.075 0.075 0.075 0.075 {method 'join' of 'str' objects}
10000000 0.594 0.000 0.594 0.000 {method 'random' of '_random.Random' objects}
可以看到:
1. choice 法到底层用的是 getrandbits
# Only call self.getrandbits if the original random() builtin method
# has not been overridden or if a new getrandbits() was supplied.
说明 getrandbits 应该是比 random 更快的,否则官方不会这么用
2. choice 法的 function calls 是 choices 法的 6 倍,而正好时间也是将近 6 倍,很可能这两者是有关联的
3.看 tottime,choices 的时间主要是在 random.py:352
return [population[_int(random() * total)] for i in range(k)]
这里构建 list 消耗大可以理解
choice 的时间主要是在<string>:1,random.py:222,random.py:252 上
choice 一个 5 行的函数,吃这么多时间,很难理解
Python字符串操作
http://blog.csdn.net/ataraxia2010/article/details/6907907
http://www.cnpythoner.com/wiki/string.html
http://www.cnblogs.com/zhongbin/p/3273048.html1
2
3
4
5
6
7
8
9
10
11
12
13
14
15
16
17
18
19
20
21
22
23
24
25
26
27
28
29
30
31
32
33
34
35
36
37
38
39
40
41
42
43
44
45
46
47
48
49
50
51
52
53
54
55
56
57
58
59
60
61
62
63
64
65
66
67
68
69
70
71
72
73
74
75
76
77
78
79
80
81
82
83
84
85
86
87
88
89
90
91
92
93
94
95
96
97
98
99
100
101
102
103
104
105
106
107
108
109
110
111
112
113
114
115
116
117
118
119
120
121
122
123
124
125
126
127
128
129
130
131
132
133
134
135
136
137
138
139
140
141
142
143
144
145
146
147
148
149
150
151
152
153
154
155
156
157
158
159
160
161
162
163
164
165
166
167
168
169
170
171
172
173
174
175
176
177
178
179
180
181
182
183
184
185
186
187
188
189
190
191
192
193
194
195
196
197
198
199
200
201
202
203
204
205
206
207
208
209
210
211
212
213
214
215
216
217
218
219
220
221
222
223
224
225
226
227
228
229
230
231
232
233
234
235
236
237
238
239
240
241
242
243
244
245
246
247
248
249
250
251
252
253
254
255
256
257
258
259
260
261
262
263
264
265
266
267
268
269
270
271
272
273
274
275
276
277
278
279
280
281
282
283
284
285
286
287
288
289
290
291
292
293
294
295
296
297
298
299
300
301
302
303
304
305
306
307
308
309
310
311
312
313
314
315
316
317
318
319
320
321
322
323
324
325
326
327
328
329
330
331
332
333
334
335
336
337
338
339
340
341
342
343
344
345
346
347
348
349
350
351
352
353
354
355
356
357
358
359
360
361
362
363
364
365
366
367
368
369
370
371
372
373
374
375
376
377
378
379
380
381
382
383
384
385
386
387
388
389
390
391
392
393
394
395
396
397
398
399
400
401
402
403
404
405
406
407
408
409
410
411
412
413
414
415
416
417
418
419
420
421
422
423
424
425
426
427
428
429
430
431
432
433
434
435
436
437
438
439
440
441
442
443
444
445
446
447
448
449
450
451
452
453
454
455
456
457
458
459
460
461
462
463
464
465
466
467
468
469
470
471
472
473
474
475
476
477
478
479
480
481
482
483
484
485
486
487python实现的字符串操作
1.复制字符串
#strcpy(sStr1,sStr2)
sStr1 = 'strcpy'
sStr2 = sStr1
sStr1 = 'strcpy2'
print sStr2
2.连接字符串
#strcat(sStr1,sStr2)
sStr1 = 'strcat'
sStr2 = 'append'
sStr1 += sStr2
print sStr1
3.查找字符
#strchr(sStr1,sStr2)
sStr1 = 'strchr'
sStr2 = 'r'
nPos = sStr1.index(sStr2)
print nPos
4.比较字符串
#strcmp(sStr1,sStr2)
sStr1 = 'strchr'
sStr2 = 'strch'
print cmp(sStr1,sStr2)
5.扫描字符串是否包含指定的字符
#strspn(sStr1,sStr2)
sStr1 = '12345678'
sStr2 = '456'
#sStr1 and chars both in sStr1 and sStr2
print len(sStr1 and sStr2)
6.字符串长度
#strlen(sStr1)
sStr1 = 'strlen'
print len(sStr1)
7.将字符串中的小写字符转换为大写字符
#strlwr(sStr1)
sStr1 = 'JCstrlwr'
sStr1 = sStr1.upper()
print sStr1
8.追加指定长度的字符串
#strncat(sStr1,sStr2,n)
sStr1 = '12345'
sStr2 = 'abcdef'
n = 3
sStr1 += sStr2[0:n]
print sStr1
9.字符串指定长度比较
#strncmp(sStr1,sStr2,n)
sStr1 = '12345'
sStr2 = '123bc'
n = 3
print cmp(sStr1[0:n],sStr2[0:n])
10.复制指定长度的字符
#strncpy(sStr1,sStr2,n)
sStr1 = ''
sStr2 = '12345'
n = 3
sStr1 = sStr2[0:n]
print sStr1
11.字符串比较,不区分大小写
#stricmp(sStr1,sStr2)
sStr1 = 'abcefg'
sStr2 = 'ABCEFG'
print cmp(sStr1.upper(),sStr2.upper())
12.将字符串前n个字符替换为指定的字符
#strnset(sStr1,ch,n)
sStr1 = '12345'
ch = 'r'
n = 3
sStr1 = n * ch + sStr1[3:]
print sStr1
13.扫描字符串
#strpbrk(sStr1,sStr2)
sStr1 = 'cekjgdklab'
sStr2 = 'gka'
nPos = -1
for c in sStr1:
if c in sStr2:
nPos = sStr1.index(c)
break
print nPos
14.翻转字符串
#strrev(sStr1)
sStr1 = 'abcdefg'
sStr1 = sStr1[::-1]
print sStr1
15.查找字符串
python strstr
#strstr(sStr1,sStr2)
sStr1 = 'abcdefg'
sStr2 = 'cde'
print sStr1.find(sStr2)
16.分割字符串
#strtok(sStr1,sStr2)
sStr1 = 'ab,cde,fgh,ijk'
sStr2 = ','
sStr1 = sStr1[sStr1.find(sStr2) + 1:]
print sStr1
http://blog.csdn.net/ataraxia2010/article/details/6907907
s.strip() .lstrip() .rstrip(',') 去空格及特殊符号
复制字符串
Python
1 #strcpy(sStr1,sStr2)
2 sStr1 = 'strcpy'
3 sStr2 = sStr1
4 sStr1 = 'strcpy2'
5 print sStr2
连接字符串
Python
1 #strcat(sStr1,sStr2)
2 sStr1 = 'strcat'
3 sStr2 = 'append'
4 sStr1 += sStr2
5 print sStr1
查找字符
< 0 未找到
Python
1 #strchr(sStr1,sStr2)
2 sStr1 = 'strchr'
3 sStr2 = 's'
4 nPos = sStr1.index(sStr2)
5 print nPos
比较字符串
Python
1 #strcmp(sStr1,sStr2)
2 sStr1 = 'strchr'
3 sStr2 = 'strch'
4 print cmp(sStr1,sStr2)
扫描字符串是否包含指定的字符
Python
1 #strspn(sStr1,sStr2)
2 sStr1 = '12345678'
3 sStr2 = '456'
4 #sStr1 and chars both in sStr1 and sStr2
5 print len(sStr1 and sStr2)
字符串长度
Python
1 #strlen(sStr1)
2 sStr1 = 'strlen'
3 print len(sStr1)
将字符串中的大小写转换
Python
1 #strlwr(sStr1)
2 sStr1 = 'JCstrlwr'
3 sStr1 = sStr1.upper()
4 #sStr1 = sStr1.lower()
5 print sStr1
追加指定长度的字符串
Python
1 #strncat(sStr1,sStr2,n)
2 sStr1 = '12345'
3 sStr2 = 'abcdef'
4 n = 3
5 sStr1 += sStr2[0:n]
6 print sStr1
字符串指定长度比较
Python
1 #strncmp(sStr1,sStr2,n)
2 sStr1 = '12345'
3 sStr2 = '123bc'
4 n = 3
5 print cmp(sStr1[0:n],sStr2[0:n])
复制指定长度的字符
Python
1 #strncpy(sStr1,sStr2,n)
2 sStr1 = ''
3 sStr2 = '12345'
4 n = 3
5 sStr1 = sStr2[0:n]
6 print sStr1
将字符串前n个字符替换为指定的字符
Python
1 #strnset(sStr1,ch,n)
2 sStr1 = '12345'
3 ch = 'r'
4 n = 3
5 sStr1 = n * ch + sStr1[3:]
6 print sStr1
扫描字符串
Python
1 #strpbrk(sStr1,sStr2)
2 sStr1 = 'cekjgdklab'
3 sStr2 = 'gka'
4 nPos = -1
5 for c in sStr1:
6 if c in sStr2:
7 nPos = sStr1.index(c)
8 break
9 print nPos
翻转字符串
Python
1 #strrev(sStr1)
2 sStr1 = 'abcdefg'
3 sStr1 = sStr1[::-1]
4 print sStr1
查找字符串
Python
1 #strstr(sStr1,sStr2)
2 sStr1 = 'abcdefg'
3 sStr2 = 'cde'
4 print sStr1.find(sStr2)
分割字符串
Python
1 #strtok(sStr1,sStr2)
2 sStr1 = 'ab,cde,fgh,ijk'
3 sStr2 = ','
4 sStr1 = sStr1[sStr1.find(sStr2) + 1:]
5 print sStr1
6 或者
7 s = 'ab,cde,fgh,ijk'
8 print(s.split(','))
连接字符串
Python
1 delimiter = ','
2 mylist = ['Brazil', 'Russia', 'India', 'China']
3 print delimiter.join(mylist)
PHP 中 addslashes 的实现
Python
1 def addslashes(s):
2 d = {'"':'\\"', "'":"\\'", "\0":"\\\0", "\\":"\\\\"}
3 return ''.join(d.get(c, c) for c in s)
4
5 s = "John 'Johny' Doe (a.k.a. \"Super Joe\")\\\0"
6 print s
7 print addslashes(s)
只显示字母与数字
Python
1 def OnlyCharNum(s,oth=''):
2 s2 = s.lower();
3 fomart = 'abcdefghijklmnopqrstuvwxyz0123456789'
4 for c in s2:
5 if not c in fomart:
6 s = s.replace(c,'');
7 return s;
8
9 print(OnlyStr("a000 aa-b"))
http://www.cnpythoner.com/wiki/string.html
字符串连接
方法1: 用字符串的join方法
a = ['a','b','c','d']
content = ''
content = ''.join(a)
print content
方法2: 用字符串的替换占位符替换
a = ['a','b','c','d']
content = ''
content = '%s%s%s%s' % tuple(a)
print content
想要了解更多,请看python字符串连接
字符串截取
我们可以通过索引来提取想要获取的字符,可以把python的字符串也做为字符串的列表就更好理解
python的字串列表有2种取值顺序
1是从左到右索引默认0开始的,最大范围是字符串长度少1
s = 'ilovepython'
s[0]的结果是i
2是从右到左索引默认-1开始的,最大范围是字符串开头
s = 'ilovepython'
s[-1]的结果是n
上面这个是取得一个字符,如果你的实际要取得一段子串的话,可以用到变量[头下标:尾下标],就可以截取相应的字符串,其中下标是从0开始算起,可以是正数或负数,下标可以为空表示取到头或尾。
比如
s = 'ilovepython'
s[1:5]的结果是love
当使用以冒号分隔的字符串,python返回一个新的对象,结果包含了以这对偏移标识的连续的内容,左边的开始是包含了下边界,比如
上面的结果包含了s[1]的值l,而取到的最大范围不包括上边界,就是s[5]的值p
想要了解更多,请看python字符串截取
字符串替换
字符串替换可以用内置的方法和正则表达式完成。
1用字符串本身的replace方法:
a = 'hello word'
b = a.replace('word','python')
print b
2用正则表达式来完成替换:
import re
a = 'hello word'
strinfo = re.compile('word')
b = strinfo.sub('python',a)
print b
想要了解更多,请看python 字符串替换
字符串比较
cmp方法比较两个对象,并根据结果返回一个整数。cmp(x,y)如果X< Y,返回值是负数 如果X>Y 返回的值为正数。
sStr1 = 'strch'
sStr2 = 'strchr'
print cmp(sStr1,sStr2)##-1
字符串相加
我们通过操作符号+来进行字符串的相加,不过建议还是用其他的方式来进行字符串的拼接,这样效率高点。
原因:在循环连接字符串的时候,他每次连接一次,就要重新开辟空间,然后把字符串连接起来,再放入新的空间,再一次循环,又要开辟新的空间,把字符串连接起来放入新的空间,如此反复,内存操作比较频繁,每次都要计算内存空间,然后开辟内存空间,再释放内存空间,效率非常低。
sStr1 = 'strch'
sStr2 = 'strchr'
newstr = sStr1 + sStr2
print newstr
字符串查找
python 字符串查找有4个方法,1 find,2 index方法,3 rfind方法,4 rindex方法。
1 find()方法:
info = 'abca'
print info.find('a')##从下标0开始,查找在字符串里第一个出现的子串,返回结果:0
info = 'abca'
print info.find('a',1)##从下标1开始,查找在字符串里第一个出现的子串:返回结果3
info = 'abca'
print info.find('333')##返回-1,查找不到返回-1
2 index()方法:
python 的index方法是在字符串里查找子串第一次出现的位置,类似字符串的find方法,不过比find方法更好的是,如果查找不到子串,会抛出异常,而不是返回-1
info = 'abca'
print info.index('a')
print info.index('33')
字符串分割
字符串分割,可以用split,rsplit方法,通过相应的规则来切割成生成列表对象
info = 'name:haha,age:20$name:python,age:30$name:fef,age:55'
content = info.split('$')
print content
字符串翻转
通过步进反转[::-1]
a = 'abcd'
b = a[::-1]##[::-1]通过步进反转
print b
字符串编码
通过字符串的decode和encode方法
1 encode([encoding,[errors]])
#其中encoding可以有多种值,比如gb2312 gbk gb18030 bz2 zlib big5 bzse64等都支持。errors默认值为"strict",意思是UnicodeError。可能的值还有'ignore', 'replace', 'xmlcharrefreplace', 'backslashreplace' 和所有的通过codecs.register_error注册的值。
S.decode([encoding,[errors]]) 下面是字符串编码应用:
a = '你好'
b = 'python'
print a.decode('utf-8').encode('gbk')##decode方法把字符串转换为unicode对象,然后通过encode方法转换为指定的编码字符串对象
print b.decode('utf-8')##decode方法把字符串转换为unicode对象
字符串追加和拼接
通过字符串的占位符来进行字符串的拼接
#1 元组拼接
m = 'python'
astr = 'i love %s' % m
print astr
#2 字符串的format方法
m = 'python'
astr = "i love {python}".format(python=m)
print astr
#3 字典格式化字符串
m = 'python'
astr = "i love %(python)s " % {'python':m}
print astr
字符串复制
通过变量来进行赋值
fstr = 'strcpy'
sstr = fstr
fstr = 'strcpy2'
print sstr
字符串长度
通过内置方法len()来计算字符串的长度,注意这个计算的是字符的长度。
aa = 'afebb'
bb = '你'
print len(aa)
print len(bb)
字符串大小写
通过下面的upper(),lower()等方法来转换大小写
S.upper()#S中的字母大写
S.lower() #S中的字母小写
S.capitalize() #首字母大写
S.istitle() #S是否是首字母大写的
S.isupper() #S中的字母是否便是大写
S.islower() #S中的字母是否全是小写
字符串去空格
通过strip(),lstrip(),rstrip()方法去除字符串的空格
S.strip()去掉字符串的左右空格
S.lstrip()去掉字符串的左边空格
S.rstrip()去掉字符串的右边空格
字符串其他方法
字符串相关的其他方法:count(),join()方法等。
S.center(width, [fillchar]) #中间对齐
S.count(substr, [start, [end]]) #计算substr在S中出现的次数
S.expandtabs([tabsize]) #把S中的tab字符替换没空格,每个tab替换为tabsize个空格,默认是8个
S.isalnum() #是否全是字母和数字,并至少有一个字符
S.isalpha() #是否全是字母,并至少有一个字符
S.isspace() #是否全是空白字符,并至少有一个字符
S.join()#S中的join,把列表生成一个字符串对象
S.ljust(width,[fillchar]) #输出width个字符,S左对齐,不足部分用fillchar填充,默认的为空格。
S.rjust(width,[fillchar]) #右对齐
S.splitlines([keepends]) #把S按照行分割符分为一个list,keepends是一个bool值,如果为真每行后而会保留行分割符。
S.swapcase() #大小写互换
python3中替换python2中cmp函数的新函数分析(lt、le、eq、ne、ge、gt)
http://blog.csdn.net/sushengmiyan/article/details/113325891
2
3
4
5
6
7
8
9
10
11
12
13
14
15
16
17
18
19
20
21
22
23
24
25
26
27
28
29
30
31
32
33
34
35
36
37
38
39
40
41
42
43
44在python2中我们经常会使用cmp函数来比较一些东西,但是在python3中,你再来使用这个函数的时候,发现就报错了,提示找不到这个函数,这是为啥呢?嗯,新版的python已经舍弃之。
在python3中使用时报错信息如下:
[python] view plain copy
Syntax Error: if cmp(os.getcwd(), os.path.dirname(os.sys.argv[0])) <> 0:: Test.py, line 34055
提示找不到cmp函数了,那么在python3中该如何使用这个函数呢?
看python的帮助文档,在oprater这个模块中有了这么几个函数
[python] view plain copy
operator.lt(a, b)
operator.le(a, b)
operator.eq(a, b)
operator.ne(a, b)
operator.ge(a, b)
operator.gt(a, b)
operator.__lt__(a, b)
operator.__le__(a, b)
operator.__eq__(a, b)
operator.__ne__(a, b)
operator.__ge__(a, b)
operator.__gt__(a, b)
这几个函数就是用来替换之前的cmp的,之前使用cmp的同胞们,咱们以后就换上面这些函数咯。
先简单说下这几个函数的意思吧。
lt(a, b) 相当于 a < b
le(a,b) 相当于 a <= b
eq(a,b) 相当于 a == b
ne(a,b) 相当于 a != b
gt(a,b) 相当于 a > b
ge(a, b)相当于 a>= b
函数的返回值不是布尔哦。这点需要注意,还是跟cmp一样返回的是数值哦。
Python字符串比较
https://www.liurongxing.com/python-is-cmp-compare-operator.html
http://www.pythonclub.org/python-basic/string-compare1
2
3
4
5
6
7
8
9
10
11
12
13
14
15
16
17
18
19
20
21
22
23
24
25python中的is、==和cmp()比较字符串
python is 主要是判断 2 个变量是否引用的是同一个对象,如果是的话,则返回 true,否则返回 false。
== 用来判断两个对象的值是否相等
cmp() 函数则是相当于 <, ==, > 但是在 Python3 中,cmp() 函数被移除了,所以我以后还是避免少用这个函数。
简单比较是用内置函数 cmp() 来比较两个字符串
Python字符串比较忽略大小写
正则表达式,使用IGNORECASE标志
>
>>> import re
>>> m = re.search('multi', 'A mUltiCased string', re.IGNORECASE)
>>> bool(m)
True
在比较前把2个字符串转换成同样大写
在比较前把2个字符串转换成同样大写,用upper()方法,或小写,lower()
>>> s = 'A mUltiCased string'.lower()
>>> s
'a multicased string'
>>> s.find('multi')
2
利用Python在一个文件的头部插入数据
http://blog.csdn.net/junbujianwpl/article/details/73194846
https://www.zhihu.com/question/509863751
2
3
4
5
6
7
8
9
10
11
12
13
14
15
16
17
18
19
20
21
22
23
24
25
26
27
28
29
30
31
32
33
34
35
36
37
38
39
40
41
42
43
44
45
46
47
48
49
50
51
52
53
54
55
56
57
58
59
60
61
62
63
64
65
66
67
68
69
70
71
72
73
74
75
76
77
78
79在一个文件的末尾追加数据是很常用的。在使用过程中应该都比较熟悉不会出现什么错误。但是往一个文件头部插入数据可能或多或少会碰到一些问题。
看似正确的错误代码
很多代码看似正确,但是其实都是错的。一起来看下这些代码
1、看似正确的错误代码1
with open(path, "r+") as f:
f.seek(0)
f.write(data)
确实是从头写了,而且有些原有数据确实在,但是数据有问题。。。。
因为”r+”方式写文件操作没有插入的语义,只有写文件的含义,原来位置如果有数据,不会后移的,是覆盖掉了。。。。所以,你可能会看到一些老的数据。不仔细辨别可能就天真地以为成功了。。。
2、看似正确的错误代码2
with open(path, "w+") as f:
old = f.read()
f.seek(0)
f.write(data)
f.write(old)
你读取到的数据永远为空。。。。
因为”w+”的含义就是截取长度为0然后写入文件。
3、看似正确的错误代码3
with open(path, "a+") as f:
old = f.read()
#f.truncate(0) #取消掉注释成正确代码
f.seek(0)
f.write(data)
写入的数据永远出现在文件末尾。。。。。
要打破魔咒的话要先将文件截断成0字节。。。。
snack:想要”a+”的效果变”r+”,在读之前先seek(0),在写之前要truncate一下,确保要写入的位置是文件的末尾。
4. 正确的代码
with open(path, "r+") as f:
old = f.read()
f.seek(0)
f.write(data)
f.write(old)
原理思路:读出原有文件内容,移动索引到开始,写入新的数据,然后写入旧的数据。
以下方法皆可用
file_name = 'a.txt'
with open(file_name, 'r') as f:
lines = f.readlines()
with open(file_name, 'w') as n:
n.write('something new')
n.writelines(lines)
with open ('filename', 'r') as original:
data = original.read ()
with open ('filename', 'w') as modified:
modified.write ("new first line\n" + data )
def check_and_change_path_file():
if os.path.exists(WVT_PATH_FILE) and os.path.isfile(WVT_PATH_FILE):
with open(WVT_PATH_FILE, 'r+') as file_fd:
file_line = file_fd.readline().strip()
if file_line != WVT_PATH_FILE_COMMENT_STR:
file_fd.seek(0, 0)
origin_data = file_fd.read()
file_fd.seek(0, 0)
file_fd.writelines([WVT_PATH_FILE_COMMENT_STR, '\n', WVT_PATH_FILE_PATH_STR, '\n\n'])
file_fd.write(origin_data)
Python文件读写
http://blog.csdn.net/XXKKFF/article/details/4421971
http://blog.csdn.net/ztf312/article/details/472598051
2
3
4
5
6
7
8
9
10
11
12
13
14
15
16
17
18
19
20
21
22
23
24
25
26
27
28
29
30
31
32
33
34
35
36
37
38
39
40
41
42
43
44
45
46
47
48
49
50
51
52
53
54
55
56r 以只读模式打开文件
w 以只写模式打开文件,且先把文件内容清空(truncate the file first)
a 以添加模式打开文件,写文件的时候总是写到文件末尾,用seek也无用。打开的文件也是不能读的
r+ 以读写方式打开文件,文件可读可写,可写到文件的任何位置
w+ 和r+不同的是,它会truncate the file first
a+ 和r+不同的是,它只能写到文件末尾
r只读,r+读写,不创建
w新建只写,w+新建读写,二者都会将文件内容清零
(以w方式打开,不能读出。w+可读写)
w+与r+区别:
r+:可读可写,若文件不存在,报错;w+: 可读可写,若文件不存在,创建
file.read([size])
Read at most size bytes from the file (less if the read hits EOF before obtaining size bytes). If the size argument is negative or omitted, read all data until EOF is reached. The bytes are returned as a string object. An empty string is returned when EOF is encountered immediately. (For certain files, like ttys, it makes sense to continue reading after an EOF is hit.) Note that this method may call the underlying C function fread() more than once in an effort to acquire as close to size bytes as possible. Also note that when in non-blocking mode, less data than was requested may be returned, even if no size parameter was given.
Note
This function is simply a wrapper for the underlying fread() C function, and will behave the same in corner cases, such as whether the EOF value is cached.
file.readline([size])
Read one entire line from the file. A trailing newline character is kept in the string (but may be absent when a file ends with an incomplete line). [5] If the size argument is present and non-negative, it is a maximum byte count (including the trailing newline) and an incomplete line may be returned. An empty string is returned only when EOF is encountered immediately.
Note
Unlike stdio‘s fgets(), the returned string contains null characters ('\0') if they occurred in the input.
file.readlines([sizehint])
Read until EOF using readline() and return a list containing the lines thus read. If the optional sizehint argument is present, instead of reading up to EOF, whole lines totalling approximately sizehint bytes (possibly after rounding up to an internal buffer size) are read. Objects implementing a file-like interface may choose to ignore sizehint if it cannot be implemented, or cannot be implemented efficiently.
file.seek(offset[, whence])
Set the file’s current position, like stdio‘s fseek(). The whence argument is optional and defaults to os.SEEK_SET or 0 (absolute file positioning); other values are os.SEEK_CUR or 1 (seek relative to the current position) and os.SEEK_END or 2 (seek relative to the file’s end). There is no return value.
file.truncate([size])
Truncate the file’s size. If the optional size argument is present, the file is truncated to (at most) that size. The size defaults to the current position. The current file position is not changed. Note that if a specified size exceeds the file’s current size, the result is platform-dependent: possibilities include that the file may remain unchanged, increase to the specified size as if zero-filled, or increase to the specified size with undefined new content. Availability: Windows, many Unix variants.
file.write(str)
Write a string to the file. There is no return value. Due to buffering, the string may not actually show up in the file until the flush() or close() method is called.
file.writelines(sequence)
Write a sequence of strings to the file. The sequence can be any iterable object producing strings, typically a list of strings. There is no return value. (The name is intended to match readlines(); writelines() does not add line separators.)
Files support the iterator protocol. Each iteration returns the same result as file.readline(), and iteration ends when the readline() method returns an empty string.
File objects also offer a number of other interesting attributes. These are not required for file-like objects, but should be implemented if they make sense for the particular object.
file.closed
bool indicating the current state of the file object. This is a read-only attribute; the close() method changes the value. It may not be available on all file-like objects.
Python文件读写时的换行符与回车符
http://blog.csdn.net/mrknight/article/details/97179951
2
3
4
5
6
7
8
9
10
11
12
13
14
15
16
17
18
19
20
21
22
23
24
25
26
27
28
29
30
31
32
33
34
35
36
37
38
39
40
41
42
43
44
45
46
47
48
49
50
51
52
53
54
55
56
57
58
59
60
61
62
63
64
65
66
67
68
69
70
71
72
73
74
75
76
77
78
79
80
81
82
83
84
85
86
87
88
891. 背景知识
ASCII码中的换行符与回车符:
换行符 10 LF '\n'
回车符 13 CR '\r'
在操作系统的历史中,有很多种方法来表示另起一行,但'\n'和'\r'是最常用的方式,目前主流操作系统的行结束符号如下所示:
操作系统 字符组合
UNIX & Mac OS X '\n'
Mac(pre OS X) '\r'
MS Windows '\r\n'
2. 测试程序(python2.7 + win7)
(1) test1: "w"方式写时的'\n'会在被系统自动替换为'\r\n'
[python] view plain copy
# -*- coding: utf-8 -*-
def main():
try:
fout = open("test1.txt", "w")
except IOError:
print "Error: open file failed."
return
for i in range(5):
line = str(i) + "\n"
fout.write(line)
fout.close()
if __name__ == "__main__":
main()
测试结果:
(2) test2: "wb"方式写时的'\n'不会在被系统自动替换为'\r\n'
[python] view plain copy
fout = open("test2.txt", "wb")
测试结果:
(3) test3: "r"方式读时,文件中的'\r\n'会被系统替换为'\n'
另外,python提到的通用新行格式(U修饰符),个人觉得是把"r"默认"rU"的,测试中两种方式读取结果一样。
[python] view plain copy
# -*- coding: utf-8 -*-
def main():
try:
fin = open("test1.txt", "r")
except IOError:
print "Error: open file failed."
return
for line in fin:
for i in range(len(line)):
print "\t%d" % ord(line[i]),
print ""
fin.close()
if __name__ == "__main__":
main()
对于上述不同内容的两个文件输出为:
(4) test4: "rb"方式读时,文件中的'\r\n'不会被系统替换为'\n'
3. 结论
上述问题实际上自己在文件处理中遇到,文件换行中的回车符和换行符挺容易弄混,总结了一下,共大家查阅。
Python的with语句
https://www.ibm.com/developerworks/cn/opensource/os-cn-pythonwith/index.html
http://blog.csdn.net/suwei19870312/article/details/23258495
http://www.jb51.net/article/51045.htm
https://yq.aliyun.com/ziliao/1358891
2
3
4
5
6
7
8
9
10
11
12
13
14
15
16
17
18
19
20
21
22
23
24
25
26
27
28
29
30
31
32
33
34
35
36
37
38
39
40
41
42
43
44
45
46
47
48
49
50
51
52
53
54
55
56
57
58
59
60
61
62
63
64
65
66
67
68
69
70
71
72
73
74
75
76
77
78
79
80
81
82
83
84
85
86
87
88
89
90要使用 with 语句,首先要明白上下文管理器这一概念。有了上下文管理器,with 语句才能工作。
下面是一组与上下文管理器和with 语句有关的概念。
上下文管理协议(Context Management Protocol):包含方法 __enter__() 和 __exit__(),支持
该协议的对象要实现这两个方法。
上下文管理器(Context Manager):支持上下文管理协议的对象,这种对象实现了
__enter__() 和 __exit__() 方法。上下文管理器定义执行 with 语句时要建立的运行时上下文,
负责执行 with 语句块上下文中的进入与退出操作。通常使用 with 语句调用上下文管理器,
也可以通过直接调用其方法来使用。
运行时上下文(runtime context):由上下文管理器创建,通过上下文管理器的 __enter__() 和
__exit__() 方法实现,__enter__() 方法在语句体执行之前进入运行时上下文,__exit__() 在
语句体执行完后从运行时上下文退出。with 语句支持运行时上下文这一概念。
上下文表达式(Context Expression):with 语句中跟在关键字 with 之后的表达式,该表达式
要返回一个上下文管理器对象。
语句体(with-body):with 语句包裹起来的代码块,在执行语句体之前会调用上下文管
理器的 __enter__() 方法,执行完语句体之后会执行 __exit__() 方法。
基本语法和工作原理
with 语句的语法格式如下:
清单 1. with 语句的语法格式
with context_expression [as target(s)]:
with-body
这里 context_expression 要返回一个上下文管理器对象,该对象并不赋值给 as 子句中的 target(s) ,如果指定了 as 子句的话,会将上下文管理器的 __enter__() 方法的返回值赋值给 target(s)。target(s) 可以是单个变量,或者由“()”括起来的元组(不能是仅仅由“,”分隔的变量列表,必须加“()”)。
Python 对一些内建对象进行改进,加入了对上下文管理器的支持,可以用于 with 语句中,比如可以自动关闭文件、线程锁的自动获取和释放等。假设要对一个文件进行操作,使用 with 语句可以有如下代码:
清单 2. 使用 with 语句操作文件对象
with open(r'somefileName') as somefile:
for line in somefile:
print line
# ...more code
这里使用了 with 语句,不管在处理文件过程中是否发生异常,都能保证 with 语句执行完毕后已经关闭了打开的文件句柄。如果使用传统的 try/finally 范式,则要使用类似如下代码:
清单 3. try/finally 方式操作文件对象
somefile = open(r'somefileName')
try:
for line in somefile:
print line
# ...more code
finally:
somefile.close()
比较起来,使用 with 语句可以减少编码量。已经加入对上下文管理协议支持的还有模块 threading、decimal 等。
PEP 0343 对 with 语句的实现进行了描述。with 语句的执行过程类似如下代码块:
清单 4. with 语句执行过程
context_manager = context_expression
exit = type(context_manager).__exit__
value = type(context_manager).__enter__(context_manager)
exc = True # True 表示正常执行,即便有异常也忽略;False 表示重新抛出异常,需要对异常进行处理
try:
try:
target = value # 如果使用了 as 子句
with-body # 执行 with-body
except:
# 执行过程中有异常发生
exc = False
# 如果 __exit__ 返回 True,则异常被忽略;如果返回 False,则重新抛出异常
# 由外层代码对异常进行处理
if not exit(context_manager, *sys.exc_info()):
raise
finally:
# 正常退出,或者通过 statement-body 中的 break/continue/return 语句退出
# 或者忽略异常退出
if exc:
exit(context_manager, None, None, None)
# 缺省返回 None,None 在布尔上下文中看做是 False
执行 context_expression,生成上下文管理器 context_manager
调用上下文管理器的 __enter__() 方法;如果使用了 as 子句,则将 __enter__() 方法的返回值赋值给 as 子句中的 target(s)
执行语句体 with-body
不管是否执行过程中是否发生了异常,执行上下文管理器的 __exit__() 方法,__exit__() 方法负责执行“清理”工作,如释放资源等。如果执行过程中没有出现异常,或者语句体中执行了语句 break/continue/return,则以 None 作为参数调用 __exit__(None, None, None) ;如果执行过程中出现异常,则使用 sys.exc_info 得到的异常信息为参数调用 __exit__(exc_type, exc_value, exc_traceback)
出现异常时,如果 __exit__(type, value, traceback) 返回 False,则会重新抛出异常,让with 之外的语句逻辑来处理异常,这也是通用做法;如果返回 True,则忽略异常,不再对异常进行处理
Python升级模块
1 | pip 当前内建命令并不支持升级所有已安装的Python模块。 |
Python使用第三方源升级模块
1 | pip默认源由于墙,所以速度很慢,可使用第三源提高速度: |
重新导入Python模块
1 | Python提供了reload()方法,它可以重新导入已import的模块。 |
Python查看模块版本
1 | >>> help(tushare) |
Python socket编程
https://gist.github.com/kevinkindom/108ffd675cb9253f8f71
https://gxnotes.com/article/80943.html
https://stackoverflow.com/questions/6439790/sending-a-reset-in-tcp-ip-socket-connection
https://stackoverflow.com/questions/19378809/how-to-stop-a-tcpserver-how-to-remove-time-wait-sockets
https://stackoverflow.com/questions/6380057/python-binding-socket-address-already-in-use
http://hhtucode.blogspot.tw/2013/03/python-simple-socket-server.html
https://brokenbad.com/address-reuse-in-pythons-socketserver/
https://www.tonylin.idv.tw/dokuwiki/doku.php/python:socket:time_wait_issue
https://stackoverflow.com/questions/17659334/connections-outlive-socketserver-tcpserver
https://stackoverflow.com/questions/15260558/python-tcpserver-address-already-in-use-but-i-close-the-server-and-i-use-allow
https://stackoverflow.com/questions/6380057/python-binding-socket-address-already-in-use
https://stackoverflow.com/questions/19378809/how-to-stop-a-tcpserver-how-to-remove-time-wait-sockets
http://hhtucode.blogspot.tw/2013/03/python-simple-socket-server.html
http://wiki.jikexueyuan.com/project/java-socket/socket-tcp-bean.html
协议相关
http://blog.csdn.net/wenqian1991/article/details/40110703
http://www.firefoxbug.com/index.php/archives/2796/
https://serverfault.com/questions/329845/how-to-forcibly-close-a-socket-in-time-wait
http://blog.csdn.net/tianmohust/article/details/7436157
http://blog.csdn.net/xiaofei0859/article/details/6044694
http://blog.csdn.net/overstack/article/details/8833894
https://www.zhihu.com/question/50646354
http://blog.davidvassallo.me/2010/07/13/time_wait-and-port-reuse/
http://www.cnblogs.com/ggzss/archive/2011/09/25/2190404.html
http://www.cnblogs.com/zhenjing/archive/2011/04/20/2021791.html
http://blog.163.com/xychenbaihu@yeah/blog/static/13222965520118139252103/
1 | class ThreadedTCPRequestHandler(socketserver.BaseRequestHandler): |
Python多线程
http://yangcongchufang.com/%E9%AB%98%E7%BA%A7python%E7%BC%96%E7%A8%8B%E5%9F%BA%E7%A1%80/python-process-thread.html
https://tracholar.github.io/wiki/python/python-multiprocessing-tutorial.html
https://morvanzhou.github.io/tutorials/python-basic/multiprocessing/
https://www.ibm.com/developerworks/cn/aix/library/au-multiprocessing/index.html
https://zhuanlan.zhihu.com/p/20953544
http://blackwolfsec.cc/2016/07/22/Python_mutithreading_mutiprocessing/
http://blog.csdn.net/zwan0518/article/details/38434567
http://www.cnblogs.com/whatisfantasy/p/6440585.html
http://python3-cookbook.readthedocs.io/zh_CN/latest/c12/p01_start_stop_thread.html
http://www.runoob.com/python/python-multithreading.html
list和dict的线程安全
https://www.zoulei.net/2016/07/31/list_dict_threading_safe/
Python协程(异步编程)
https://python.freelycode.com/contribution/detail/57
https://python.freelycode.com/contribution/detail/858
https://zhuanlan.zhihu.com/p/27258289
https://ipfans.github.io/2015/08/introduction-to-async-and-await/
http://www.techug.com/post/playing-around.html
https://www.liaoxuefeng.com/wiki/0014316089557264a6b348958f449949df42a6d3a2e542c000/001432090954004980bd351f2cd4cc18c9e6c06d855c498000
https://ipfans.github.io/2016/02/simple-implement-asyncio-to-understand-how-async-works/
http://www.woola.net/detail/2016-10-18-python-coprocessor.html
http://python.jobbole.com/88427/
https://github.com/ictar/python-doc/blob/master/Python%20Common/Python%20async-await%E6%95%99%E7%A8%8B.md
http://www.jianshu.com/p/b5e347b3a17c
https://www.ziwenxie.site/2016/12/19/python-asyncio/
http://python.jobbole.com/87310/
Python subprocess超时问题解决集锦
http://www.jianshu.com/p/a58491d1abf8
http://everettjf.com/2016/01/29/python27-subprocess-timeout/
https://stackoverflow.com/questions/1191374/using-module-subprocess-with-timeout
https://stackoverflow.com/questions/4789837/how-to-terminate-a-python-subprocess-launched-with-shell-true
https://stackoverflow.com/questions/16866602/kill-a-running-subprocess-call
https://stackoverflow.com/questions/4084322/killing-a-process-created-with-pythons-subprocess-popen
http://python.usyiyi.cn/translate/python_278/library/subprocess.html#module-subprocess
http://usyiyi.cn/documents/python_278/library/subprocess.html
http://blog.csdn.net/xhw88398569/article/details/48022967
http://blog.csdn.net/imzoer/article/details/8678029
http://www.firefoxbug.com/index.php/archives/1690/
http://python3-cookbook.readthedocs.io/zh_CN/latest/c13/p06_executing_external_command_and_get_its_output.html
http://www.voidcn.com/article/p-aobdgfcq-bad.html
https://python.freelycode.com/contribution/detail/244
http://codewenda.com/%E4%BD%BF%E7%94%A8%E6%A8%A1%E5%9D%97subprocess%E4%B8%8E%E8%B6%85%E6%97%B6/
http://blog.csdn.net/cenziboy/article/details/8298844
http://outofmemory.cn/code-snippet/6725/python-subprocess-module-jiankong-zi-process-2-zhong-mode-mang-wait-directly-return-tongshi-setting
http://www.cnblogs.com/Security-Darren/p/4733368.html
1 | http://everettjf.com/2016/01/29/python27-subprocess-timeout/ |
Python的logging模块
1 | def logging_config(): |
python enumerate用法
http://blog.csdn.net/dcrmg/article/details/78148997
http://blog.csdn.net/xyw_blog/article/details/18401237
http://blog.csdn.net/churximi/article/details/51648388
http://www.runoob.com/python/python-func-enumerate.html
http://www.runoob.com/python3/python3-func-enumerate.html1
2
3
4
5
6
7
8
9
10
11
12
13
14
15
16
17
18
19
20
21
22
23
24
25
26
27
28
29
30
31
32
33
34
35
36
37
38
39
40
41
42
43
44
45
46
47
48
49
50
51
52
53
54
55
56
57
58
59
60
61
62
63
64
65
66
67
68
69
70
71
72
73
74
75
76
77
78
79>>> list(enumerate([5,6,7,8,9]))
[(0, 5), (1, 6), (2, 7), (3, 8), (4, 9)]
>>> lst = list(range(100, 200))
>>> lst
[100, 101, 102, 103, 104, 105, 106, 107, 108, 109, 110, 111, 112, 113, 114, 115, 116, 117, 118, 119, 120, 121, 122, 123, 124, 125, 126, 127, 128, 129, 130, 131, 132, 133, 134, 135, 136, 137, 138, 139, 140, 141, 142, 143, 144, 145, 146, 147, 148, 149, 150, 151, 152, 153, 154, 155, 156, 157, 158, 159, 160, 161, 162, 163, 164, 165, 166, 167, 168, 169, 170, 171, 172, 173, 174, 175, 176, 177, 178, 179, 180, 181, 182, 183, 184, 185, 186, 187, 188, 189, 190, 191, 192, 193, 194, 195, 196, 197, 198, 199]
>>> for index, value in enumerate(lst):
... print('{} -- {}'.format(index, value))
...
eunmerate在英文中是列举、枚举的意思,在python中eunmerate()是一个内置的函数,用于在一个可迭代或可遍历的对象(如列表、字符串、数组、字典)中,将对象组成一个一个序列和索引,可以同时获得索引和索引值。
enumerate函数原型:
[python] view plain copy
enumerate(sequence, [start=0])
功能:将可循环序列sequence以start开始分别列出序列数据和数据下标;
即对一个可遍历的数据对象(如列表、元组或字符串),enumerate会将该数据对象组合为一个索引序列,同时列出数据和数据下标;
enumerate()使用
对于一个列表list1,同时列出索引和每一个元素:
[python] view plain copy
list1 = ['A','B','C','D','E']
for index, item in enumerate(list1):
print index, item
输出:
[python] view plain copy
0 A
1 B
2 C
3 E
4 F
enumerate还可以接受第二个参数start,仍会从第一个索引值开始,遍历完所有的索引值,但列出来的索引起始值是从start开始(默认为0):
[python] view plain copy
list1 = ['A','B','C','D','E']
for index, item in enumerate(list1,10):
print index, item
输出:
[python] view plain copy
10 A
11 B
12 C
13 D
14 E
enumerate用于字符串:
[python] view plain copy
str = 'ABCDE'
for index , item in enumerate(str):
print index , item
输出:
[python] view plain copy
0 A
1 B
2 C
3 E
4 F
repr() 函数
http://www.runoob.com/python/python-func-repr.html
http://www.jianshu.com/p/2a41315ca47e1
2
3
4
5
6
7
8
9
10
11
12
13
14
15
16
17
18
19
20
21
22
23
24
25
26
27
28
29
30
31
32
33
34
35
36
37
38
39
40
41
42
43
44
45
46
47
48
49
50
51
52
53
54
55
56
57
58
59
60
61
62
63
64
65
66
67
68
69
70
71
72
73
74
75
76
77
78
79描述
repr() 函数将对象转化为供解释器读取的形式。
语法
以下是 repr() 方法的语法:
repr(object)
参数
object -- 对象。
返回值
返回一个对象的 string 格式。
实例
以下展示了使用 repr() 方法的实例:
>>>s = 'RUNOOB'
>>> repr(s)
"'RUNOOB'"
>>> dict = {'runoob': 'runoob.com', 'google': 'google.com'};
>>> repr(dict)
"{'google': 'google.com', 'runoob': 'runoob.com'}"
在 Python 中要将某一类型的变量或者常量转换为字符串对象通常有两种方法,即 str() 或者 repr() 。
>>> a = 10
>>> type(str(a))
<class 'str'>
>>> type(repr(a))
<class 'str'>
但是这二者之间有什么区别呢?因为提供两个功能完全相同的内建函数是没有意义的。先看一个例子。
>>> print(str('123'))
123
>>> print(str(123))
123
>>> print(repr('123'))
'123'
>>> print(repr(123))
123
从例子中不难发现,当我们把一个字符串传给 str() 函数再打印到终端的时候,输出的字符不带引号。而将一个字符串传给 repr() 函数再打印到终端的时候,输出的字符带有引号。
造成这两种输出形式不同的原因在于:
print 语句结合 str() 函数实际上是调用了对象的 __str__ 方法来输出结果。而 print 结合 repr() 实际上是调用对象的 __repr__ 方法输出结果。下例中我们用 str 对象直接调用这两个方法,输出结果的形式与前一个例子保持一致。
>>> print('123'.__repr__())
'123'
>>> print('123'.__str__())
123
不过这个例子可能还是无法很好表达到底 str() 与 repr() 各有什么意义,我们再来看一个例子。
>>> from datetime import datetime
>>> now = datetime.now()
>>> print(str(now))
2017-04-22 15:41:33.012917
>>> print(repr(now))
datetime.datetime(2017, 4, 22, 15, 41, 33, 12917)
通过 str() 的输出结果我们能很好地知道 now 实例的内容,但是却丢失了 now 实例的数据类型信息。而通过 repr() 的输出结果我们不仅能获得 now 实例的内容,还能知道 now 是 datetime.datetime 对象的实例。
因此 str() 与 repr() 的不同在于:
str() 的输出追求可读性,输出格式要便于理解,适合用于输出内容到用户终端。
repr() 的输出追求明确性,除了对象内容,还需要展示出对象的数据类型信息,适合开发和调试阶段使用。
另外如果想要自定义类的实例能够被 str() 和 repr() 所调用,那么就需要在自定义类中重载 __str__ 和 __repr__ 方法。
作者:叶俊贤
链接:http://www.jianshu.com/p/2a41315ca47e
來源:简书
著作权归作者所有。商业转载请联系作者获得授权,非商业转载请注明出处。
lambda函数
http://blog.csdn.net/cc7756789w/article/details/467653911
2
3
4
5
6
7
8
9
10
11
12
13
14
15
16
17
18
19
20
21
22
23
24
25
26
27
28
29
30
31
32
33
34
35
36
37
38
39
40
41
42
43
44
45
46
47
48
49
50
51
52
53
54
55lambda 通常称为匿名函数,常用于定义一些很简单的函数。
注意: lambda是一个表达式,lambda会创建一个函数对象,但不会把这个函数对象赋给一个标识符;而def是语句,def会把一个函数对象赋值给一个变量。
表达式 Expressions:
有值,所以可以写在赋值语句的右侧,而import,for等语句不能被用于赋值。
语句 Statement:
不一定有值。语句有简单语句和复合语句之分:简单语句是指一逻辑行的代码,例如表达式语句、赋值语句和return语句等。复合语句是指包含、影响或控制一组语句的代码。例如if、try和class语句等。
因为lambda是表达式,所以可以直接作为list或dict的成员 [lambda x: x*x, lambda x: x+x] 但是def等语句无法直接放入其中。
lambda用法:
pord = lambda x: x*x
print pord(2)
# 4
prod2 = lambda x,y: x*y
print prod2(2,3)
# 6
lambda : 后面只能有一个语句,就如def 的 return 一样用于返回值,所以无法在后面使用多余的语句如if等,并且这样返回也是错的:
prod = lambda x,y: x,y
# NameError: name 'y' is not defined
来看看 def 定义的函数会返回什么?
>>> def y():
... x = 2
... y = 4
... return x,y
...
>>> y()
(2, 4)
>>> type(y())
<type 'tuple'>
返回了一个元组,return并不能返回多个值,故而a, b 被语法糖元组给包裹了,但是很显然lambda并不支持这么做。
lambda起到简化语句,并且不需要担心命名冲突。lambda 也可直接作为函数的返回语句,起到一个闭包Closure的作用:
>>> def a(x, y):
... return lambda : x*x + y*y
...
>>> a(2,3)
<function <lambda> at 0x7f2133346320>
>>> a(2,3)()
13
你甚至可以配合reduce高阶函数利用一条代码就实现一个阶乘:
>>> factorial = lambda x: reduce(int.__mul__, xrange(2,x+1))
>>> factorial(10)
3628800
reduce函数
http://blog.csdn.net/xxkkff/article/details/44113831
2
3
4
5
6
7
8
9
10
11
12
13
14
15
16
17
18
19
20
21
22
23
24
25
26
27天在搜用python求阶乘的时候, 搜出来的最简单的是用reduce这个built-in function, 但是我在用reduce的时候, 却报NameError: name 'reduce' is not defined. 于是又搜了一下,发现在python 3.0.0.0以后, reduce已经不在built-in function里了, 要用它就得from functools import reduce.
详见The fate of reduce() in Python 3000
reduce的用法
reduce(function, sequence[, initial]) -> value
Apply a function of two arguments cumulatively to the items of a sequence,
from left to right, so as to reduce the sequence to a single value.
For example, reduce(lambda x, y: x+y, [1, 2, 3, 4, 5]) calculates
((((1+2)+3)+4)+5). If initial is present, it is placed before the items
of the sequence in the calculation, and serves as a default when the
sequence is empty.
意思就是对sequence连续使用function, 如果不给出initial, 则第一次调用传递sequence的两个元素, 以后把前一次调用的结果和sequence的下一个元素传递给function. 如果给出initial, 则第一次传递initial和sequence的第一个元素给function.
[python] view plain copy
>>> from functools import reduce
>>> reduce(lambda x,y: x+y, [1, 2, 3])
6
>>> reduce(lambda x, y: x+y, [1,2,3], 9)
15
>>> reduce(lambda x,y: x+y, [1, 2, 3], 7)
13
>>>
Python函数式编程
http://blog.csdn.net/qq_26718271/article/details/72639510
http://blog.csdn.net/loveliuzz/article/details/77805198
map, reduce和filter的用法
https://stackoverflow.com/questions/13638898/how-to-use-filter-map-and-reduce-in-python-3
http://blog.csdn.net/damotiansheng/article/details/44139111
https://stackoverflow.com/questions/40015439/why-does-map-return-a-map-object-instead-of-a-list-in-python-3/40015480
https://stackoverflow.com/questions/36486950/python-calling-list-on-a-map-object-twice
https://docs.python.org/3.0/whatsnew/3.0.html#views-and-iterators-instead-of-lists
https://stackoverflow.com/questions/19017301/how-do-i-multiply-lists-together-using-a-function
https://stackoverflow.com/questions/19777612/python-range-and-zip-object-type1
2
3
4
5
6
7
8
9
10
11
12
13
14
15
16
17
18
19
20
21
22
23
24
25
26
27
28
29
30https://segmentfault.com/a/1190000000322433
在升级到python3的时候,发现了一个map函数的变化,害得我找了半天问题。
在python2中,map会直接返回结果,比如说:
map(lambda x: x, [1,2,3])
可以直接返回
[1,2,3]
但是到了python3, 返回的就是一个map对象:
<map object at 0x7f381112ad50>
如果要得到结果,必须用list作用于这个map对象。
如果说计算结果已经出来了,只是要用list来打印结果,那就算了。
接下来就是我发现的python3下map坑爹货了:
如果不在map前加上list,lambda函数根本就不会执行
这就是lazy evaluation,其实是个改进,但的确造成了不兼容。 那个2to3可以帮你找到大部分这一类问题,详情参见 http://docs.python.org/2/library/2to3.html
谢谢! 2to3上确实有: > Wraps map() in a list call. It also changes map(None, x) to list(x). > Using from future_builtins import map disables this fixer. 看来不用list对map对象,确实是不执行的。 我之所以觉得是个坑,是因为我把带副作用的函数放在了map里面,结果这个语句没有执行,搞得我一直找不到为什么变量的值没有改变。
你可以用list comprehension,它直接返回list,不是一个类似iterator的对象,比如 [x*100 for x in [1,2,3]] 返回[100,200,300] 而且你还可以少写一个lambda
不止是是map函数,python3很多改成返回iterator了. http://docs.python.org/3/whatsnew/3.0.html#views-and-iterators-instead-of-lists
python 非常有用的调试语句能打印内存
http://blog.sina.com.cn/s/blog_754e2e010102vem4.html1
2
3
4
5
6
7
8
9http://blog.csdn.net/ithomer/article/details/5974029
a = 20
b = 400
str = struct.pack("ii", a, b)
print 'length:', len(str) #length: 8
print str
print repr(str) # '/x14/x00/x00/x00/x90/x01/x00/x00'
struct模块
http://blog.csdn.net/ithomer/article/details/59740291
2
3
4
5
6
7
8
9
10
11
12
13
14
15
16
17
18
19
20
21
22
23
24
25
26
27
28
29
30
31
32
33
34
35
36
37
38
39
40
41
42
43
44
45
46
47
48
49
50
51
52
53
54
55
56
57
58
59
60
61
62
63
64
65
66
67
68
69
70
71
72
73
74
75
76
77
78
79
80
81
82
83
84
85
86
87
88
89
90
91
92
93
94
95
96
97
98
99
100
101
102
103
104
105
106
107
108
109
110
111
112
113
114
115
116
117
118
119
120
121
122
123
124
125
126
127
128
129
130
131
132
133
134
135
136
137
138
139
140
141
142
143
144
145
146
147
148
149
150
151
152
153
154
155
156
157
158
159
160
161
162
163
164
165
166
167
168
169
170
171
172
173
174
175
176
177
178
179
180
181
182
183
184
185
186
187
188
189
190
191
192
193
194
195
196
197
198
199
200
201
202
203
204
205
206
207
208
209
210
211
212
213
214
215
216
217
218
219
220
221
222
223
224
225
226
227
228
229
230
231
232
233
234
235
236
237
238
239
240
241
242
243
244
245
246
247
248
249
250
251
252
253
254
255
256
257
258
259
260
261
262
263
264
265
266import struct
pack、unpack、pack_into、unpack_from
[python] view plain copy
# ref: http://blog.csdn.net/JGood/archive/2009/06/22/4290158.aspx
import struct
#pack - unpack
print
print '===== pack - unpack ====='
str = struct.pack("ii", 20, 400)
print 'str:', str
print 'len(str):', len(str) # len(str): 8
a1, a2 = struct.unpack("ii", str)
print "a1:", a1 # a1: 20
print "a2:", a2 # a2: 400
print 'struct.calcsize:', struct.calcsize("ii") # struct.calcsize: 8
#unpack
print
print '===== unpack ====='
string = 'test astring'
format = '5s 4x 3s'
print struct.unpack(format, string) # ('test ', 'ing')
string = 'he is not very happy'
format = '2s 1x 2s 5x 4s 1x 5s'
print struct.unpack(format, string) # ('he', 'is', 'very', 'happy')
#pack
print
print '===== pack ====='
a = 20
b = 400
str = struct.pack("ii", a, b)
print 'length:', len(str) #length: 8
print str
print repr(str) # '/x14/x00/x00/x00/x90/x01/x00/x00'
#pack_into - unpack_from
print
print '===== pack_into - unpack_from ====='
from ctypes import create_string_buffer
buf = create_string_buffer(12)
print repr(buf.raw)
struct.pack_into("iii", buf, 0, 1, 2, -1)
print repr(buf.raw)
print struct.unpack_from("iii", buf, 0)
运行结果:
[work@db-testing-com06-vm3.db01.baidu.com python]$ python struct_pack.py
===== pack - unpack =====
str: ?
len(str): 8
a1: 20
a2: 400
struct.calcsize: 8
===== unpack =====
('test ', 'ing')
('he', 'is', 'very', 'happy')
===== pack =====
length: 8
?
'/x14/x00/x00/x00/x90/x01/x00/x00'
===== pack_into - unpack_from =====
'/x00/x00/x00/x00/x00/x00/x00/x00/x00/x00/x00/x00'
'/x01/x00/x00/x00/x02/x00/x00/x00/xff/xff/xff/xff'
(1, 2, -1)
==============================================================================
Python是一门非常简洁的语言,对于数据类型的表示,不像其他语言预定义了许多类型(如:在C#中,光整型就定义了8种)
它只定义了六种基本类型:字符串,整数,浮点数,元组(set),列表(array),字典(key/value)
通过这六种数据类型,我们可以完成大部分工作。但当Python需要通过网络与其他的平台进行交互的时候,必须考虑到将这些数据类型与其他平台或语言之间的类型进行互相转换问题。打个比方:C++写的客户端发送一个int型(4字节)变量的数据到Python写的服务器,Python接收到表示这个整数的4个字节数据,怎么解析成Python认识的整数呢? Python的标准模块struct就用来解决这个问题。
struct模块的内容不多,也不是太难,下面对其中最常用的方法进行介绍:
1、 struct.pack
struct.pack用于将Python的值根据格式符,转换为字符串(因为Python中没有字节(Byte)类型,可以把这里的字符串理解为字节流,或字节数组)。其函数原型为:struct.pack(fmt, v1, v2, ...),参数fmt是格式字符串,关于格式字符串的相关信息在下面有所介绍。v1, v2, ...表示要转换的python值。下面的例子将两个整数转换为字符串(字节流):
[python] view plain copy
#!/usr/bin/env python
#encoding: utf8
import sys
reload(sys)
sys.setdefaultencoding("utf-8")
import struct
a = 20
b = 400
str = struct.pack("ii", a, b)
print 'length: ', len(str) # length: 8
print str # 乱码:
print repr(str) # '\x14\x00\x00\x00\x90\x01\x00\x00'
格式符"i"表示转换为int,'ii'表示有两个int变量。
进行转换后的结果长度为8个字节(int类型占用4个字节,两个int为8个字节)
可以看到输出的结果是乱码,因为结果是二进制数据,所以显示为乱码。
可以使用python的内置函数repr来获取可识别的字符串,其中十六进制的0x00000014, 0x00001009分别表示20和400。
2、 struct.unpack
struct.unpack做的工作刚好与struct.pack相反,用于将字节流转换成python数据类型。它的函数原型为:struct.unpack(fmt, string),该函数返回一个元组。
下面是一个简单的例子:
[python] view plain copy
#!/usr/bin/env python
#encoding: utf8
import sys
reload(sys)
sys.setdefaultencoding("utf-8")
import struct
a = 20
b = 400
# pack
str = struct.pack("ii", a, b)
print 'length: ', len(str) # length: 8
print str # 乱码:
print repr(str) # '\x14\x00\x00\x00\x90\x01\x00\x00'
# unpack
str2 = struct.unpack("ii", str)
print 'length: ', len(str2) # length: 2
print str2 # (20, 400)
print repr(str2) # (20, 400)
3、 struct.calcsize
struct.calcsize用于计算格式字符串所对应的结果的长度,如:struct.calcsize('ii'),返回8。因为两个int类型所占用的长度是8个字节。
[python] view plain copy
import struct
print "len: ", struct.calcsize('i') # len: 4
print "len: ", struct.calcsize('ii') # len: 8
print "len: ", struct.calcsize('f') # len: 4
print "len: ", struct.calcsize('ff') # len: 8
print "len: ", struct.calcsize('s') # len: 1
print "len: ", struct.calcsize('ss') # len: 2
print "len: ", struct.calcsize('d') # len: 8
print "len: ", struct.calcsize('dd') # len: 16
4、 struct.pack_into、 struct.unpack_from
这两个函数在Python手册中有所介绍,但没有给出如何使用的例子。其实它们在实际应用中用的并不多。Google了很久,才找到一个例子,贴出来共享一下:
[python] view plain copy
#!/usr/bin/env python
#encoding: utf8
import sys
reload(sys)
sys.setdefaultencoding("utf-8")
import struct
from ctypes import create_string_buffer
buf = create_string_buffer(12)
print repr(buf.raw) # '\x00\x00\x00\x00\x00\x00\x00\x00\x00\x00\x00\x00'
struct.pack_into("iii", buf, 0, 1, 2, -1)
print repr(buf.raw) # '\x01\x00\x00\x00\x02\x00\x00\x00\xff\xff\xff\xff'
print struct.unpack_from("iii", buf, 0) # (1, 2, -1)
具体内容请参考Python手册 struct 模块
Python手册 struct 模块:http://docs.python.org/library/struct.html#module-struct
struct 类型表
Format C Type Python type Standard size Notes
x pad byte no value
c char string of length 1 1
b signed char integer 1 (3)
B unsigned char integer 1 (3)
? _Bool bool 1 (1)
h short integer 2 (3)
H unsigned short integer 2 (3)
i int integer 4 (3)
I unsigned int integer 4 (3)
l long integer 4 (3)
L unsigned long integer 4 (3)
q long long integer 8 (2), (3)
Q unsigned long long integer 8 (2), (3)
f float float 4 (4)
d double float 8 (4)
s char[] string 1
p char[] string
P void * integer (5), (3)
Notes:
The '?' conversion code corresponds to the _Bool type defined by C99. If this type is not available, it is simulated using a char. In standard mode, it is always represented by one byte.
New in version 2.6.
The 'q' and 'Q' conversion codes are available in native mode only if the platform C compiler supports C long long, or, on Windows, __int64. They are always available in standard modes.
New in version 2.2.
When attempting to pack a non-integer using any of the integer conversion codes, if the non-integer has a __index__() method then that method is called to convert the argument to an integer before packing. If no __index__() method exists, or the call to __index__() raises TypeError, then the __int__() method is tried. However, the use of __int__() is deprecated, and will raise DeprecationWarning.
Changed in version 2.7: Use of the __index__() method for non-integers is new in 2.7.
Changed in version 2.7: Prior to version 2.7, not all integer conversion codes would use the __int__() method to convert, and DeprecationWarning was raised only for float arguments.
For the 'f' and 'd' conversion codes, the packed representation uses the IEEE 754 binary32 (for 'f') or binary64 (for 'd') format, regardless of the floating-point format used by the platform.
The 'P' format character is only available for the native byte ordering (selected as the default or with the '@' byte order character). The byte order character '=' chooses to use little- or big-endian ordering based on the host system. The struct module does not interpret this as native ordering, so the 'P' format is not available.
A format character may be preceded by an integral repeat count. For example, the format string '4h' means exactly the same as 'hhhh'.
Whitespace characters between formats are ignored; a count and its format must not contain whitespace though.
For the 's' format character, the count is interpreted as the size of the string, not a repeat count like for the other format characters; for example, '10s' means a single 10-byte string, while '10c' means 10 characters. For packing, the string is truncated or padded with null bytes as appropriate to make it fit. For unpacking, the resulting string always has exactly the specified number of bytes. As a special case, '0s' means a single, empty string (while '0c' means 0 characters).
The 'p' format character encodes a “Pascal string”, meaning a short variable-length string stored in a fixed number of bytes, given by the count. The first byte stored is the length of the string, or 255, whichever is smaller. The bytes of the string follow. If the string passed in to pack() is too long (longer than the count minus 1), only the leading count-1 bytes of the string are stored. If the string is shorter than count-1, it is padded with null bytes so that exactly count bytes in all are used. Note that for unpack(), the 'p' format character consumes count bytes, but that the string returned can never contain more than 255 characters.
For the 'P' format character, the return value is a Python integer or long integer, depending on the size needed to hold a pointer when it has been cast to an integer type. A NULL pointer will always be returned as the Python integer 0. When packing pointer-sized values, Python integer or long integer objects may be used. For example, the Alpha and Merced processors use 64-bit pointer values, meaning a Python long integer will be used to hold the pointer; other platforms use 32-bit pointers and will use a Python integer.
For the '?' format character, the return value is either True or False. When packing, the truth value of the argument object is used. Either 0 or 1 in the native or standard bool representation will be packed, and any non-zero value will be True when unpacking.
Python2与Python3的zip结果的差别
区别在于,在python2中,zip的结果为一个列表,而python3中,zip的结果是返回一个迭代器,可以被next()函数调用并不断返回下一个值的对象称为迭代器:Iterator. 所以第一次list就调用了迭代器,之后再次调用,该迭代器不能进行下一个next函数操作,所以返回的列表为空。1
2
3
4
5
6
7
8
9
10
11
12
13
14
15
16
17
18
19
20
21
22
23
24
25
26
27
28
29
30
31
32
33
34
35
36
37
38
39
40
41
42
43
44
45
46
47
48
49
50
51
52
53
54
55
56Python3
>>> test1 = [1, 2, 3, 4, 5]
>>> test2 = [1, 2, 3, 4, 5]
>>> zip1 = zip(test1, test2)
>>> list(zip1)
[(1, 1), (2, 2), (3, 3), (4, 4), (5, 5)]
>>> list(zip1)
[]
>>> zip1 = zip(test1, test2)
>>> mapobj = map(lambda args: args[0] * args[1], zip1)
>>> list(mapobj)
[1, 4, 9, 16, 25]
>>> list(mapobj)
[]
>>> list(zip1)
[]
>>> zip1 = zip(test1, test2)
>>> mapobj = map(lambda args: args[0] * args[1], zip1)
>>> list(zip1)
[(1, 1), (2, 2), (3, 3), (4, 4), (5, 5)]
>>> list(mapobj)
[]
>>>
Python2
>>> test1 = [1, 2, 3, 4, 5]
>>> test2 = [1, 2, 3, 4, 5]
>>> zip1 = zip(test1, test2)
>>> list(zip1)
[(1, 1), (2, 2), (3, 3), (4, 4), (5, 5)]
>>> list(zip1)
[(1, 1), (2, 2), (3, 3), (4, 4), (5, 5)]
>>> zip1 = zip(test1, test2)
>>> mapobj = map(lambda args: args[0] * args[1], zip1)
>>> list(mapobj)
[1, 4, 9, 16, 25]
>>> list(mapobj)
[1, 4, 9, 16, 25]
>>> list(zip1)
[(1, 1), (2, 2), (3, 3), (4, 4), (5, 5)]
>>> zip1 = zip(test1, test2)
>>> mapobj = map(lambda args: args[0] * args[1], zip1)
>>> list(zip1)
[(1, 1), (2, 2), (3, 3), (4, 4), (5, 5)]
>>> list(mapobj)
[1, 4, 9, 16, 25]
>>>
同样,在python3中,range函数的返回值也为iterator
>>> m = map(lambda x: x**2, range(0,4))
>>> list(m)
[0, 1, 4, 9]
>>> list(m)
[]
>>>
Python判断某个对象是否是可迭代对象
https://www.liaoxuefeng.com/wiki/001374738125095c955c1e6d8bb493182103fac9270762a000/0013868196435255fcca20a1630446ea2dd434a7176e152000
http://www.cnblogs.com/hdtianfu/archive/2012/10/20/2732689.html
https://codeday.me/bug/20170218/1148.html
http://blog.csdn.net/u012005313/article/details/482131411
2
3
4
5
6
7
8
9
10
11
12
13
14
15
16
17
18
19
20
21
22
23
24
25
26
27
28
29
30
31
32
33
34
35
36
37
38
39
40
41
42
43
44
45
46
47
48
49
50
51
52
53
54
55
56
57
58
59
60
61
62
63
64
65
66
67
68
69
70
71
72python中判断实例可迭代地几种方式
1. 利用 __iter__内建属性
if hasattr(obj, '__iter__') :
print 'iterable'
这种方法不能检测字符串,如:hasattr('', '__iter__')返回False。
或者这样子:
try :
i = iter(obj)
except TypeError, v :
print v
2. 假设obj是iterable的,如果不是的话,就抛出异常
try:
for v in obj:
print v
except TypeError, e:
print e
3. 检查实例是否是collections.Iterable子类
import collections
if isinstance(obj, collections.Iterable):
print 'iterable'
如果判断一个对象是否是可迭代对象,方法是通过collections模块的iterable类型判断:
[python] view plain copy
from collections import Iterable
isinstance('abc', Iterable) #str是否可迭代
isinstance([1,2,3], Iterable) #list是否可迭代
isinstance(123, Iterable) #整数是否可迭代啊
>>> from collections import Iterable
>>> test1 = [1, 2, 3, 4, 5]
>>> test2 = [1, 2, 3, 4, 5]
>>> zip1 = zip(test1, test2)
>>> isinstance(zip1, Iterable)
True
>>> m = map(lambda x: x**2, range(0,4))
>>> isinstance(m, Iterable)
True
>>> ra = range(100, 120)
>>> isinstance(ra, Iterable)
True
>>> isinstance(list, Iterable)
False
>>> isinstance(dict, Iterable)
False
>>> lst = list(range(10))
>>> isinstance(lst, Iterable)
True
>>> dct = {}
>>> isinstance(dct, Iterable)
True
>>> for index, value in (enumerate(range(100, 110))):
... print(index, value)
...
0 100
1 101
2 102
3 103
4 104
5 105
6 106
7 107
8 108
9 109
>>>
可迭代对象,迭代器和生成器
https://foofish.net/iterators-vs-generators.html
http://foofish.net/blog/109/iterators-vs-generators
https://python-ning.github.io/2015/11/30/python_generators_and_iterators/
http://wulc.me/2016/09/08/python%20%E4%B8%AD%E7%9A%84%E5%8F%AF%E8%BF%AD%E4%BB%A3%E5%AF%B9%E8%B1%A1(iterable)%E3%80%81%E8%BF%AD%E4%BB%A3%E5%99%A8(iterator)%E4%B8%8E%E7%94%9F%E6%88%90%E5%99%A8(generator)/
http://www.jianshu.com/p/211955d5e8e61
2
3
4
5
6
7
8
9
10
11
12
13
14
15
16
17
18
19
20
21
22
23
24
25
26
27
28
29
30
31
32
33
34
35
36
37
38
39
40
41
42
43
44
45
46
47
48
49
50
51
52
53
54
55
56
57
58
59
60
61
62
63
64
65
66
67
68
69
70
71
72
73
74
75
76
77
78
79
80
81
82
83
84
85
86
87
88
89
90
91
92
93
94
95
96
97
98
99
100
101
102
103
104
105
106
107
108
109
110
111
112
113
114
115
116
117
118
119
120
121
122
123
124
125
126
127
128
129
130
131
132
133
134
135
136
137
138
139
140
141
142
143
144
145
146
147
148
149
150
151
152
153
154
155
156
157
158
159
160
161
162
163什么是迭代
Wiki定义:是重复反馈过程的活动,其目的是为了接近并到达所需的目标或结果。
在程序中,迭代是一种遍历集合元素的方式,我们可以通过索引值递增来遍历集合元素,而迭代是遍历集合元素另一种方式。
下面是使用索引来进行遍历集合元素的方式:
val = [1,2,3,4,5]
for i in range(len(val)):
retVal = val[i]
这种方式在C++中很常见,在Python中我们可以用更简洁的语法来进行遍历,也就是迭代。
三个关键字
说到迭代,在Python里就会提到下面三个关键词:
Iterable(可迭代)
iterator(迭代器)
generator(生成器)
这三个关键字,可能从一开始的某段代码你就接触到了,只是你没有发觉,代码是这样的。
val = [1,2,3,4,5]
for i in val:
print i
上面这个for...in,就是Python中迭代器的语法糖。好了,现在你可能开始在想这个for做了什么事了,先把这个疑问放在心里,我们先一步步来解析上面的几个关键字。
Iterable 可迭代
先来看个反面教材,如果我们用for...in语法糖去遍历一个int会怎样???
intVal = 1024
for _ in intVal:
pass
>>>TypeError: 'int' object is not iterable
从上面的错误可以看到,整数类型的对象不是可迭代的,也就是说for..in只适用于iterable对象,那么什么类型的对象才是iterable(可迭代)呢。
在Python中,实现了_iter_函数的类型都是可迭代的,例如list,tuple,dict等
可以用dir函数查看一下是否存在协议函数__iter__
print '__iter__' in dir(dict)
print '__iter__' in dir(list)
print '__iter__' in dir(tuple)
>>>True
>>>True
>>>True
通过上面的方式我们可以判断一个对象是不是可迭代的,当然我们还有另外一种更接地气的方法。
l = [1]
from collections import Iterable
print isinstance(l, Iterable) #注意这里只能用实例进行判断,而不能用list判断
iterator 迭代器
对于一个可迭代的对象,我们需要借助迭代器来对其进行迭代,那么我们怎么才能得到一个迭代器呢?
iter()方法
通过使用iter方法,我们可以得到一个迭代器,记住,要传入一个可迭代对象做为参数:
l = [1]
o = iter(l)
print type(o)
>>><type 'listiterator'>
从上面的代码可以看到,我们通过将一个可迭代对象传给iter方法得到了一个迭代器,那么有了这个迭代器之后,我们应该怎么迭代呢?
next()方法
调用迭代器的next方法可以对元素进行遍历,但是next方法是不能无限使用的:
l = [1, 2, 3]
o = iter(l)
print o.next()
print o.next()
print o.next()
print o.next()
>>>1
>>>2
>>>3
>>>Traceback (most recent call last):
File "e:\Microsoft VS Code\TestFiles\test.py", line 63, in <module>
print o.next()
StopIteration
通过next方法我们可以一个个的遍历可迭代对象中的元素,当遍历结束的时候,会引发异常StopIteration。
迭代器类
除了以上的方法,我们还可以构造一个类来进行迭代,这个类需要实现next和__iter__方法,下面构造了一个斐波那契数列:
class FabIteratorClass(object):
def __init__(self, max):
self.m_Max = max
self.m_Idx = 0
self.m_a = 0
self.m_b = 1
def __iter__(self):
return self
def next(self):
if self.m_Idx < self.m_Max:
ret = self.m_b
self.m_a, self.m_b = self.m_b, self.m_a + self.m_b
self.m_Idx += 1
return ret
raise StopIteration()
for val in FabIteratorClass(3):
print val
>>>1
>>>1
>>>2
所以,作为一个迭代器,他的特征如下:
拥有__iter__方法,或者由iter方法返回
拥有next方法
会产生StopIteration异常
生成器
说到生成器,那么一定会说到一个关键字yield,只要一个函数里出现了这个关键字,我们就把这个函数称为生成器,生成器是一种内存友好的函数,例如平时用到的xrange函数,就是一个生成器,生成器不会把所有值预先生成,而是在需要时才生成,是一种Lazy Evaluation的做法。生成器也是迭代器的一种!
同样是斐波那契数列,我们用生成器处理一下:
def fab(max):
idx = 0
a = 0
b = 1
while idx < max:
ret = b
a, b = b, a + b
idx += 1
yield ret
c = fab(5)
print type(c)
for val in c:
print val
>>><type 'generator'>
>>>1
>>>1
>>>2
>>>3
>>>5
总结:
三者的继承关系是这样:generator--->Iterator--->Iterable
迭代器类型需要实现__iter__和next方法,生成器是一种特殊的迭代器,内部支持了生成器协议,不需要明确定义iter()和next()方法
迭代器一定是可迭代对象,但是可迭代对象不一定是迭代器
作者:ZeroTryTryTry
链接:http://www.jianshu.com/p/211955d5e8e6
來源:简书
著作权归作者所有。商业转载请联系作者获得授权,非商业转载请注明出处。
Python执行windows cmd命令
http://www.cnblogs.com/xuxm2007/archive/2011/01/17/1937220.html
http://www.cnblogs.com/feichengwulai/articles/3463139.html
http://www.cnblogs.com/vamei/archive/2012/09/23/2698014.html1
2
3
4
5
6
7
8
9
10
11
12
13
14
15
16
17
18
19
20
21
22
23
24
25
26
27
28
29
30
31
32
33
34
35
36
37
38
39
40
41
42
43
44
45
46
47
48
49
50
51
52
53
54
55
56
57
58
59
60
61
62
63
64
65
66
67
68
69
70
71
72
73
74
75
76
77
78Python中执行系统命令常见方法有两种:
两者均需 import os
(1) os.system
# 仅仅在一个子终端运行系统命令,而不能获取命令执行后的返回信息
system(command) -> exit_status
Execute the command (a string) in a subshell.
# 如果再命令行下执行,结果直接打印出来
>>> os.system('ls')
04101419778.CHM bash document media py-django video
11.wmv books downloads Pictures python
all-20061022 Desktop Examples project tools
(2) os.popen
# 该方法不但执行命令还返回执行后的信息对象
popen(command [, mode='r' [, bufsize]]) -> pipe
Open a pipe to/from a command returning a file object.
例如:
>>>tmp = os.popen('ls *.py').readlines()
>>>tmp
Out[21]:
['dump_db_pickle.py ',
'dump_db_pickle_recs.py ',
'dump_db_shelve.py ',
'initdata.py ',
'__init__.py ',
'make_db_pickle.py ',
'make_db_pickle_recs.py ',
'make_db_shelve.py ',
'peopleinteract_query.py ',
'reader.py ',
'testargv.py ',
'teststreams.py ',
'update_db_pickle.py ',
'writer.py ']
好处在于:将返回的结果赋于一变量,便于程序的处理。
(3) 使用模块subprocess (python3)
>>> import subprocess
>>> subprocess.call (["cmd", "arg1", "arg2"],shell=True)
获取返回和输出:
import subprocess
p = subprocess.Popen('ls', shell=True, stdout=subprocess.PIPE, stderr=subprocess.STDOUT)
for line in p.stdout.readlines():
print line,
retval = p.wait()
(4) 使用模块commands模块 (python2)
>>> import commands
>>> dir(commands)
['__all__', '__builtins__', '__doc__', '__file__', '__name__', 'getoutput', 'getstatus','getstatusoutput', 'mk2arg', 'mkarg']
>>> commands.getoutput("date")
'Wed Jun 10 19:39:57 CST 2009'
>>>
>>> commands.getstatusoutput("date")
(0, 'Wed Jun 10 19:40:41 CST 2009')
注意: 当执行命令的参数或者返回中包含了中文文字,那么建议使用subprocess,如果使用os.popen则会出现下面的错误:
查看源代码
打印
帮助
Traceback (most recent call last):
File "./test1.py", line 56, in <module>
main()
File "./test1.py", line 45, in main
fax.sendFax()
File "./mailfax/Fax.py", line 13, in sendFax
os.popen(cmd)
UnicodeEncodeError: 'ascii' codec can't encode characters in position 46-52: ordinal not inrange(128)
Python 内置的那些牛逼闪亮的函数
http://www.runoob.com/python/python-built-in-functions.html
http://docspy3zh.readthedocs.io/en/latest/library/functions.html
http://www.bijishequ.com/detail/544130?p=1
2
3
4
5
6
7
8
9
10
11
12
13
14
15
16
17
18
19
20
21
22
23
24
25
26
27
28
29
30
31
32
33
34
35
36
37
38
39
40
41
42
43
44
45
46
47
48
49
50
51
52
53
54
55
56
57
58
59
60
61
62
63
64
65
66
67
68
69
70
71
72
73
74
75
76
77
78
79
80
81
82
83
84
85
86
87
88
89
90
91
92
93
94
95
96
97
98
99
100
101
102
103
104
105
106
107
108
109
110
111
112
113
114
115
116
117
118
119
120
121
122
123
124
125
126
127
128
129
130
131
132
133
134
135
136
137
138
139
140
141
142
143
144
145
146
147
148
149
150
151
152原文: http://isbullsh.it/2012/05/05-Python-built-in-functions/
译者: TheLover_Z
引言
这篇文章我们来看几个很有用的 Python 内置函数 。这些函数简直是屌爆了,我认为每个 Pythoner 都应该知道这些函数。
对于每个函数,我会使用一个普通的实现来和内置函数做对比。
如果我直接引用了内置函数的文档,请理解,因为这些函数文档写的非常棒!
all(iterable)
如果可迭代的对象(数组,字符串,列表等,下同)中的元素都是 true (或者为空)的话返回 True 。
_all = True
for item in iterable:
if not item:
_all = False
break
if _all:
# do stuff
更简便的写法是:
if all(iterable):
# do stuff
any(iterable)
如果可迭代的对象中任何一个元素为 true 的话返回 True 。如果可迭代的对象为空则返回 False 。
_any = False
for item in iterable:
if item:
_any = True
break
if _any:
# do stuff
更简便的写法是:
if any(iterable):
# do stuff
cmp(x, y)
比较两个对象 x 和 y 。 x < y 的时候返回负数, x ==y 的时候返回 0, x > y 的时候返回正数。
def compare(x,y):
if x < y:
return -1
elif x == y:
return 0
else:
return 1
你完全可以使用一句 cmp(x, y) 来替代。
dict([arg])
使用 arg 提供的条目生成一个新的字典。
arg 通常是未知的,但是它很方便!比如说,如果我们想把一个含两个元组的列表转换成一个字典,我们可以这么做。
l = [('Knights', 'Ni'), ('Monty', 'Python'), ('SPAM', 'SPAAAM')]
d = dict()
for tuple in l:
d[tuple[0]] = tuple[1]
# {'Knights': 'Ni', 'Monty': 'Python', 'SPAM': 'SPAAAM'}
或者这样:
l = [('Knights', 'Ni'), ('Monty', 'Python'), ('SPAM', 'SPAAAM')]
d = dict(l) # {'Knights': 'Ni', 'Monty': 'Python', 'SPAM': 'SPAAAM'}
enumerate(iterable [,start=0])
我真的是超级喜欢这个!如果你以前写过 C 语言,那么你可能会这么写:
for i in range(len(list)):
# do stuff with list[i], for example, print it
print i, list[i]
噢,不用那么麻烦!你可以使用 enumerate() 来提高可读性。
for i, item in enumerate(list):
# so stuff with item, for example print it
print i, item
isinstance(object, classinfo)
如果 object 参数是 classinfo 参数的一个实例或者子类(直接或者间接)的话返回 True 。
当你想检验一个对象的类型的时候,第一个想到的应该是使用 type() 函数。
if type(obj) == type(dict):
# do stuff
elif type(obj) == type(list):
# do other stuff
...
或者你可以这么写:
if isinstance(obj, dict):
# do stuff
elif isinstance(obj, list):
# do other stuff
...
pow(x, y [,z])
返回 x 的 y 次幂(如果 z 存在的话则以 z 为模)。
如果你想计算 x 的 y 次方,以 z 为模,那么你可以这么写:
mod = (x ** y) % z
但是当 x=1234567, y=4567676, z=56 的时候我的电脑足足跑了 64 秒!
不要用 ** 和 % 了,使用 pow(x, y, z) 吧!这个例子可以写成 pow(1234567, 4567676, 56) ,只用了 0.034 秒就出了结果!
zip([iterable, ])
这个函数返回一个含元组的列表,具体请看例子。
l1 = ('You gotta', 'the')
l2 = ('love', 'built-in')
out = []
if len(l1) == len(l2):
for i in range(len(l1)):
out.append((l1[i], l2[i]))
# out = [('You gotta', 'love'), ('the', 'built-in)]
或者这么写:
l1 = ['You gotta', 'the']
l2 = ['love', 'built-in']
out = zip(l1, l2) # [('You gotta', 'love'), ('the', 'built-in)]
如果你想得到倒序的话加上 * 操作符就可以了。
print zip(*out)
# [('You gotta', 'the'), ('love', 'built-in')]
结论
Python 内置函数很方便,它们很快并且经过了优化,所以它们可能效率更高。
我真心认为每个 Python 开发者都应该好好看看内置函数的文档(引言部分)。
忘了说了,在 itertools 模块中有很多很不错的函数。再说一次,它们确实屌爆了。
中英文对照
可迭代的对象 - iterable
python入门
1 | 任意元素的列表 |
python命令行集锦
1 | >>> record = ('Dave', 'dave@example.com', '773-555-1212', '847-555-1212') |
Python日志重定向输出缓存问题
1 | python -u script.py |