设置fcitx输入法框架
System Settings -> Language Support,添加中文语言,并修改keyboard input method system为fcitx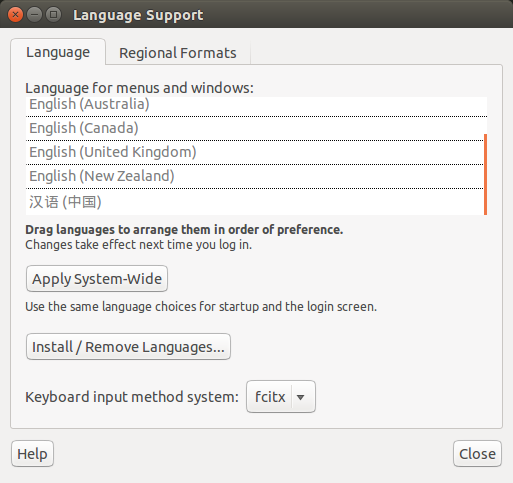
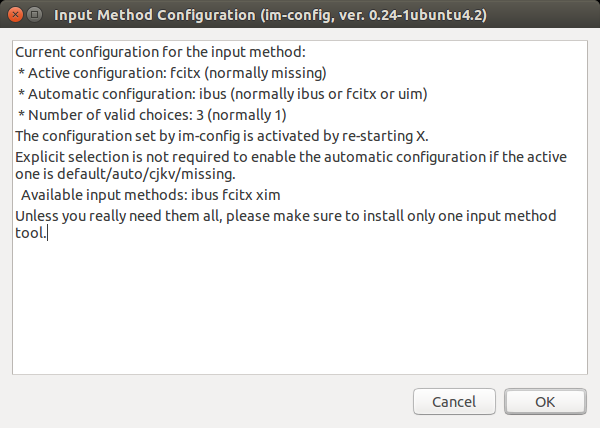
也可以通过终端启动im-config切换输入法框架,点击OK按钮,再点击Yes按钮,将fcitx设为默认的输入法框架,最后点击OK。
打开终端,并运行fcitx-configtool
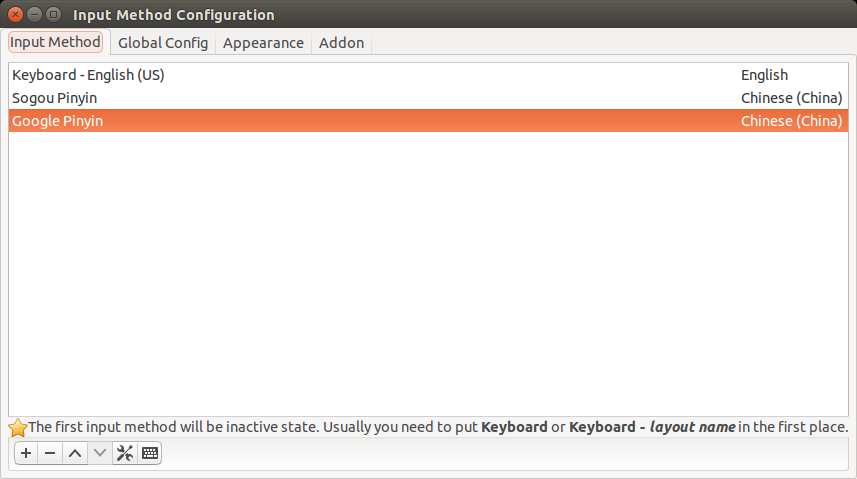
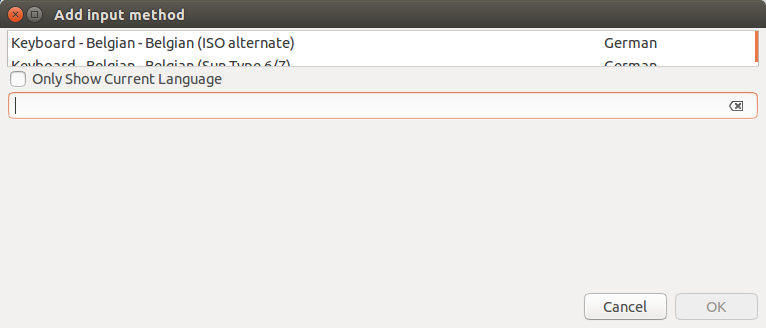
点击右下角的+图标添加新的输入法,并取消“only show current language”,在下边搜索框搜索需要添加的输入法
重启系统生效
如果 Fcitx 没有随桌面环境自动启动,或者您想修改下 Fcitx 启动参数,请用桌面环境提供的自动启动工具配置,或者直接编辑用户目录~/.config/autostart/ 下的 fcitx-autostart.desktop 文件以确认自动启动是否被禁用。如果用户目录下的文件并不存在,您可以复制自动启动文件 /etc/xdg/autostart/fcitx-autostart.desktop 到用户目录:
1
2
3
4
5
6
7
8
9cp /etc/xdg/autostart/fcitx-autostart.desktop ~/.config/autostart/
如果您使用的桌面环境并不自动支持 XDG, 请在您使用的启动脚本里面添加:
fcitx
以实现自动启动。
注意: 当 iBus 等其它输入法程序同时启动且开启了 Xim 支持时, 可能会害 Fcitx 启动不了,请确保已禁用了其它输入法程序的自动启动。可在text entry添加中文,可省略该操作
System Settings -> Text Entry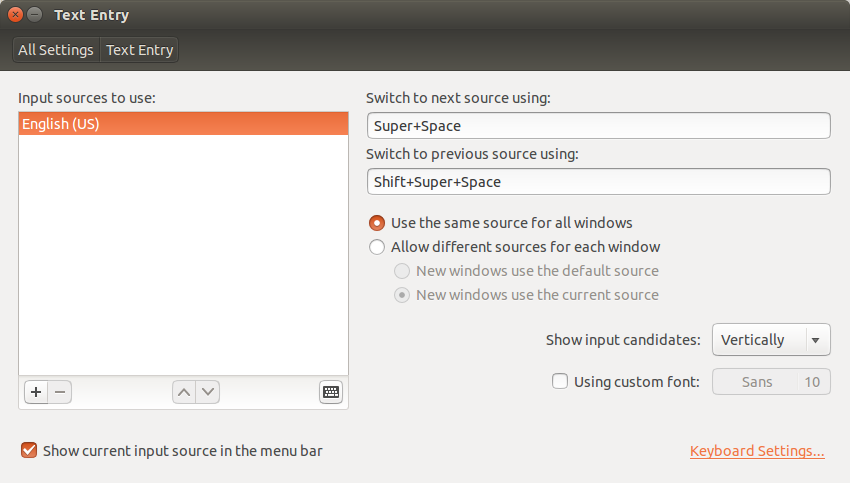
由于Fcitx易于崩溃,明明切换到了搜狗拼音输入法,但是还是只能输入英文字符。可通过如下shell脚本重启
1
2
3
4
5
6
7
8
9
10
11
12
13
14#! /bin/bash
# pidof fcitx | xargs kill -9
# pidof sogou-qimpanel | xargs kill -9
killall -9 fcitx
killall -9 sogou-qimpanel
rm -rf ~/.config/SogouPY
rm -rf ~/.config/SogouPY.users
rm -rf ~/.config/sogou-qimpanel
nohup fcitx > /dev/null 2>&1 &
nohup sogou-qimpanel > /dev/null 2>&1 &Fcitx如果不能开机自启
fcitx 不能开机自启,是因为 fctix 在安装时未能在/etc/xdg/autostart/ 目录下添加开机自动启动配置文件。解决方法:
1). Ctrl + Alt + T 打开终端,输入fcitx –version ,然后终端会显示你安装的版本号。
在fcitx官网上下载你对应版本的 fcitx 安装包,比如说我对应的版本为fcitx-4.2.9.1.tar.xz
解压后,在目录./fcitx-4.2.X.X/data/ 你可以找到一个名为 fcitx-autostart.desktop.in 重命名为 fcitx-autostart.desktop 然后拷贝到 /etc/xdg/autostart/ 目录下,重启你会发现右上角有输入法的选项了。2). 把下面这段代码粘贴到根目录的.xprofile文件中(如果不存在这个文件,则新建一个。
cd ~/
sudo vim .xprofile输入如下内容,保存退出
1
2
3
4
5export LC_ALL=zh_CN.utf8
export XMODIFIERS=@im=fcitx
export QT_IM_MODULE=xim
export GTK_IM_MODULE=xim
fcitx -d参考链接
1
2
3
4
5
6
7
8
9
10https://wiki.archlinux.org/index.php/Fcitx_(%E7%AE%80%E4%BD%93%E4%B8%AD%E6%96%87)
https://www.linuxdashen.com/ubuntu%E5%AE%89%E8%A3%85%E8%B0%B7%E6%AD%8C%E6%8B%BC%E9%9F%B3%E8%BE%93%E5%85%A5%E6%B3%95%EF%BC%88fcitx%E8%BE%93%E5%85%A5%E6%B3%95%E6%A1%86%E6%9E%B6%EF%BC%89
http://jingyan.baidu.com/article/4b07be3c60da3f48b380f3f0.html
http://jingyan.baidu.com/article/adc815134f4b92f722bf7350.html
http://blog.csdn.net/rflyee/article/details/9472579
http://blog.csdn.net/tecn14/article/details/24784047
https://my.oschina.net/eechen/blog/224291
https://www.findhao.net/res/786
http://www.xbatu.com/node/251
http://yuenshome.space/?p=4378
Ubuntu入门教程
http://wiki.ubuntu.org.cn/Ubuntu%E6%A1%8C%E9%9D%A2%E5%85%A5%E9%97%A8%E6%8C%87%E5%8D%97
https://help.ubuntu.com/
http://wiki.ubuntu.org.cn/%E6%96%B0%E6%89%8B%E5%85%A5%E9%97%A8%E6%8C%87%E5%BC%95
http://teliute.org/linux/TeUbt/lesson3/lesson3.html
Ubuntu快捷键
1 | 长按super(win)键即可显示系统快捷键图 |
Ubuntu快速显示桌面
http://blog.csdn.net/yelangjueqi/article/details/55098099
http://blog.csdn.net/u010454729/article/details/45061359
1 | 常用快捷方式总结: |
Ubuntu显示隐藏目录
https://www.ubuntudoc.com/show-hidden-files-folders-ubuntu/?lang=zh1
Ctrl + H
Ubuntu安装护眼程序Typing Break
https://askubuntu.com/questions/63999/how-can-i-install-typing-break1
2
3
4
5
6
7
8
9
10
11
12
13
14
15
16
17
18
19
20
21
22
23
24
25
26
27
28
29
30
3111.10
Gnome 3 developers have dropped this from gnome-control-center with a recommendation that it be repackaged and available as a separate application. A launchpad wishlist item was requested.
An alternative in for typing break is workrave. It is now available as a backport:
sudo apt-get install workrave
You need to white-list this application to appear in the Unity indicator-applet. Read this question if you want a more detailed explanation about what to do.
12.04
An enterprising developer has resurrected DrWright for Precise. The package is available from a PPA:
sudo add-apt-repository ppa:drwright/stable
sudo apt-get update
sudo apt-get install drwright
12.10,13.10,14.04
Note, that for 12.10,13.10,14.04 ppa is not up to date, so you have to use precise repositories:
deb http://ppa.launchpad.net/drwright/stable/ubuntu precise main
deb-src http://ppa.launchpad.net/drwright/stable/ubuntu precise main
Uubntu 14中,执行add-apt-repository命令后, 修改/etc/apt/sources.list.d/drwright-stable-trusty.list文件内容如下,然后执行update操作,并install,但是在系统设置中也没有type break的设置,待重启验证(不能work)
hogan@ubuntu:/etc/apt/sources.list.d$ cat drwright-stable-trusty.list
deb http://ppa.launchpad.net/drwright/stable/ubuntu precise main
# deb-src http://ppa.launchpad.net/drwright/stable/ubuntu precise main
# deb http://ppa.launchpad.net/drwright/stable/ubuntu trusty main
# deb-src http://ppa.launchpad.net/drwright/stable/ubuntu trusty main
Ubuntu安装Flux色温调节软件
http://blog.csdn.net/gatieme/article/details/629221641
2
3
4
5
6
7
8
9
10
11安装GUI
sudo add-apt-repository ppa:nathan-renniewaldock/flux
sudo apt-get update
sudo apt-get install fluxgui
安装守护进程
wget https://justgetflux.com/linux/xflux64.tgz
tar -zxvf xflux64.tgz
sudo cp xflux /usr/bin
打开fluxgui配置经纬度即可
Eyerest and workrave
http://blog.csdn.net/gevolution90/article/details/8579069
http://forum.ubuntu.com.cn/viewtopic.php?f=137&t=392969
https://github.com/zlbruce/eyerest
Ubuntu安装build-essential
http://www.cnblogs.com/bing-yu12/p/6384447.html
http://blog.163.com/zhangjinqing1234@126/blog/static/3073026020095381371131
2
3
4
5
6linux操作系统上面开发程序, 光有了gcc是不行的,它还需要一个build-essential软件包,作用是提供编译程序必须软件包的列表信息
也就是说 编译程序有了这个软件包,它才知道头文件在哪,才知道库函数在哪,还会下载依赖的软件包,最后才组成一个开发环境
当然build-essential包安装时需要的依赖包,有些你用不上
sudo apt-get update
sudo apt-get install build-essential
Ubuntu安装JRE
https://linux.cn/article-3792-1.html
http://zh.wikihow.com/%E5%9C%A8Ubuntu-Linux%E4%B8%8A%E5%AE%89%E8%A3%85Oracle-Java1
2
3
4
5
6
7
8
9
10
11
12
13
14
15
16
171. 查看Java版本
java -version
2. 如出现以下错误,则表示没有安装jre
The program ‘java’ can be found in the following packages:
* default-jre
* gcj-4.6-jre-headless
* openjdk-6-jre-headless
* gcj-4.5-jre-headless
* openjdk-7-jre-headless
Try: sudo apt-get install
3. 安装Oracle JDK
sudo add-apt-repository ppa:webupd8team/java
sudo apt-get update
sudo apt-get install oracle-java8-installer
sudo apt-get install oracle-java8-set-default
ubuntu安装JDK
http://topspeedsnail.com/ubuntu16-install-java-jdk/
http://www.cnblogs.com/a2211009/p/4265225.html
http://zh.wikihow.com/%E5%9C%A8Ubuntu-Linux%E4%B8%8A%E5%AE%89%E8%A3%85Oracle-Java
https://www.linuxdashen.com/ubuntu%E5%AE%89%E8%A3%85oracle-java8%E4%BB%A5%E5%8F%8A%E7%8E%AF%E5%A2%83%E5%8F%98%E9%87%8F%E7%9A%84%E6%AD%A3%E7%A1%AE%E8%AE%BE%E7%BD%AE%E6%96%B9%E6%B3%95
https://wiki.ubuntu.com.cn/Java%E5%AE%89%E8%A3%85%E9%85%8D%E7%BD%AE1
2
3
4
5
6
7
8sudo add-apt-repository ppa:webupd8team/java
sudo apt-get update
sudo apt-get install oracle-java8-installer
# 设置Java环境变量,可选,不是必要
sudo apt-get install oracle-java8-set-default
apt命令
https://linux.cn/article-7364-1.html
https://my.oschina.net/junn/blog/138803
http://www.cnblogs.com/indiepop/archive/2011/11/10/2244903.html1
2
3
4
5
6
7
8
9
10
11
12
13
14
15
16
17
18
19
20
21更新本地数据库
sudo apt-get update
安装软件包
sudo apt-get install <package>
查找软件包
sudo apt-cache search <package>
更新已安装的包
sudo apt-get upgrade
升级系统
sudo apt-get dist-upgrade
删除软件包
sudo apt-get remove <package>
删除软件包,包括删除配置文件
sudo apt-get remove --purge <package>
sudo apt-get purge <package>
Ubuntu侧边栏图标
1 | 侧边栏图标位于~/.local/share/applications,可修改,可删除,解决新老版本交替使用的问题 |
Eclipse加上侧边栏图标
https://my.oschina.net/secyaher/blog/274490
http://blog.csdn.net/sgzy001/article/details/51901344
http://blog.csdn.net/ustczwc/article/details/9005142
https://www.jianshu.com/p/0209d5d042161
2
3
4
5
6
7
8
9
10
11
12
13
14
15
16
17
18
19
20
21
22
23
24
25
26
27
28
29
30
31
32
33
34
35
36
37
38
39
40
41
42
43
44
45
46
47
48
49
50hogan@ubuntu:~/.local/share/applications$ pwd
/home/hogan/.local/share/applications
hogan@ubuntu:~/.local/share/applications$ cat eclipse.desktop
[Desktop Entry]
Encoding=UTF-8
Version=1.0
Type=Application
Name=Eclipse Launcher
Icon=eclipse
Path=/home/hogan/Downloads/eclipse
Exec=/home/hogan/Downloads/eclipse/eclipse/eclipse
# Exec=/home/hogan/Downloads/eclipse/eclipse/eclipse %U
StartupNotify=false
StartupWMClass=Eclipse
OnlyShowIn=Unity;
X-UnityGenerated=true
本文将讲述如何将eclipse快捷方式添加到左侧快捷栏
1. sudo vim /usr/share/applications/eclipse.desktop
2.添加如下内容到eclipse.desktop中
[Desktop Entry]
Encoding=UTF-8
Name=Eclipse
Comment=Eclipse IDE
Exec=/home/hunter/tools/adt-bundle/eclipse/eclipse
Icon=/home/hunter/tools/adt-bundle/eclipse/icon.xpm
Terminal=false
StartupNotify=true
Type=Application
Categories=Application;Development;
其中/home/hunter/tools/adt-bundle/eclipse/为eclipse所在路径
3.修改权限
sudo chmod a+x /usr/share/applications/eclipse.desktop
4.将图标拖到左边导航栏
cd /usr/share/applications/
nautilus .
找到eclipse图标,拖到左侧
Ubuntu免密码sudo
http://www.jianshu.com/p/5d02428f313d
http://blog.csdn.net/cor_twi/article/details/446798391
2
3
4
5
6
7
8
9cd /etc/sudoers.d
sudo touch nopasswd4sudo
sudo vi nopasswd4sudo
输入 yourusername ALL=(ALL) NOPASSWD : ALL
ESC :wq!
Ubuntu命令行或脚本连接断开wifi
https://linux.cn/article-4015-1.html
https://www.deadend.me/2016/08/13/ubuntu-14-04-connect-wifi-via-command-line/
https://gxnotes.com/article/17300.html
https://gxnotes.com/article/13806.html
http://www.jianshu.com/p/4d0fb1d4e055
https://wenqixiang.com/linux-wireless-configuration-in-terminal-command-line/
https://askubuntu.com/questions/522842/ubuntu-14-04-connect-to-a-wifi-network-using-command-line
https://askubuntu.com/questions/461825/connect-to-wifi-from-command-line
https://askubuntu.com/questions/461825/connect-to-wifi-from-command-line
https://askubuntu.com/questions/294257/connect-to-wifi-network-through-ubuntu-terminal
https://askubuntu.com/questions/522842/ubuntu-14-04-connect-to-a-wifi-network-using-command-line
https://askubuntu.com/questions/138472/how-do-i-connect-to-a-wpa-wifi-network-using-the-command-line
https://stackoverflow.com/questions/29361296/command-line-connect-to-wireless-network-does-not-work-on-ubuntu-10-04
https://stackoverflow.com/questions/21662351/connect-wifi-with-python-or-linux-terminal
https://stackoverflow.com/questions/32530988/programmatically-connecting-to-a-wifi-network-in-linux1
2
3
4
5
6
7
8
9
10
11
12
13
14
15
16
17
18
19
20
21
22
23
24
25
26
27
28
29
30
31
32
33
34
35
36
37
38
39
40
41
42
43
44
45
46
47
48
49
50启动、关闭WiFi
# 启动
nmcli nm wifi on
# 关闭
nmcli nm wifi off
连接、断开WiFi
# 连接
nmcli d wifi connect <WiFiSSID> password <WiFiPassword> iface <WiFiInterface>
nmcli c down id <SavedWiFiConn>
# 断开
nmcli d disconnect iface <WiFiInterface>
nmcli c up id <SavedWiFiConn>
Ubuntu 16.04
##disconnect
nmcli d disconnect <WifiInterface>
##connect
nmcli d connect <WifiInterface>
Another way:
##disconnect
nmcli c down <SavedWiFiConn>
##connect
nmcli c up <SavedWiFiConn>
Ubuntu 15.10 & previous
##disconnect
nmcli d disconnect iface <WifiInterface>
##connect
nmcli d wifi connect <WiFiSSID> password <WiFiPassword> iface <WifiInterface>
Another way:
##disconnect:
nmcli c down id <SavedWiFiConn>
##connect:
nmcli c up id <SavedWiFiConn>
bc除法精度问题
http://codingstandards.iteye.com/blog/7937341
2
3
4
5
6
7
8
9
10
11
12
13
14
15
16
17hogan@ubuntu:~$ bc
bc 1.06.95
Copyright 1991-1994, 1997, 1998, 2000, 2004, 2006 Free Software Foundation, Inc.
This is free software with ABSOLUTELY NO WARRANTY.
For details type `warranty'.
69 / 4
17
69 / 4.0
17
69 / 4
17
scale=2
69 / 4
17.25
100 / 5
20.00
ubuntu使用ibus或者fcitx框架输入法
Ubuntu默认安装了ibus和fcitx的输入法框架,而且默认的输入法框架为ibus
ubuntu手动更新
http://www.jb51.net/os/Ubuntu/397838.html1
Dash中搜索update, software updater或软件更新器
sudo apt-get update错误
http://blog.csdn.net/u013038461/article/details/39519449
http://forum.ubuntu.com.cn/viewtopic.php?f=48&t=462924
http://www.voidcn.com/article/p-wkhqksva-pp.html
http://www.cppblog.com/deercoder/archive/2011/10/19/158705.html1
2
3
4
5
6
7
8
9
10
11
12
13
14
15
16
17
18运行命令 sudo apt-get update 出现错误:
GPG error: http://archive.ubuntu.com trusty-updates InRelease: Clearsigned file isn't valid, got 'NODATA' (does the network require authentication?)
解决方法:
sudo apt-get clean
sudo mv /var/lib/apt/lists /var/lib/apt/lists.broke
sudo mkdir -p /var/lib/apt/lists/partial
sudo apt-get update
方法来自:http://askubuntu.com/a/512173/198920,该方法对本人的电脑有效。
要是无效的话,还可以参考http://forum.ubuntu.org.cn/viewtopic.php?f=48&t=464134
Wine安装
http://wiki.ubuntu.org.cn/Wine
https://wiki.winehq.org/Main_Page
https://www.ibm.com/developerworks/cn/linux/l-wine/
https://zh.wikihow.com/%E5%9C%A8Ubuntu%E7%B3%BB%E7%BB%9F%E4%B8%AD%E5%AE%89%E8%A3%85Wine
https://wiki.archlinux.org/index.php/Wine_(%E7%AE%80%E4%BD%93%E4%B8%AD%E6%96%87)
http://blog.csdn.net/Lina_ACM/article/details/65627249
https://linux.cn/thread-3436-1-1.html
https://lado.me/2017/04/27/wine-run-windows-program-on-linux/1
2
3
4
5
6
7
8
9
10
11
12
13
14
15
16
17
18
19
20
21
22
23
24
25
26
27
28
29
30
31
32
33
34
35
36
37安装源中的wine
sudo apt-get install wine</PPA>
因为版本比较旧,所以通常不用,改用PPA中的wine。
==安装最新版 wine==
ubuntu 官方自带了 wine ,但是推荐用 winehq 官方提供的最新版本 wine ,新版本解决了很多以前显得麻烦的问题。
PPA地址:https://launchpad.net/~wine/+archive/ubuntu/wine-builds
<pre>sudo add-apt-repository ppa:wine/wine-builds
(这里应该在(ubuntu14.10)“设置→软件和更新→其他软件”里给上面的那个地址打对勾)然后安装:
sudo apt-get update
sudo apt-get install wine
sudo apt-get install wine-devel
sudo apt-get install wine-staging
上面install命令是三选一,要注意,若安装 wine 包是老的稳定版,新开发版本是 wine-devel ,经常有不少优化和修正。
如果愿意安装比 devel 稍微更 devel 的 staging 版本的话,可以试试 wine-staging。
1、安装源
sudo add-apt-repository ppa:wine/wine-builds
sudo apt-get update
2、安装wine
sudo apt-get install --install-recommends wine-staging
sudo apt-get install winehq-staging
3、卸载wine
1).卸载wine主程序,在终端里输入:
sudo apt-get remove --purge wine
2).然后删除wine的目录文件:
rm -r ~/.wine
3).卸载残留不用的软件包:
sudo apt-get autoremove
Wine使用
http://wiki.ubuntu.org.cn/UbuntuHelp:Wine/zh
https://lado.me/2017/04/27/wine-run-windows-program-on-linux/
http://wiki.ubuntu.org.cn/Wine%E7%AE%80%E6%98%8E%E6%95%99%E7%A8%8B
http://wiki.ubuntu.org.cn/Wine%E6%93%8D%E4%BD%9C%E6%8A%80%E5%B7%A7
http://forum.ubuntu.org.cn/viewtopic.php?t=72933
http://ghoulich.xninja.org/2016/08/09/install-and-use-wine-on-centos/1
2
3
4
5
6
7
8
9
10
11
12
13
14
15Ubuntu系统中,侧边栏最上面的图标叫dash快速启动,而整个侧边栏叫launcher,可在侧边栏的任意图标上右键,有unlock from launchers选项,通过Wine安装好的应用程序都可以在Dash中搜索到,这时只需要将搜索到图标拖放到launcher上即可,也可以通过运行命令行运行后,在侧边栏上右键单击并选择lock to launcher即可,对非Wine安装的应用程序也可以如此操作添加到侧边栏快速启动。
Wine的桌面快捷方式为.desktop的文件,位于~/Desktop目录下,格式如下:
hogan@ubuntu:~/Desktop$ pwd
/home/hogan/Desktop
hogan@ubuntu:~/Desktop$ ls
Notepad++ (copy).desktop Source Insight 3.desktop Source Insight 4.0.desktop
hogan@ubuntu:~/Desktop$ cat Source\ Insight\ 4.0.desktop
[Desktop Entry]
Name=Source Insight 4.0
Exec=env WINEPREFIX="/home/hogan/.wine" wine C:\\\\Program\\ Files\\ \\(x86\\)\\\\Source\\ Insight\\ 4.0\\\\sourceinsight4.exe
Type=Application
StartupNotify=true
Icon=1E94_NewShortcut11_9B96954BC5A741EBA38089DC96765DF7.0
hogan@ubuntu:~/Desktop$
Ubuntu添加桌面快捷方式
https://www.ibm.com/developerworks/cn/linux/l-cn-dtef/index.html
http://www.flakor.cn/2014-11-26-796.html
https://my.oschina.net/Obahua/blog/110612
http://www.cnblogs.com/librena/p/6726489.html
https://www.techforgeek.info/ubuntu_desktop_file.html
https://linux.cn/article-2289-1.html
http://www.jb51.net/os/Ubuntu/84222.html
http://blog.csdn.net/golden1314521/article/details/32179811
https://www.jianshu.com/p/0209d5d04216
Ubuntu添加快捷方式到dash或launcher
https://specifications.freedesktop.org/desktop-entry-spec/desktop-entry-spec-latest.html
https://my.oschina.net/Obahua/blog/110612
http://blog.csdn.net/johnnycode/article/details/17848291
http://www.cnblogs.com/librena/p/6726489.html
http://hahaya.github.io/add-software-ico-to-launcher/1
2
3
4
5
6
7
8
9
10
11
12
13
14
15
16
17
18
19
20
21
22
23
24
25
26
27
28
29经常在Ubuntu下安装绿色软件,之前只能将快捷方式放到桌面上,感觉不方便。
其实设置很简单,总结一下,好脑子不如烂笔头!
1.在 /usr/share/applications 目录下增加 sublime.desktop 文件,注意权限!
[plain] view plain copy
$ sudo vim /usr/share/applications/sublime_test.desktop
2.添加如下内容,然后保存。
[plain] view plain copy
[Desktop Entry
Name=Sublime Text 2
Type=Application
Terminal=false
Comment=Edit text files
Exec=/home/john/Dev/SublimeText2/sublime_text %F
Icon=/home/john/Dev/SublimeText2/Icon/48x48/sublime_text.png
3.搞定,直接在Dash中检索sublime 然后将图标拖到 Launcher 上即可。
特别注意(配置建议!):
1、配置信息中路径不要使用引号(最好不要有空格)。
2、复制以上代码时注意每行末尾不要有空格。
wine安装程序桌面快捷方式备份
1 | Source Insight |
Wine卸载软件
http://forum.ubuntu.org.cn/viewtopic.php?t=65231
http://blog.csdn.net/ustczwc/article/details/8956231
http://blog.csdn.net/tongxxhaha/article/details/76875188
http://www.cnblogs.com/jackchiang/p/4072621.html1
2
3
4
5
6
7
8
9
10
11
12
13
14
15
16
17
18
19
20
21
22
23
24
25
26
27
28
29
30
31
32
33
34
35
36
37
381. 命令行方式
到程序的目录里面
~/.wine/drive_c/Program Files/*****
wine 卸载程序名.exe
2. GUI方式
命令行输入wine uninstaller,然后GUI方式卸载软件
很多朋友尝试在Ubuntu中用wine安装exe格式的应用程序,但经常遇到装完之后启动程序就崩溃、或者根本无法启动、无法使用的情况,于是想立即把安装的程序卸载,可是在wine中却找不到卸载exe软件的方式,今天就给大家分享一下wine卸载exe软件的两个方法:
1、删除法
Ubuntu系统安装的软件会分布在很多不同的目录,即使使用wine模拟windows安装也会如此;
wine会在/home下的用户名目录生成三个隐藏的文件夹 .wine、.local、.config ,默认是看不到的,通过按快捷键 ctrl+H 才能显示出来,进入 .wine 文件夹可以看到 drive_c 文件夹,这是wine自动生成的虚拟 C盘,里面有类似windows系统盘的目录结构,在里面找到需要卸载的软件文件夹删除;
接着找到/home/用户名目录/.local/share/applications/wine/Programs,将软件对应的文件删除;
最后/home/用户名目录/.config/menus/applications-merged,将软件对应的文件删除;
如果您没有找到如上的文件夹,只需要按 ctrl+F 搜索软件名,把搜索结果中的文件夹和文件删除就可以。
2、命令行
如果您觉得上述方法比较繁琐,还可以通过在终端输入wine命令来卸载软件,但需要该软件含有类似 uninstall.exe 的卸载程序;
ctrl+alt+T打开终端,cd进入软件uninstall.exe所在的目录,输入wine uninstall.exe 即可执行卸载程序,Ubuntu对字符大小写要求很严格,若在终端中手动输入请您务必区分大小写;
如果您想删掉所有.exe格式的软件,可以使用 wine uninstaller 命令。
如果您觉得wine不好用,想要卸载,可以执行 sudo apt-get remove --purge wine 即可卸载wine;
如果您发现已卸载软件的图标还存在于dash中,可进入/home/用户名目录/Desktop ,删除对应的图标即可。
deb格式软件的卸载:
顺道写上如何卸载deb格式的文件同时删除配置文件:sudo dpkg -p 文件名,输入以后回车即可。
Ubuntu桌面图标不显示
https://www.coder4.com/archives/4307
http://www.oschina.net/question/54100_9404
http://www.it610.com/article/4462067.htm
http://forum.ubuntu.org.cn/viewtopic.php?t=472401
http://www.th7.cn/system/lin/201709/227486.shtml
http://blog.csdn.net/ch_dq/article/details/60578941
http://sourcedigit.com/13322-fix-unity-freezes-login-ubuntu-14-10-utopic-unicorn/1
2
3
4
5
6
7
8
9
10如题。升级到14.04后,原先通过gconf-editor设置的方法失效了。
实际上,14.04转而使用dconf-editor了。。
sudo apt-get install dconf-editor
然后找到:
org.gnome.nautilus.desktop
这下面的值分别代表了图标,不解释了,找到需要的设置为true即可。
工具推荐
1 | 1. 串口工具 |
.bashrc backup
1 | hogan@ubuntu:~$ cat .bashrc |